Crochet Beautiful 3D Ladybug Earrings – Easy Tutorial
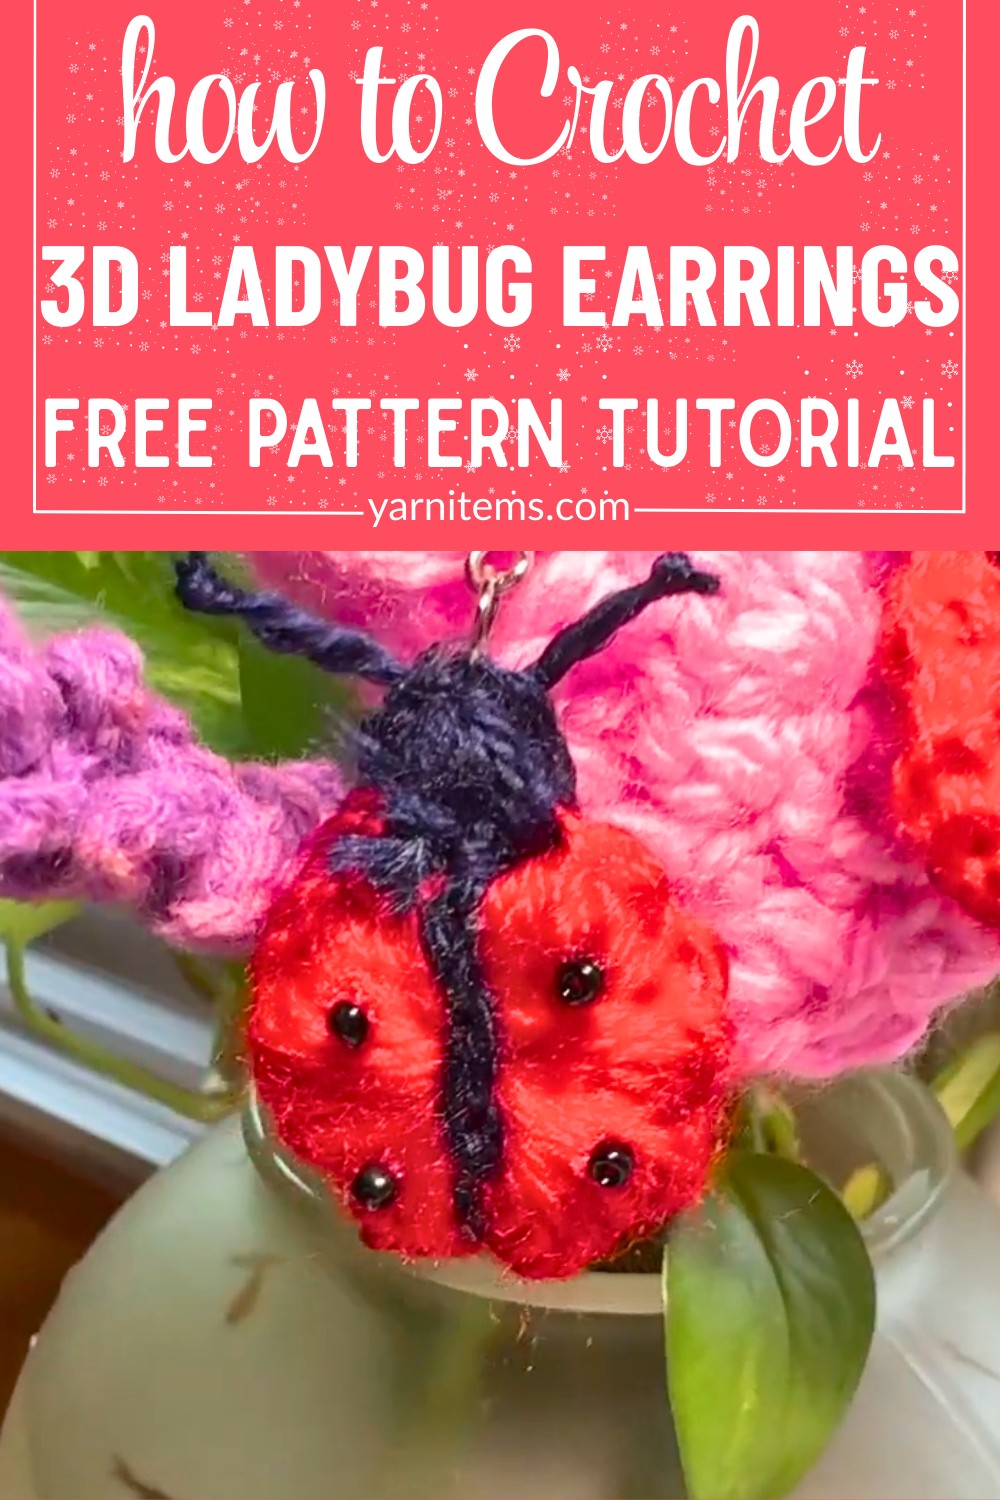
These Crochet 3D ladybug earrings are the perfect blend of cute and creative, made with puff stitches, beads, and embroidery. They make a bold yet lightweight statement piece.

Ladybug earrings are a fun and creative accessory that can brighten up your day. These lightweight, 3D crochet earrings are special because they’re cute, versatile, and handmade with love. You can wear them to show off your unique style, gift them to someone special, or simply admire their beauty as part of your collection.
Crochet 3D Ladybug Earrings
Making these earrings is surprisingly simple and combines beautiful colors like red and black. You’ll crochet the small ladybug body, add tiny black beads for spots, and attach hooks to turn them into earrings. It’s a playful and rewarding way to create something useful and charming. Plus, they look great with casual outfits or as a standout accessory.
Credit MAMA’S CRAFT
Key Pattern Features:
- Vibrant 3D design with a red puff-stitched body and black details, including a stitched face, antennae, and bead “spots.”
- Dual-sided finish ensures the earring looks great from any angle.
- Elegant assembly includes a hanging bead, jump ring, and earring hook for a polished look.
- Compact yet textured construction using puff stitches and simple embroidery for added detail.
This pattern begins with the ladybug’s body, crocheted in a vibrant red yarn using puff stitches in the round to create a textured, dome-like look. You’ll start by working 10 puff stitches into a magic ring, joining them into a circle for the rounded base of the ladybug. This gives the body its distinct shape while adding a soft, dimensional feel.

The face is crocheted separately using black yarn for contrast. Here, several unfinished puff stitches are worked before being pulled together to form a compact, curved section at the top of the body. This adds an adorable character to the design while maintaining the simplicity of the overall pattern.

Next, you’ll add finer details—like the antennae and center seam—using basic embroidery techniques. A line of black thread stitched down the center of the ladybug body creates the iconic “split-wing” effect, while additional stitching ensures the design is symmetrical and attractive on both sides.

For the finishing touches, you’ll glue small black beads onto the red base to mimic the ladybug’s iconic spots. Once the body is fully decorated, you’ll assemble the earring by attaching a jump ring, a decorative hanging bead, and an earring hook. These final steps transform the crochet work into wearable art with a professional finish.

Video Tutorial
Materials & Tools Needed
- Red Crochet Yarn
Choose lightweight yarn for a delicate finish. The tutorial suggests fingering or thread weight yarn. - Black Crochet Yarn
To create the ladybug’s face and detailing. Ensure it matches the weight of the red yarn. - 1.25 mm Crochet Hook
Ideal for working with lightweight yarn to achieve the fine detailing. - Earring Hooks (2)
Small hooks for creating the earring base. - Jump Rings (2)
Metal rings to attach the earring hooks to the ladybug body. - Hanging Beads (Optional)
Decorative beads to add flair to the bottom of the earring. - Black Beads (2 mm)
Create the black spots on the ladybug’s body. You will need 4 beads for each side. - Scissors
For cutting yarn cleanly. - Glue
For attaching black beads securely to the ladybug body. - Needle
For stitching finer sections like the antennae and the body’s detail line. - Pliers
To open and close jump rings securely.

Pattern Abbreviations & Terminology
Here are key abbreviations for this pattern:
- ch: Chain
- sl st: Slip Stitch
- sc: Single Crochet
- puff st: Puff Stitch (explained below)
- st: Stitch
Puff Stitch (Explained)
- Yarn over, insert hook into the stitch, and pull up a loop. Repeat yarn over and pull up loops multiple times (number varies in instructions) to create bulk. Then pull through all loops on hook to “close” the puff stitch.
Step-by-Step Crochet Instructions
Red Ladybug Body
- Magic Ring Start
- Use the red yarn to create a magic ring.
- Chain 1 to secure the ring.
- Create Puff Stitches
- Work 10 puff stitches into the magic ring:
- Yarn over, pull the loop up large.
- Yarn over and pull a loop 4 times, creating bulk.
- Pull through all loops on hook and chain 1 to close each puff stitch.
- Work 10 puff stitches into the magic ring:
- Complete the Body
- Once 10 puff stitches are made, slip stitch into the first puff stitch to close the circle.
- Cut the yarn and make a knot to secure.
Black Ladybug Face
- Attach Black Yarn
- Join black yarn to the completed red body using a slip stitch.
- Create Small Puff Stitches
- Crochet 3 small puff stitches as follows:
- Work unfinished puff stitches by pulling up loops 3 times per stitch instead of 4.
- Move to the next stitch and repeat for 3 consecutive puff stitches.
- Crochet 3 small puff stitches as follows:
- Finish the Face
- Pull through all loops to secure the puff stitches together.
- Cut the yarn and knot securely.
Ladybug Details
- Make Antennae
- Using black yarn and a needle, stitch antennae at the top of the face.
- Knot securely and trim excess yarn.
- Add Center Line
- Using black yarn, stitch a straight line down the middle of the red body (both front and back).
- Knot and trim yarn securely.
- Attach Black Beads
- Use glue to attach 4 black beads (2 per side) as spots on the red ladybug body.
- Let glue dry completely.
Earring Assembly
- Add Jump Ring
- Open a jump ring with pliers and insert it into the center top of the ladybug body (near antennae).
- Attach Hanging Bead
- Slide a bead onto the jump ring for a decorative hanging effect.
- Attach Earring Hook
- Add the earring hook to the jump ring above the hanging bead.
- Close the jump ring securely with pliers.
Finishing Touches
- Secure Loose Ends
- Ensure all yarn ends are securely knotted, trimmed, and tucked.
- Check bead and glue placement for durability.
Troubleshooting and Suggestions
- Dealing with puff stitches: Ensure your loops are even and consistent when making puff stitches, as uneven tension can distort the shape of your circles. Take your time, and don’t hesitate to adjust the puff stitches before pulling them together.
- Color changes: When switching between red and black yarn, secure your knots neatly at the back of the work to prevent the threads from showing through.
- Bead placement: Use tweezers to attach beads with precision, and let the glue dry completely before handling. For extra durability, consider stitching the beads on rather than gluing.
Creative Modifications
- Swap out the traditional red-and-black color scheme for a playful “fantasy ladybug” look—try pastels, metallic threads, or even glow-in-the-dark yarn for whimsical earrings.
- Skip the earring assembly and turn the finished ladybug into a cute keychain or bag charm. You can even attach it to hair clips for a fun accessory.
- Add extra embellishments like glittery fabric paint, rhinestones, or small bows to make each piece unique.