Create rows of playful crochet paw prints with this texture-rich crochet stitch—perfect for blankets, scarves, and pet-themed patterns that are as charming as they are cozy!

The paw print crochet stitch is a delightful way to add a touch of charm to your handmade items. Featuring small, textured paw prints, this design is perfect for anyone who loves animals or wants to create something unique and meaningful. If you’re making a blanket for your pet, a special scarf, or even decorative pieces, this stitch adds a playful, cozy vibe to your creations. It’s not just adorable, it’s a fun way to personalize your crochet work.
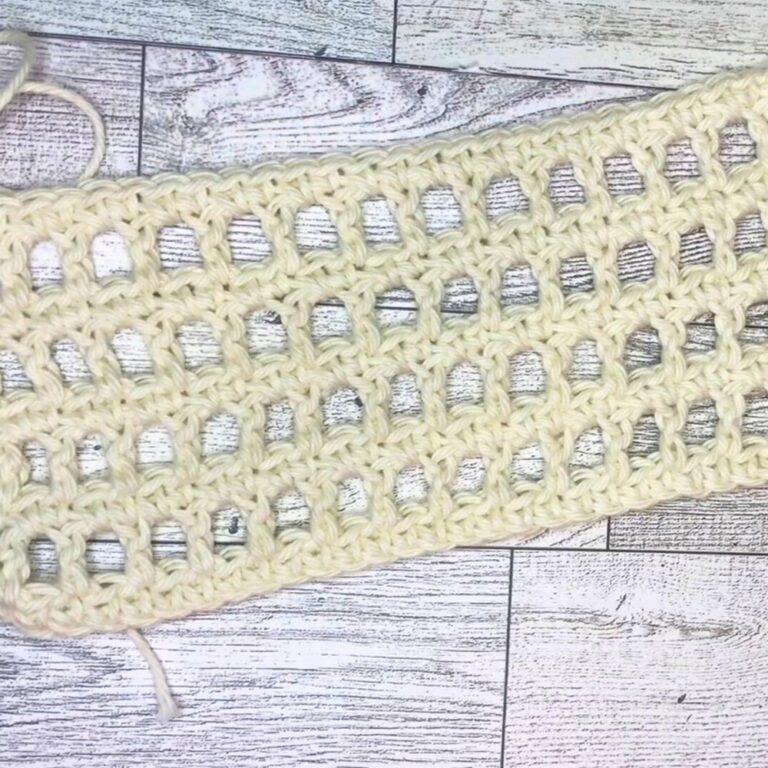
Crochet Paw Print Stitch Tutorial
This Stitch Pattern uses simple crochet techniques to form visible paw prints in the design. It alternates rows of solid stitches with uneven paw print shapes, giving it its unique look. You can even adjust the size and colors to suit your style.
Credit Hook & Loop Crochet Tutorials
Key Features of the Paw Print Stitch:
- Foundation-Friendly: Begins with a multiple of 10 + 5 chains for versatile sizing.
- Interactive Texture: Uses chains, double crochets (dc), and single crochets (sc) to form the paw print shapes, with raised details like toe pads created using strategic placement of stitches.
- Alternating Rows: Paw prints are staggered across the fabric, adding visual interest and a sense of movement.
- Reset Rows: Alternating plain double crochet rows ensure stable spacing between paw prints.
- Customizable Design: Easily adapted to various yarn weights, colors, and pattern types, from blankets to scarves or even pet-themed accessories.
The paw print stitch begins with a foundation chain worked in multiples of 10 plus 5, allowing for limitless width adjustments to suit different pattern sizes. A base row of simple double crochets provides the groundwork for the textured design.
From Row 2, the paw prints come to life! Chains, skipped stitches, and grouped double crochets (dc) create spaces for the paw pads to emerge. Each new row builds upon the previous, with Rows 3 and 4 forming the distinctive shapes of the paws—using a combination of chains, single crochets, and double crochets to detail both the padded foot and individual toes. These design-rich rows are alternated with simpler “reset” rows of double crochet to maintain structure and balance.
To add dynamic placement, every four rows, the stitch pattern shifts slightly, staggering the paw prints to create an engaging linear design. This alternating technique gives the finished fabric a playful and evenly spaced appearance, ideal for making throws, baby blankets, or even pet beds.
The finishing touches can include optional borders to frame the edges and enhance uniformity. The result is a wonderfully textured fabric that is both functional and fun.
Special Stitches and Features:
- Fake Double Crochet: A clever way to create clean, straight edges that blend seamlessly with the row.
- Toe Pads: Created by working chain spaces and single crochets in alternating patterns, these details give the paw prints their adorable 3D texture.
- Staggered Rows: Alternating paw print placement across rows avoids repetition and creates a flowing design.
Video Tutorial
Required Materials
- Yarn: 100% cotton yarn (or your choice of yarn). To make it thicker, work with both ends of the yarn held together.
- Hook: 3.5 mm crochet hook.
- Scissors: For trimming the yarn.
- Tapestry needle: To weave in the loose ends.
- Measuring Tape: To ensure size accuracy (optional).

Step-by-Step Instructions
Foundation Chain
- Start with a slipknot.
- Chain a multiple of 10 + 5 for your intended pattern width.
- Example: 35 chains in total.
Row 1 (Base row of double crochet):
- Work 1 double crochet (dc) into the 3rd chain from the hook.
- Note: These first two chains do not count as a stitch.
- Continue with 1 dc in each chain across the foundation chain.
- Total number of stitches: 34 (based on the example).
Row 2 (Start of the Paw Prints):
- Turn your work, and create 1 fake double crochet (dc).
- Alternatively, chain 3 if not using a fake dc, though the fake dc makes straighter edges.
- Work 4 dc into the next stitches (you now have 5 dc in total, including the fake dc).
- Chain 3, skip 3 stitches, and make 7 dc.
- Repeat this sequence of:
- Chain 3, skip 3 stitches, 7 dc.
- End the row with 5 dc.
Row 3 (Forming the Paw Prints):
- Create 1 fake dc, and then work 3 dc.
- Chain 2, skip the last dc from the previous row.
- Work 3 single crochets (sc) into the chain-3 space.
- Chain 2, skip the next dc, and work 5 dc.
- Repeat the sequence for alternating paw prints:
- Chain 2, skip the next dc, 3 sc into the next chain-3 space, skip the next dc, 5 dc.
- End the row with 4 dc.
Row 4 (Creating the Paw Print Details):
- Start with a fake dc, then make 3 more dc (5 dc total).
- Into the next chain space, work 1 dc, chain 1, work 1 dc into the middle of the 3 single crochets (from Row 3).
- Chain 1 and make 1 dc into the next space.
- Continue with the sequence:
- 5 dc, 1 dc into the space, chain 1, 1 dc in the middle of the single crochets, chain 1, 7 dc.
- Repeat across and complete the row with 5 dc.
Row 5 (Reset Row):
- Work 1 dc into each stitch across, ensuring an even base for the next set of paw prints.
Row 6 (Alternating the Paw Prints for Variety)
- Instead of starting with the same spacing as before, shift the pattern:
- Start with 10 dc, chain 3, skip 3 stitches, and work 7 dc.
- Chain 3, skip 3 stitches, and end with 10 dc.
- Repeat the alternating pattern as needed.
Row 7 (Repeat Row 3):
- Begin with 9 dc, then repeat the Row 3 pattern as outlined before (paw prints).
- End with 9 dc.
Row 8 (Like Row 4):
- Begin with 9 dc, and then work the paw print details again using Row 4’s structure.
- Continue to alternate spacing, ensuring your paw prints are spread out across the fabric.
Row 9 Onwards
- For subsequent rows, repeat Rows 5–8 as needed to create your fabric.
- Alternate the paw print placement every 4 rows to create a dynamic design.
Finishing
- Once you’ve reached your desired size, finish the pattern with a border or bind-off:
- Chain 1, pull through your yarn, and trim the tail.
- Weave in all yarn ends securely using a tapestry needle.
Tips
- Start small with a swatch to familiarize yourself with the stitch pattern.
- This pattern works beautifully for creating blankets, scarves, or other cozy patterns.
- Feel free to experiment with different yarn weights and hook sizes to achieve different textures.
Troubleshooting and Suggestions:
Common Issues:
- Uneven Paw Prints: If the “pads” appear misshaped or uneven, ensure your tension is consistent throughout the row. For tricky areas like popcorn or cluster stitches, try practicing on a swatch first.
- Gaps Between Paws: Are gaps forming where stitches transition? Double-check your skipped stitch counts and ensure you’re working directly into the specified chain spaces.
- Edges Not Straight: Using a fake double crochet instead of a chain-3 ensures clean, straighter edges. If you prefer using a chain-3, try marking the top of it with a stitch marker to avoid confusion.
Creative Modifications:
- Color Customization: Alternate yarn colors between rows of paw prints for a striped, multicolored effect. For a realistic detail, use brown, gray, or black yarn for paw print rows.
- Compact Design: To make smaller paw prints, experiment with lighter yarn weights or eliminate the chain-3 spaces within each motif for a denser fabric.
- Pattern Ideas: This stitch works wonderfully for blankets, but don’t stop there—try it on baby bibs, pet scarves, tote bags, or even crocheted wall hangings for pet lovers.