
How to Crochet Solid Granny Square With No Gaps
Here’s how to crochet a solid granny square with clean corners, tightly closed center, and smooth sides using simple stitches and an easy-to-follow round-by-round pattern.

Open spaces along corners and joins can make granny squares look uneven when you want dense, continuous fabric. This beginner-friendly crochet technique uses taller corner stitches to shape each square while keeping sides filled with stitches.
This crochet tutorial guides you through forming center, building four corners, expanding each round, and finishing edges neatly. You’ll also learn how to manage color changes, secure yarn ends, and prepare finished crochet squares for blankets, cushions, bags, or garments.
Credit crochet with parisa
Materials & Tools
- Yarn: Any preferred yarn weight; medium or worsted-weight yarn is used in the demonstration.
- Crochet Hook: Choose an appropriate size for your yarn. The demonstration uses a 4.0 mm hook.
- Tapestry Needle: For weaving in yarn ends.
- Scissors: For trimming yarn.
- Optional: Stitch markers and measuring tape for checking corners and finished dimensions.
Finished Size & Uses
Finished dimensions depend on yarn weight, hook size, tension, and number of rounds. Continue adding rounds until your square reaches the desired size.
Use solid granny squares to create:
- Blankets and throws
- Cushion covers
- Bags and purses
- Cardigans and other garments
- Color-blocked accessories
Crochet Abbreviations
This pattern uses standard US crochet terminology.
-
ch: Chain
-
dc: Double crochet
-
tr: Treble crochet
-
sl st: Slip stitch
-
st/sts: Stitch/stitches
-
rnd: Round
-
( ): Work instructions inside parentheses into the same specified stitch or space
Pattern note: Beginning ch 4 counts as one treble crochet. Keep track of this turning chain because it forms part of each round’s corner structure.

Step-by-Step Solid Granny Square Pattern
Step 1: Create a Magic Ring
Begin with a magic ring to keep the center tightly closed. This foundation is particularly useful when you want a solid square without an open hole in the middle.
- Form an adjustable yarn loop around your fingers.
- Insert your hook through the loop and pull up working yarn.
- Secure the loop with a chain stitch if needed for your preferred magic-ring technique.
- Keep the ring adjustable so you can tighten it after completing the first round.
Teaching tip: Leave enough space inside the ring to work all initial stitches comfortably. Pulling it too tight too early can make it difficult to insert your hook.
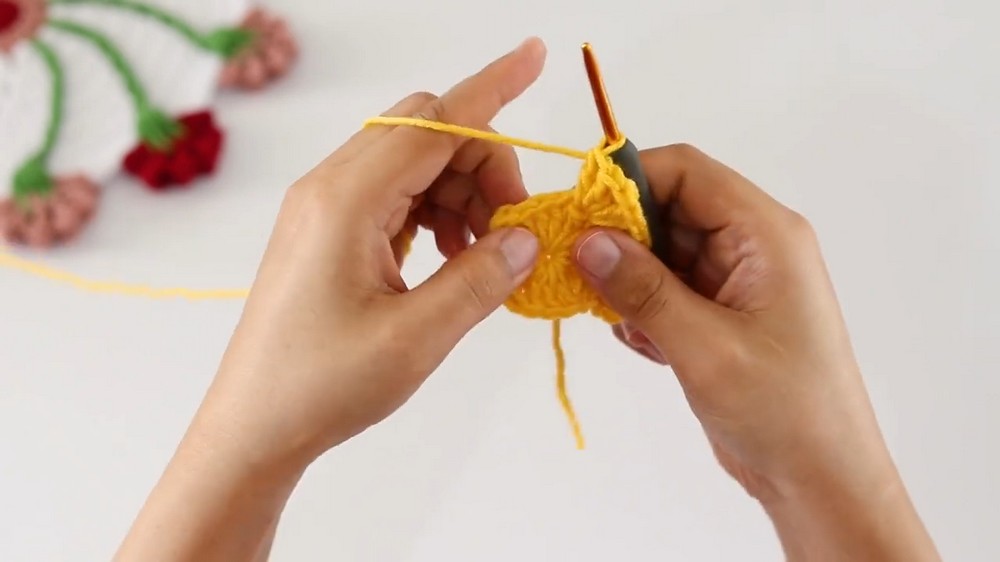
Step 2: Crochet Round 1
This round establishes four corners and four sides. Treble crochet stitches mark corner positions, while double crochet stitches fill the sides without chain spaces.
- Start the first corner: Ch 4. This counts as 1 tr.
- Work 3 dc into the center of the magic ring.
- Work 1 tr into the same ring to form the next corner.
- Work (3 dc, 1 tr) into the ring two more times.
- Work 2 dc into the ring to complete the final side leading back to the starting corner.
- Pull the magic-ring tail to close the center.
- Join with sl st into the top of the beginning ch 4.
Check your work: You should see four corner treble stitches, with three double crochet stitches along each side. The center should close neatly when you tighten the tail.
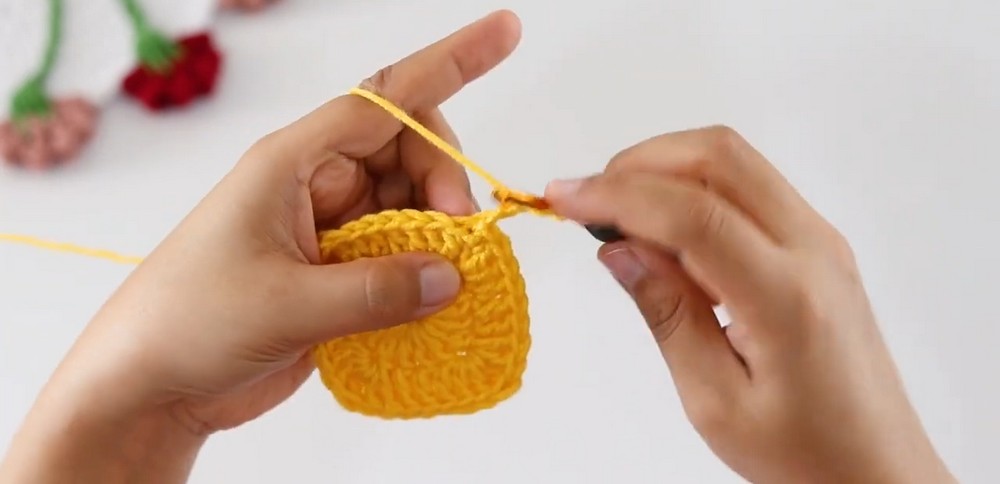
Step 3: Begin Round 2
Round 2 expands the original square. Each corner receives additional stitches, while the side sections gain one double crochet in each existing stitch.
- Ch 4, counting as 1 tr.
- Work 2 dc into the same base stitch as the beginning chain.
- Work 1 dc into each of the next 3 stitches along the first side.
- Locate the corner tr stitch from Round 1.
- Work (2 dc, 1 tr, 2 dc) into that corner stitch.
Teaching tip: Identify the corner tr before inserting your hook. Working into an adjacent double crochet instead can shift the corner and make your square look uneven.
Step 4: Complete Round 2
Continue around the square using the same corner sequence.
- Work 1 dc into each of the next 3 stitches along the side.
- Work (2 dc, 1 tr, 2 dc) into the next corner tr stitch.
- Repeat this side-and-corner sequence around the remaining sides.
- At the starting corner, work 2 dc into the base of the beginning ch 4 to complete the corner.
- Join with sl st into the top of the beginning ch 4.
Check your shape: Four distinct treble crochet corner stitches should remain visible. Your square should begin looking wider, with solid sides and no traditional chain spaces at the corners.
Step 5: Expand Round 3
From this round onward, follow the same basic corner pattern. The main difference is that each side contains more stitches than it did in the previous round.
- Ch 4, counting as 1 tr.
- Work 2 dc into the same base stitch.
- Work 1 dc into each stitch across the side until reaching the corner tr.
- Work (2 dc, 1 tr, 2 dc) into the corner tr.
- Continue across all four sides, repeating the same corner sequence.
- Finish the starting corner as established in Round 2 and join with sl st into the top of the beginning ch 4.
The supplied tutorial identifies 7 dc stitches per side for Round 3, excluding corner stitches.
Teaching tip: Count the stitches along each side before reaching the corner. Matching side lengths helps prevent an uneven or rectangular shape.

Step 6: Continue Growing Your Square
Additional rounds use the same structure: double crochet across each side and the corner increase sequence into every corner tr.
For each new round:
- Ch 4, counting as 1 tr.
- Work 2 dc into the same base stitch.
- Work 1 dc into every stitch across the side.
- Work (2 dc, 1 tr, 2 dc) into the next corner tr.
- Repeat around all four sides.
- Complete the starting corner and join with sl st into the beginning ch 4.
The side stitch counts increase by four double crochet stitches per side with each new round.
Round 1: 3 double crochet stitches per side, 16 total stitches.
Round 2: 7 double crochet stitches per side, 32 total stitches.
Round 3: 11 double crochet stitches per side, 48 total stitches.
Round 4: 15 double crochet stitches per side, 64 total stitches.
Round 5: 19 double crochet stitches per side, 80 total stitches.
Important counting note: The supplied tutorial’s round labels for side counts conflict with its earlier statement that Round 3 has 7 dc per side and Round 4 has 11. The table above follows the consistent four-stitch increase pattern, starting with 3 dc per side in Round 1.
Step 7: Check Your Square as It Grows
Pause after every couple of rounds to inspect your work. This helps you identify shaping problems before they become difficult to correct.
- Corners: Each corner should contain one treble crochet stitch.
- Sides: Each side should have the same number of double crochet stitches.
- Shape: The edges should remain straight, with four recognizable corners.
- Fabric: The square should lie reasonably flat without tight curling or excessive ruffling.
If your square starts twisting, check that you have not missed a stitch or accidentally worked into the wrong part of the turning chain.

Step 8: Change Yarn Colors Between Rounds
Color changes create stripes or geometric effects without altering the square’s basic construction.
- Finish the current round and join it with a slip stitch.
- Fasten off the old yarn if you are changing colors.
- Join the new yarn at the chosen starting stitch or corner, using a slip stitch.
- Begin the next round with ch 4, counting as 1 tr.
- Continue with the established corner and side pattern.
Tip: Keep yarn tension consistent when switching colors. A loose join can leave a visible gap, while an overly tight join may pull one corner inward.
Step 9: Fasten Off and Weave in Ends
Once your square reaches the required size, secure the final round neatly.
- Cut the yarn, leaving approximately a 6-inch tail.
- Pull the tail through the final loop to fasten off.
- Thread the tail onto a tapestry needle.
- Weave it back and forth through stitches on the wrong side of the square.
- Change direction at least once to help secure the yarn.
- Trim the excess without cutting into the stitches.
If a small hole remains at the center, use the starting yarn tail to tighten and secure the magic ring.
Step 10: Block and Join Multiple Squares
Blocking helps multiple squares match in size, making assembly easier for blankets, cushions, and garments.
- Measure each finished square.
- Arrange squares to compare their dimensions and corner alignment.
- Block them according to the yarn’s care requirements.
- Allow each square to dry completely before joining.
- Join using whip stitch, mattress stitch, or continuous slip stitch, depending on the finish you prefer.
Teaching tip: Matching dimensions before joining reduces puckering along seams and helps the finished fabric lie more evenly.

Troubleshooting Common Problems
Square is curling upward: Check whether your tension is too tight or a side stitch has been skipped.
Edges look wavy: Confirm that you have not added extra stitches along the sides. Keep increases limited to the designated corner stitches.
Corners look rounded: Make sure each corner tr is worked into the correct stitch and receives the full (2 dc, 1 tr, 2 dc) sequence on subsequent rounds.
Small hole remains in the center: Pull the magic-ring tail firmly and weave it in securely.
Starting seam is visible: Keep the joining slip stitch consistent and avoid pulling the turning chain too tightly.





One Comment