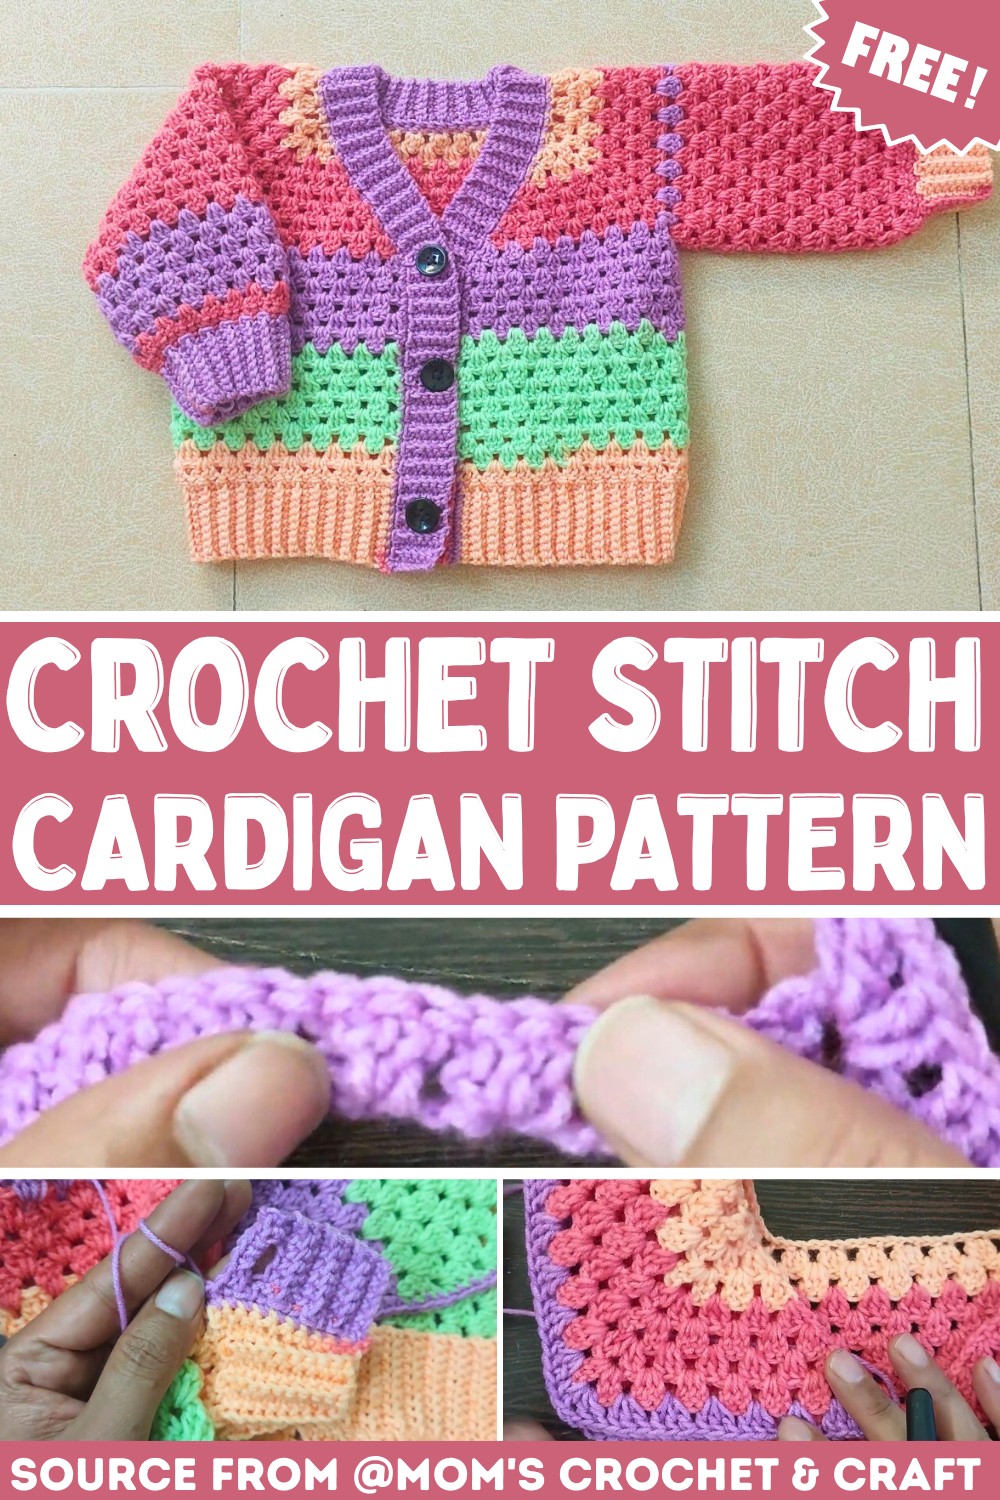
Crochet Granny Stitch Cardigan for Toddlers – V-Neck Pattern
Want a handmade toddler cardigan that grows with your measurements? This top-down granny-stitch pattern makes width and length changes simple.

Soft granny clusters, a gently shaped V-neck, and ribbed edging give this toddler crochet cardigan a classic handmade look without making the finished piece feel overly complicated.
The crochet pattern is designed for ages 2 to 3 and uses 4-ply medium/DK weight yarn with a 3.50 mm hook, while simple hook and row adjustments make it possible to change the fit.
Working from the top down means the crochet cardigan develops in a logical sequence, beginning with the V-neck yoke before the armholes are separated and the body continues downward. Once the body is complete, you will add the bottom ribbing, front and neck band, sleeves, and buttonholes, with useful checkpoints along the way to help keep the shaping even.
Credit Mom’s Crochet & Craft
Materials & Tools Needed
- Yarn: 180 grams of 4-Ply medium/DK weight yarn. The tutorial uses one solid color, but multiple colors can be used if desired.
- Crochet Hook: 3.50 mm
- Measuring tape
- Yarn needle: For weaving in ends
- Scissors
- Buttons: Approximately 4–5, depending on preference
- Stitch markers: Optional, especially helpful for beginners who want to mark turning chains
Finished Size & Customization
The pattern as written fits a 2 to 3-year-old toddler.
You can make small adjustments before and during crocheting:
- Slightly smaller: Use a 3.00 mm hook.
- Slightly larger: Use a 4.00 mm hook.
- More chest width: Add 1 or 2 additional yoke rows before dividing for the armholes. For example, make 9 or 10 yoke rows instead of 8.
- More or less length: Add or remove rows in the body before beginning the bottom ribbed border.
- Sleeve length: Add or subtract sleeve rounds to suit the desired arm length.
Because this cardigan is worked from the top down, checking the fit before moving past the yoke is especially useful. It is much easier to make an adjustment while the yoke is still open than after the sleeves and borders have been added.
Pattern Abbreviations
US crochet terms are used throughout.
- ch: Chain
- st(s): Stitch(es)
- sp: Space
- sl st: Slip Stitch
- sc: Single Crochet
- dc: Double Crochet
- sc2tog: Single Crochet 2 Together
- BLO: Back Loop Only
- Granny Cluster: 3 dc worked into the same space
- Corner Shell: (2 dc, ch 2, 2 dc) worked into the same chain or space

Crochet the V-Neck Yoke
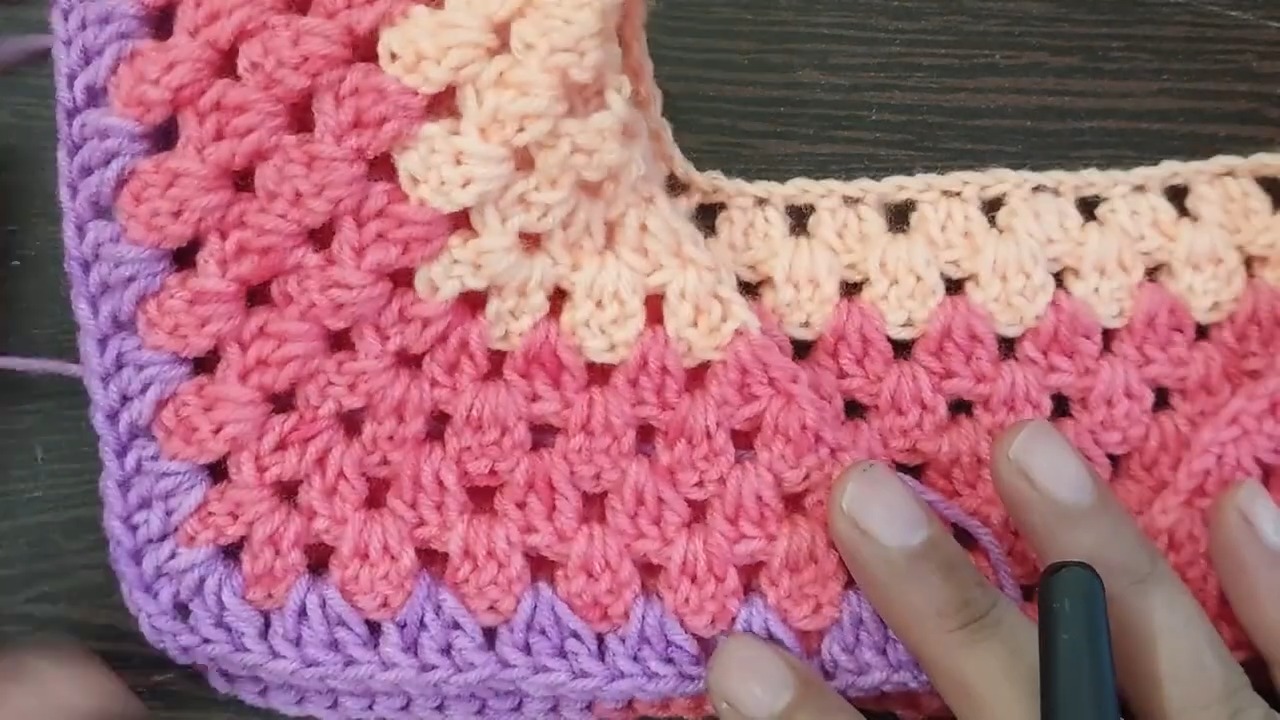
The cardigan begins at the neckline and is worked top down, back and forth in rows. The four corner sections create the yoke expansion, while the increases along the front edges gradually shape the V-neck.
Foundation: Ch 58.
Row 1: Skip the first 3 chs, which count as the first dc. In the 4th ch from the hook, make 1 dc, ch 2, and 2 dc to create the first edge and first corner; skip 2 chs, make 3 dc in the next ch for the first shoulder Granny Cluster and repeat 3 more times for 4 shoulder clusters total; skip 2 chs, make a Corner Shell (2 dc, ch 2, 2 dc) in the next ch; skip 2 chs, make 3 dc in the next ch and repeat 6 more times for 7 Granny Clusters across the back; skip 2 chs, make a Corner Shell in the next ch; skip 2 chs, make 3 dc in the next ch and repeat 3 more times for 4 shoulder clusters; skip 2 chs and work (2 dc, ch 2, 2 dc) in the very last ch to create the fourth corner and opposite front edge.
Row 2: Ch 3 and turn; make 2 dc in the very first space at the base of the ch 3 to create the V-neck increase; make a Corner Shell (2 dc, ch 2, 2 dc) in the first ch-2 corner space; make 3 dc in each space between the Granny Clusters across the shoulder; make a Corner Shell in the next ch-2 corner space; make 3 dc in each space across the back; make a Corner Shell in the next ch-2 corner space; make 3 dc in each space across the second shoulder; make a Corner Shell in the final ch-2 corner space; finish with 3 dc in the top of the skipped ch-3 from the beginning of the previous row.
Rows 3 to 8: Repeat Row 2, beginning each row with ch 3 and 2 dc in the first space, working Corner Shells in every ch-2 corner space, making 3 dc in all standard spaces, and ending with 3 dc in the top of the turning chain; for a larger size, you may continue to Row 9 or Row 10 before dividing for the armholes.
Yoke Checkpoint
Before moving on, take a moment to look at the yoke rather than only counting rows.
The four corner sections should be expanding evenly, and the front edges should be opening into a clear V-neck shape. If one side looks wider than the other, check the corner spaces and the first-space increase before continuing.
This is also the easiest point to compare the developing width with the child’s measurements. If additional chest room is needed, adding the extra yoke rows now is much simpler than trying to add width after the armholes have been divided.

Divide for the Armholes and Continue the Body
Once the yoke has reached the desired size, the shoulder sections are skipped so the front and back connect into the main body.
Dividing Row
Row 9: Ch 3 and turn; make 2 dc in the first space; make 3 dc in every space until reaching the first ch-2 corner space; make 3 dc inside the first ch-2 corner space; fold the yoke in half so the first and second corners touch, skip all shoulder stitches, and make 3 dc in the second ch-2 corner space to create the first armhole; make 3 dc in every space across the back until reaching the third ch-2 corner space; make 3 dc inside the third ch-2 corner space; fold the yoke so the fourth corner meets the third, skip the second shoulder stitches, and make 3 dc in the fourth ch-2 corner space to create the second armhole; make 3 dc in every remaining space and finish with 3 dc in the top of the turning chain.
Row 10: Ch 3 and turn; skip the first immediate space and make 3 dc in the next space; continue making 3 dc in every space across the body, including the space directly underneath the armholes; finish with 1 dc in the top of the turning chain.
The skipped first space is intentional. This is where the front-edge increases stop so the body can continue downward rather than becoming wider with every row.
Row 11: Ch 3 and turn; make 2 dc in the very first space; make 3 dc in every space across and finish with 3 dc in the last space between the final cluster and the turning chain.
Rows 12 to 22: Repeat Rows 10 and 11 alternately until you have completed 22 rows total, making sure the final row is worked on the Right Side, which is the front-facing side of the cardigan; do not cut the yarn.
Body Length Check
Before starting the ribbed border, hold the cardigan against the child or compare it with a garment of the desired length.
This is the last straightforward opportunity to make the body longer or shorter. If more length is needed, continue the alternating Row 10 and Row 11 sequence before beginning the ribbing.
Add the Bottom Ribbed Border
The bottom edge uses single crochet worked in the back loops only to create a flexible ribbed finish.
Row 1: From where you ended Row 22, ch 11.
Row 2: Sc in the 2nd ch from the hook and in each of the remaining 9 chs for 10 sc total; sl st into the next 2 stitches along the bottom edge of the cardigan and turn.
Row 3: Skip the 2 sl sts; working in BLO, make 1 sc in each of the 10 sc; ch 1 and turn.
Row 4: Working in BLO, make 1 sc in each of the 10 sc; sl st into the next 2 stitches on the cardigan’s bottom edge and turn.
Repeat Rows 3 and 4 all the way across the bottom edge, then fasten off.
Keep the ribbing relaxed while working. Pulling the stitches too tightly can make the bottom edge noticeably narrower than the body.
Front Opening and Neckband
The front edge and neckline are finished with an evenly spaced single crochet base followed by a ribbed band.
Base Sc Row: Re-join the yarn at the bottom right corner of the front panels; ch 1 and make evenly spaced sc up the right front edge, around the back of the neck, and down the left front edge, working approximately 4 sc for every 2 rows of double crochet to help prevent the edge from ruffling; fasten off at the bottom left corner.
Re-join the yarn at the bottom right corner so the border is worked right-side out.
Ribbed Band: Ch 7 to create a border width of 6 sts; sc in the 2nd ch from the hook and the next 5 chs for 6 sc; sl st into the next 2 sc on the front-edge base; turn; work the ribbed border in BLO sc, slip-stitching 2 stitches into the edge and turning after each section, exactly like the bottom border.
Continue the ribbed band up one front edge, around the V-neck and back neckline, and down the opposite front edge.

Add the Buttonholes
Button placement is easiest to plan before the ribbed band gets too far up the front. Lay the cardigan flat and decide how many buttons you want, then mark their approximate positions so the buttonholes remain evenly spaced.
Buttonhole: On a row going out from the edge, make 1 sc in BLO, ch 3, skip 3 sts, make 2 sc in BLO in the remaining sts, then ch 1 and turn.
Next Row: Sc in BLO of the first 2 sts, make 3 sc in the ch-3 space, sc in BLO of the last st, sl st 2 into the edge and turn.
Repeat the ribbed border, adding buttonholes at your marked positions, until you reach the top.
Buttonhole Check
Before continuing around the neckline, place the cardigan flat and check that each buttonhole lines up vertically with the others.
It is worth checking this now rather than waiting until the buttons are sewn on. The spaces between the buttonholes should look balanced, and each opening should be large enough for the chosen button without stretching the ribbing excessively.
Crochet the Sleeves
The sleeves are worked from the armhole opening downward. Unlike the body, each sleeve round is joined and then turned so the texture continues in the same back-and-forth direction.
Round 1: Join yarn at the underarm in the space where the two ch-2 corners were joined; ch 3 and make 2 dc in the same space; make 3 dc in every space around the armhole opening; sl st into the top of the beginning ch-3 to join.
Round 2: Ch 3, turn; make 2 dc in the same space; make 3 dc in every space around; sl st into the top of the ch-3.
Rounds 3 to 14: Repeat Round 2, remembering to turn your work at the end of every round; add or subtract rounds here if you want to change the finished sleeve length.
Turning the sleeve each time is important for matching the back-and-forth texture of the body. If the sleeve begins to look different from the cardigan body, check that you are turning after every round.
Decrease for the Cuff
Round 15: Ch 1 and turn; make 1 sc in the first st, sc2tog over the next 2 sts, and repeat (1 sc, sc2tog) all the way around the sleeve edge; sl st to the first sc to join.
The decrease pulls the sleeve opening inward before the ribbed cuff is added.

Add the Sleeve Cuff
Cuff Border
Cuff Border: Ch 11; sc in the 2nd ch from the hook and the next 9 chs for 10 sc; sl st into the next 2 sc of the sleeve opening and turn; skip the sl sts and work BLO sc back and forth exactly like the bottom border all the way around the sleeve.
Closing the Cuff
Once the ribbing has reached all the way around the sleeve, fold the cuff in half so the first chain row meets the final row.
Closing the Cuff: Sl st through the back loops of the final row to the corresponding chains of the starting row to close the cuff into a cylinder; fasten off.
Repeat the complete sleeve and cuff process for the second sleeve.
Finishing the Cardigan
Weave in the Ends
Thread a yarn needle and securely weave in all loose ends on the wrong side of the cardigan. Trim any excess yarn only after the ends are secured.
Attach the Buttons
Lay the cardigan flat with the front bands aligned. Mark the button positions directly opposite the buttonholes, then sew the buttons firmly in place using matching yarn or thread.
Shape the Finished Cardigan
Lay the cardigan flat and gently shape it with your hands, straightening the front edges, neckline, sleeves, and ribbed borders.
The completed cardigan has a cozy, flexible granny-stitch texture with a shaped V-neck and ribbed finishing details that give the toddler-sized garment a neat everyday look.

Quick Fit & Finish Check
Before calling the cardigan finished, check these points:
- The V-neck sits evenly on both sides.
- Both front edges are similar in length.
- The body hangs straight below the armholes.
- Both sleeves have the same number of rounds.
- The cuffs are comfortably narrower than the sleeve openings.
- The buttonholes line up with the buttons.
- The ribbed bottom edge is not pulling the body inward.
- All yarn tails are securely woven in.
Small adjustments are much easier to make before the buttons are permanently sewn on, so this final check is worth taking a few extra minutes for.