
Crochet Amigurumi Chick Keychain Tutorial for Beginners
Want a tiny crochet gift or keychain? This quick chick tutorial shows how to shape, stuff, finish, and customize a palm-sized amigurumi.

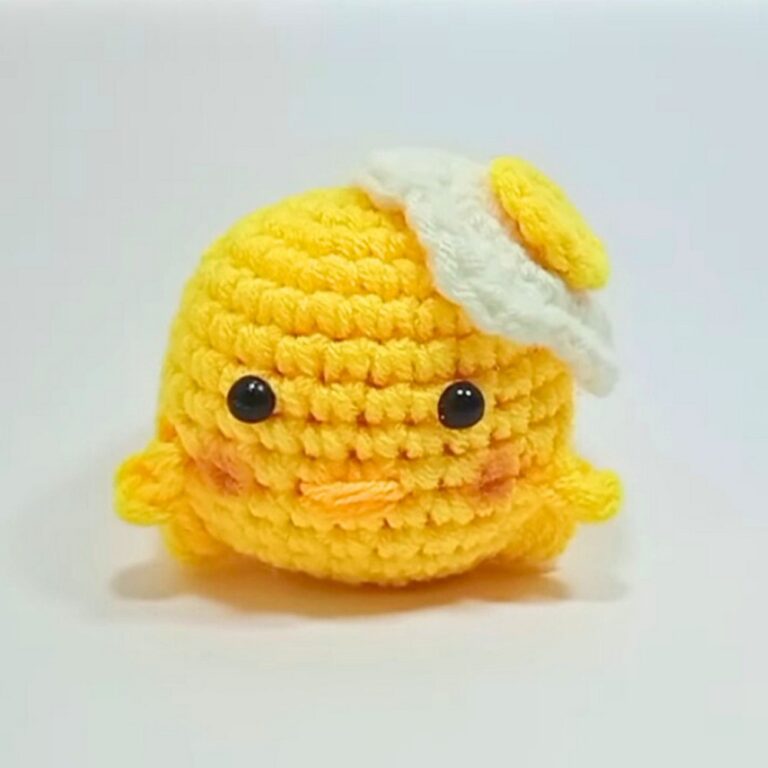
Need a tiny handmade accessory that is simple enough to finish without committing to a large piece? This crochet chick keeps its shape compact, making it a practical choice for beginners who want to practice basic crochet shaping.
With this crochet tutorial, you’ll build the chick from a magic ring, shape its rounded body with increases and decreases, then add the face and keychain ring. A few small finishing details turn it into a ready-to-use handmade accessory.
Credit Cahaya Crochet
Materials & Tools
- Yarn: Yellow milk cotton yarn, 5-ply, plus a small amount of orange yarn for the beak.
- Crochet Hook: 4/0 or 2.5 mm hook.
- Tapestry Needle: For closing the body, embroidery, and attaching the keychain ring.
- Scissors: For trimming yarn ends.
- Stitch Marker: Useful for keeping track of rounds.
- Polyester Stuffing: Dacron or similar filling for shaping the chick.
- Keychain Ring: For turning the finished chick into a functional accessory.
Finished Size & Customization
The finished chick measures approximately 1.5-2 inches in diameter, so it stays lightweight and easy to attach to keys, bags, or small gifts.
For an Easter variation, try pastel shades of milk cotton yarn instead of yellow. You can also add a tiny felt bow or miniature crocheted bow to the top for extra personality.
Pattern Abbreviations
- MR: Magic Ring
- ch: Chain
- sc: Single Crochet
- inc: Increase – work 2 sc in the same stitch
- dec: Decrease – single crochet 2 stitches together
- sl st: Slip Stitch
- Rnd: Round
- St(s): Stitch(es)

Step-by-Step Crochet Instructions
Step 1: Start the Chick with a Magic Ring
Begin with yellow yarn and make a Magic Ring (MR).
Chain 1, then work 6 single crochets into the ring. Join in the round to complete Round 1.
Stitch count: 6 stitches.
The magic ring creates the small center that will become the top of the chick’s rounded body. Keep the stitches close together so the center does not leave a noticeable opening.
Step 2: Expand the Shape with Increases
For Round 2, work 1 increase in every stitch around.
Each increase places 2 single crochets into the same stitch, bringing the round to 12 stitches.
For Round 3, repeat: 1 sc, inc around.
You will finish with 18 stitches.
For Round 4, repeat: 1 sc, inc, 1 sc around.
This brings the stitch count to 24 stitches.
Shape check: The work should now be spreading outward into a small, even circle rather than forming a narrow tube.
Step 3: Build the Chick’s Main Body
Work Rounds 5-9 with 1 sc in every stitch around.
Keep the stitch count at 24 stitches per round for all five rounds.
These even rounds create the height of the chick after the earlier increases have established its width. Continue steadily around the body and use a stitch marker if you need help identifying your round position.
By the end of Round 9, you should have a compact, rounded body ready to narrow.
Step 4: Begin Closing the Body
For Round 10, repeat: 1 sc, dec according to the supplied pattern sequence of 1 sc, dec, 1 sc, repeated 6 times around. The round ends with 18 stitches.
The decreases begin pulling the lower section inward, so check the shape as you work rather than waiting until the final round.
Step 5: Add the Stuffing Before the Opening Gets Too Small
Now firmly stuff the chick with Dacron/polyester filling.
Add the filling evenly so the body stays rounded and does not develop hollow or overly soft areas.
Helpful check: The chick should feel firm enough to hold its small shape, but the stuffing should not stretch the stitches apart.
Adding the filling here also leaves enough access to distribute it properly before the opening becomes smaller.
Step 6: Narrow the Base Further
For Round 11, repeat: 1 sc, dec around.
You will finish with 12 stitches.
The opening should now be noticeably smaller. If the filling has shifted while crocheting the decrease round, gently redistribute it before continuing.
Step 7: Close the Remaining Opening
For Round 12, work 6 decreases around.
This reduces the opening to 6 stitches.
Finish with a sl st, fasten off, and leave a long yellow yarn tail for closing and assembly.
Thread the tail onto the tapestry needle and weave it through the front loops of the remaining 6 stitches. Pull the yarn firmly to cinch the opening completely closed.
Finish check: The base should be closed without a visible hole, with the yarn tail secured neatly for the next finishing steps.
Step 8: Position the Eyes
Bring the chick’s face into position and place the safety eyes around Round 6.
Keep the eyes approximately 4 stitches apart so they sit evenly across the face.
If you prefer embroidered features, use black yarn to make small French knots or simple stitched eyes instead.
Before securing embroidered details, look at the face from the front to make sure both eyes sit at the same height.
Step 9: Embroider the Beak
Thread the tapestry needle with orange yarn.
Create a small horizontal beak centered between the eyes. Keep the stitches neat and compact so the tiny face remains clear.
Secure the orange yarn with small knots inside the chick.
Quick check: The beak should sit centrally between the eyes rather than noticeably above or below them.
Step 10: Attach the Keychain Ring
Use the remaining yellow yarn tail to attach the metal keychain ring to the crown of the chick’s head.
Pass the yarn securely through the top area and around the keychain ring, reinforcing the attachment with several sturdy stitches.
Because the ring will carry the chick when it is used as a keychain, check that the attachment feels firm before weaving in the remaining yarn ends.
Once secure, weave in and hide the loose ends.

Step 11: Give the Finished Chick Its Final Check
Hold the chick from the keychain ring and check three things:
- The body remains firmly stuffed and rounded.
- The eyes and beak are centered and balanced.
- The metal ring is securely attached at the crown.
If everything holds firmly, your tiny chick is ready to become a keychain, bag charm, or small handmade gift.




One Comment