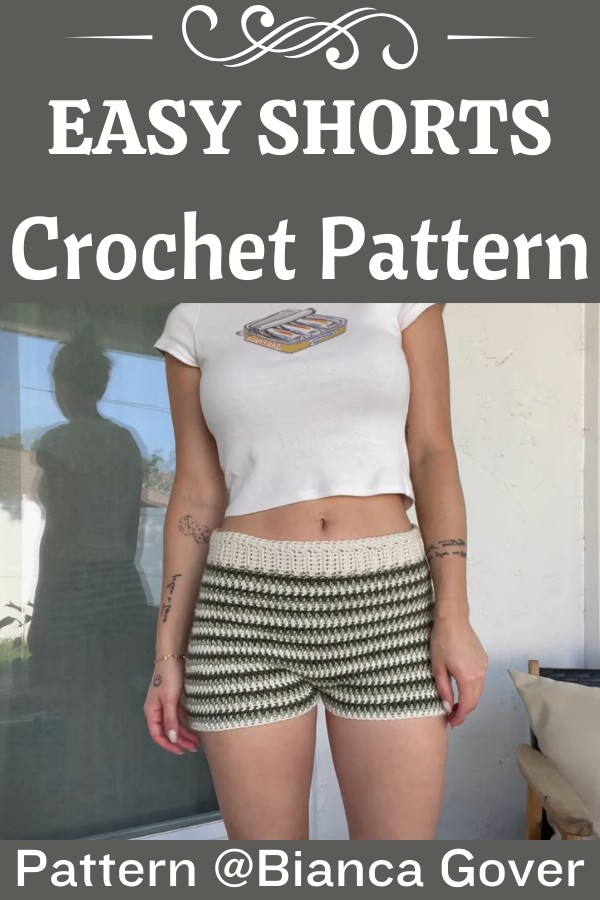
These chic high-waisted crochet shorts combine comfort and style, making them a must-have for playful summer days or relaxed lounging at home.

Crochet shorts are a fun and stylish way to add comfort and charm to your wardrobe. These high-waisted shorts are perfect for warm days and can pair beautifully with a tank top or oversized t-shirt. What makes them special is the opportunity to create a custom fit using colors and patterns you love, giving them a unique, personal touch that you won’t find in stores. Plus, they’re soft, lightweight, and handmade, perfect for lounging, casual outings, or adding a creative flair to your summer outfits.
Crochet High-Waisted Shorts With Pattern
You’ll start by crocheting a waistband that fits snugly, then work outward to shape the shorts. The process offers room for creativity, letting you choose fun color combinations and stripe designs as you go. After completing the waistband, the shorts are gradually widened to ensure a perfect fit around the hips. Adding length to the legs is easy, giving you control over how short or long you want the design to be.
Credit Bianca Gover
Key Construction and Features:
- Flexible waistband: Crocheted using single crochet rows and joined seamlessly for a snug, comfortable fit.
- Simple foundation rounds: Single crochet rows create the base for the shorts and allow for easy customization.
- Striped color pattern: Alternating light and dark green stripes give the shorts a fresh, distinctive look.
- Shaping with increases: Strategically placed increases tailor the shorts for a flattering fit through the hips and back.
- Crotch and legs: Markers define the crotch section, and half-double crochet rounds build the legs to your preferred length.
- Optional embellishments: Add decorative borders to the legs or waistband as a finishing touch.
Overview:
1. Waistband Construction:
The waistband is crocheted using single crochet rows for a stretchy yet structured foundation. Starting with a chain of 7 and working across in single crochet stitches, you’ll create evenly spaced rows until the band comfortably wraps around your waist. Joining the ends together with slip stitches forms a sturdy circular base, setting the stage for the shorts.

2. Foundation for the Body:
From the waistband edge, single crochets are worked evenly across to establish the shorts’ foundation. This step is key to creating a seamless transition from the waistband to the body. The first row is joined with a slip stitch, then worked in single crochet rounds to begin shaping the shorts.

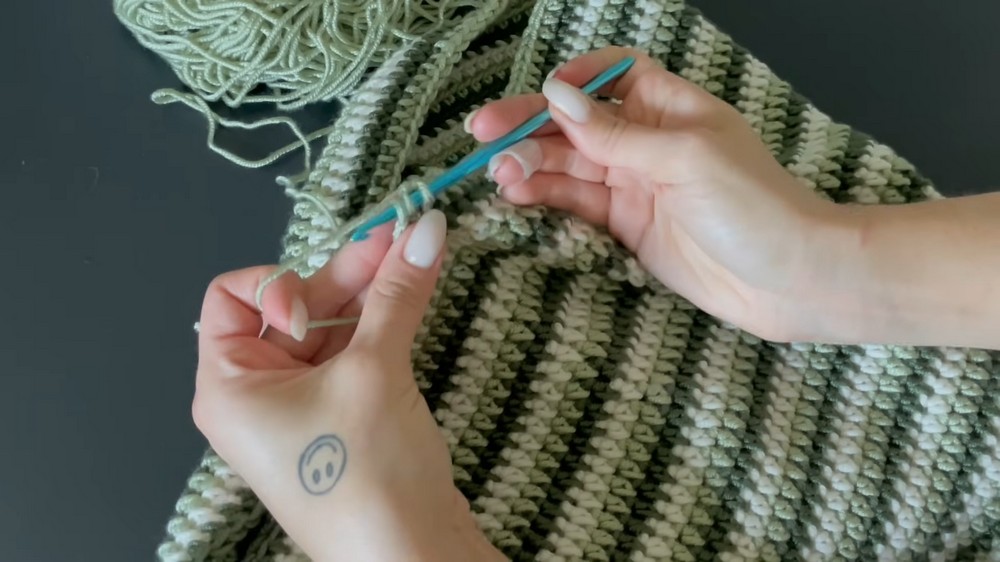
3. Stripes and Shaping:
Time to add some personality to your shorts! Attach light green yarn and crochet a single round to create your first stripe. Switch to dark green yarn for wider half-double crochet rounds that add texture and visual interest. Shaping begins with increases at marked points on the sides, ensuring a comfortable fit around the hips. As you progress, additional increases are placed at the back to accommodate natural curves. This strategic shaping results in a flattering fit that hugs the hips while tapering for the legs.

4. Crotch and Legs:
Once the body of the shorts is complete, markers are placed at the center of the front and back, defining the crotch area. A chain of stitches joins the front and back, forming the starting point for the leg openings. Half-double crochet rounds are worked for each leg, and you can easily customize the length by adding more rows for longer shorts or stopping early for a cheeky summer vibe.
5. Finishing Touches:
With the shorts complete, weave in all loose ends for a polished look. If desired, elevate the design with decorative edging like scalloped or shell stitches around the legs and waistband. These small details turn your handmade shorts into a wearable work of art.

Video Tutorial
Step-by-Step Pattern
Materials
To crochet your high-waisted shorts, you will need:
- Yarn: Yarn Bee Pearl Spun Low Fiber
Matcha Mondays(light green)Moss(dark green)Pearl
- Hook Size: Recommended size, compatible with yarn (e.g., 4.5mm or as needed to meet gauge).
- Stitch Markers: For marking increases and decreases.
- Scissors
- Yarn Needle: For weaving in ends.
Pattern Instructions
Step 1: Create the Waistband
- Setup:
- Make a slip knot and chain 7.
- Row 1:
- Begin in the second chain from the hook. Work single crochets (sc) across (6 sc).
- Chain 1 and turn.
- Rows 2 – Length Desired:
- Work sc in each stitch, chaining 1 at the end of every row. Continue until the waistband is long enough to comfortably wrap around your waist.
- Join Waistband:
- Bring the two ends of the waistband together. Use slip stitches to join and create a circular band (6 stitches across).
Step 2: Foundation for Shorts
- Perimeter Single Crochet:
- Begin single crochets evenly across the edge of the waistband. Keep spacing consistent and aim for a snug but not overly tight base.
- Join and Work Rounds:
- Once the first round is complete, join with a slip stitch. Chain 1 and continue working single crochet rounds until the base of the shorts starts to form.
Step 3: Build the Body (Starting the Stripes)
- Light Green Stripe (Matcha Mondays):
- Attach the light green yarn to the starting perimeter. Work one round of single crochet (sc) into each stitch.
- Dark Green Stripe (Moss):
- Switch to dark green yarn. Chain 2 and begin rounds of half double crochet (hdc).
Step 4: Increases for the Body
- Placement of Increases:
- Mark two points on the sides of the shorts with stitch markers for increasing the width.
- Increasing Rows:
- At each marker, work two hdc in the same stitch (increase points). Continue this for two whole rows.
- Further Increases:
- Once the shorts reach the widest part of the hips, begin incorporating increases at the back for the butt. Use four increases per row: two on the side markers and two at the back markers.
- Stop Increasing:
- Work 12 rows with increases, then stop. The shorts should now fit snugly at the hips and start narrowing downward naturally.
Step 5: Final Modifications for the Crotch and Legs
- Crotch Markers:
- Lay the shorts flat and place a marker on the center of the front and back to define the crotch area.
- Connect the Legs:
- Use a slip knot to join the crotch markers with a chain (approximately 9 chains, but adjust depending on size). This forms the base of the leg holes.
- Legs:
- Work half double crochet rounds for each leg, joining at the end of each round. Crocheting ~3 rows per leg creates a mid-thigh length, but you can adjust for longer or shorter shorts.
- Finishing:
- Weave in all ends using a yarn needle for a neat finish.
Optional: Decorative Edging
Add a scalloped or shell stitch border around the leg openings or waistband for a stylish and polished look!
Pattern Question:
Q: How do I adjust the size of the shorts to fit my waist and hips?
A: Simply measure your widest point and adjust the number of stitches or increases during the waistband and body rows. Add or subtract stitches as needed and test regularly for your perfect fit.
Troubleshooting and Suggestions:
Common Issues:
- Uneven rows or foundation stitches: Take care to space single crochets consistently when working along the waistband edge to avoid bunched or overly loose areas.
- Struggles with increases: Use stitch markers to clearly define increase points and count stitches carefully as you work. This ensures smooth transitions and optimal shaping for the hips and back.
- Leg sizing challenges: Try on the shorts as you work on the leg sections to confirm the length and snugness meet your preferences.
Creative Modifications:
- Custom Colors: Don’t be afraid to swap the greens for other shades that match your style or even use a solid color! Consider variegated yarn for a unique multi-tonal effect.
- Add extra flair: Incorporate textured stitches, like popcorn or puff, into the light green stripe for added visual interest.
- Length options: Transform these shorts into high-waisted crochet pants with extended leg rows or shorten them for swimwear cover-ups.
- Accessorize: Consider adding a crochet drawstring to the waistband with tassels or beads for both aesthetic and functional appeal.