Free Crochet Granny Square Sweater Pattern
Need a lightweight sweater with a soft, airy look? This fluffy crochet design features delicate puff stitches, relaxed balloon sleeves, and stretchy ribbed edges.
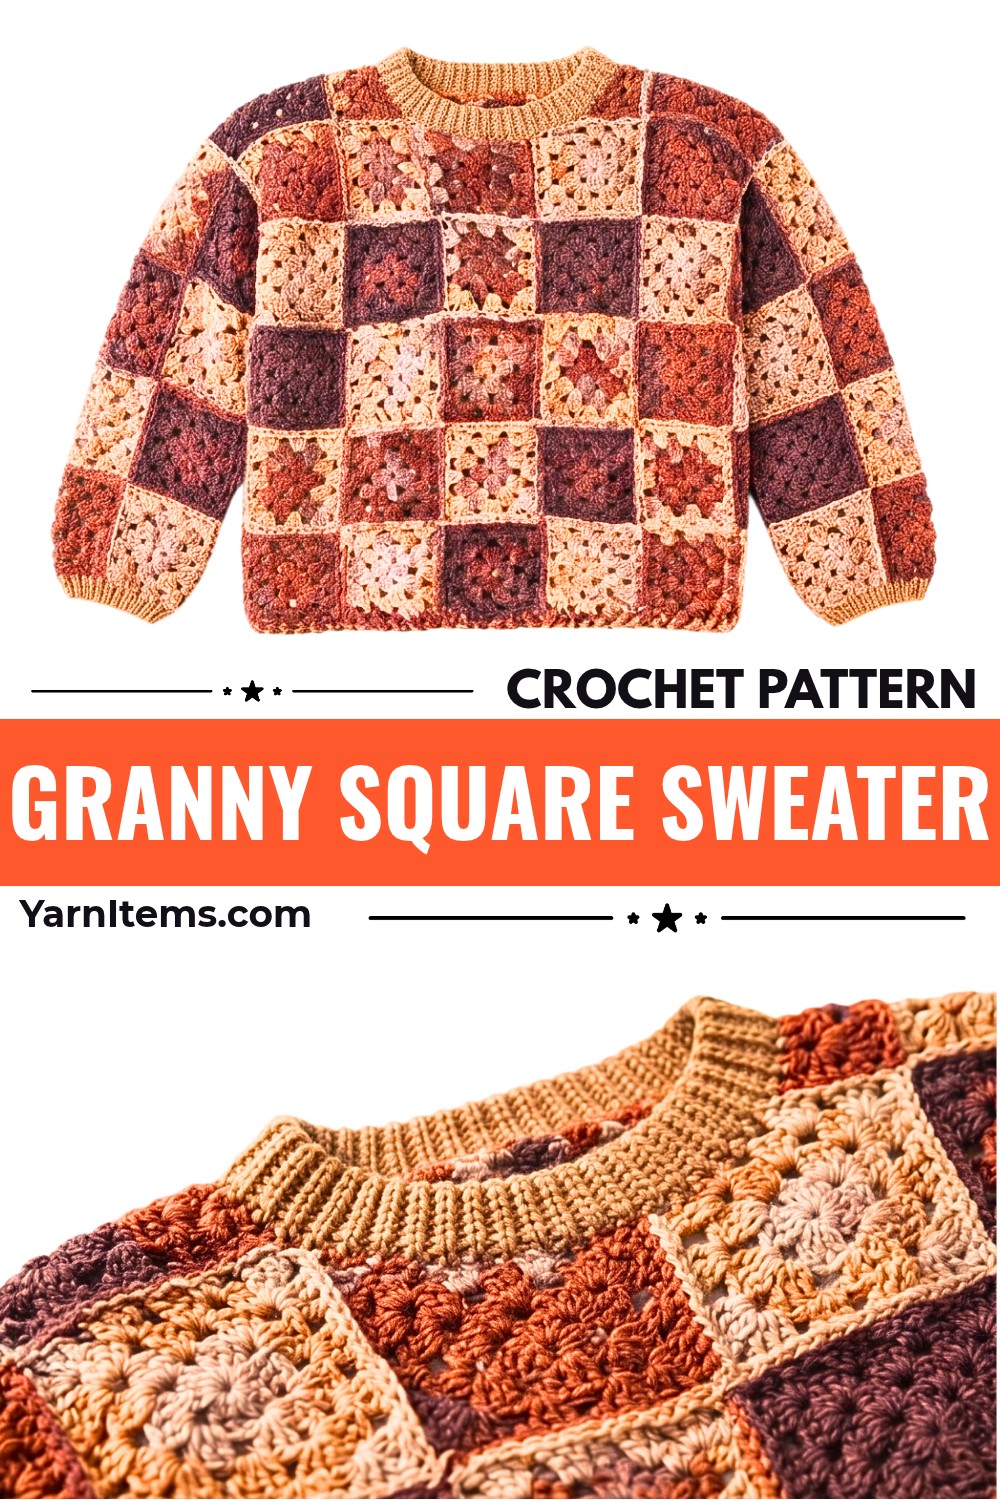
With its featherlight texture and relaxed fit, this crochet sweater layers beautifully over everyday outfits. The soft mohair-blend yarn creates an airy drape, while the balloon sleeves and delicate puff stitches give it a cozy, stylish finish.
Start with a seamless puff-stitch body, then shape the upper panels and sleeves, then add the ribbed cuffs, neckline, and hem. The step-by-step crochet instructions guide you through each stage, from the first round to the finishing details.
Credit Simple Crochet
Materials & Tools Needed
- Yarn: DK or light worsted weight acrylic yarn. The instructor uses LaVita Baby Yarn. Self-striping or variegated yarn, such as Alize Burcum Batik or Alize Maxi Flower, is recommended for creating multicolored squares without constantly changing yarn and weaving in ends.
- Crochet Hook: Choose a hook that matches your yarn and tension to produce a 9 cm square. A 3.5 mm to 4.5 mm hook is a typical starting range.
- Tapestry or Yarn Needle: For weaving in yarn tails.
- Scissors: For cutting yarn.
- Measuring Tape: To check motif measurements and garment dimensions.
- Blocking Board and T-pins or Blocking Mat: For shaping the squares before assembly.
- Garment Steamer or Steam Iron: For safely steam-blocking the acrylic motifs.
Finished Size & Customization Ideas
The demonstrated sweater fits a 94 cm (approximately 37-inch) bust with positive ease. Each individual granny square measures 9 × 9 cm after blocking.
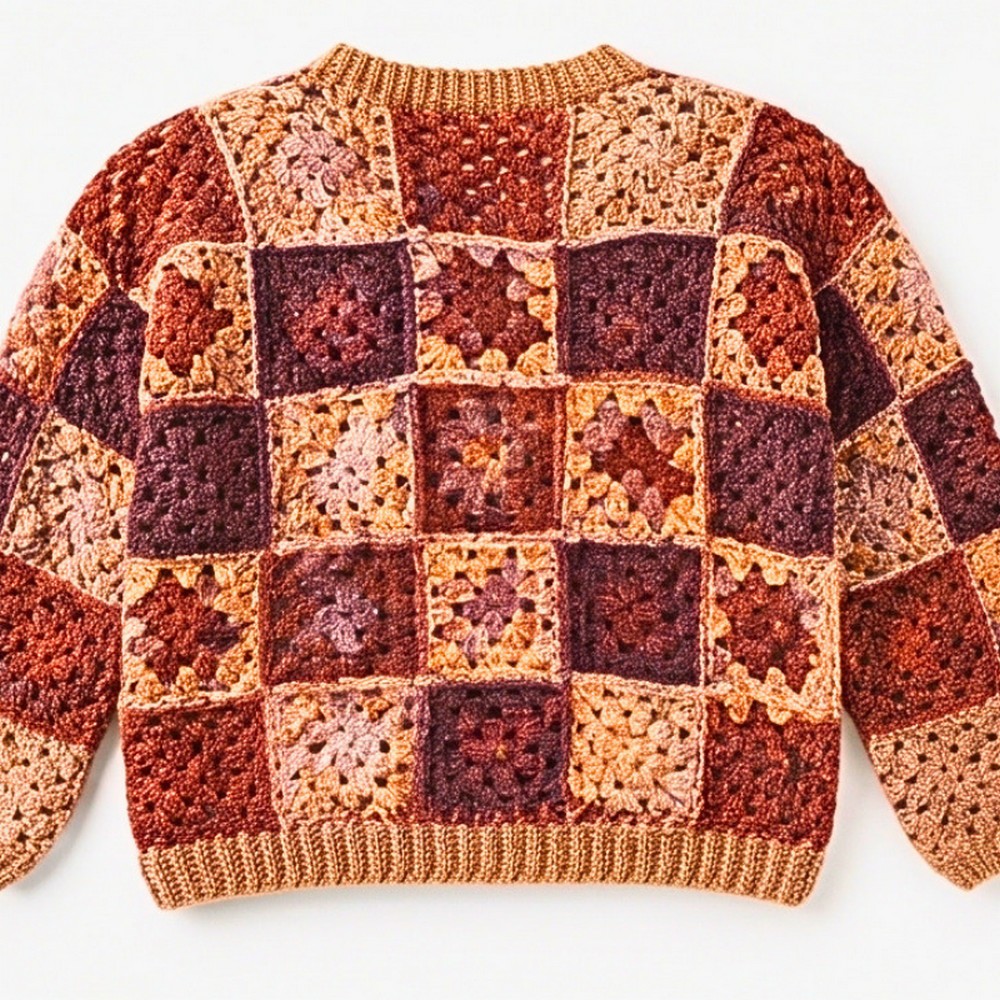
The sample layout uses 6 motifs across the front and back. This gives a flat width of 54 cm per panel, or about 108 cm around the body when you join the front and back. The body has a cropped, waist-skimming shape, with 3 rows of motifs below the armhole, giving approximately 27 cm of body drop before the ribbing.
Each sleeve uses a panel of 5 motifs from the shoulder fold to the wrist, giving about 45 cm of motif length before adding the cuff.
Adjusting Chest Width
- For a larger or smaller chest circumference, change the motif gauge by using a different yarn weight or hook size.
- For example, using a thicker yarn and hook to make 10 cm squares gives 40 cm across 4 motifs or 60 cm across 6 motifs.
- Aim for at least 10-15 cm of positive ease for a relaxed fit.
Changing Body Length
Add 1–3 additional rows of squares below the armhole if you prefer a classic hip-length or tunic-style sweater instead of the cropped sample.
Choosing a Neckline
The demonstrated arrangement leaves 2 center motifs open for a snug boat or square neckline, with custom decreases used to shape the inside corners. Leaving an even number of motifs open, such as 4, creates a more open, relaxed square neckline.
Customizing Cuffs and Hem
- For wide, straight bell cuffs, stop after the first round of double crochet.
- For a tapered, snug wrist, add 4–6 additional rounds of alternating FPdc and BPdc ribbing.
Pattern Abbreviations & Terminology
The pattern uses US crochet terms.
- ch: Chain
- sl st: Slip stitch
- dc: Double crochet
- tr: Treble crochet, made with a double yarn over
- FPdc: Front Post Double Crochet
- BPdc: Back Post Double Crochet
- BLO: Back loop only
- sp / ch-sp: Space / Chain space
- st(s): Stitch(es)
- cl: 3-dc cluster, also called a granny cluster
- dc2tog / partial dc: Incomplete double crochet worked until 2 loops remain on the hook
- tr2tog / partial tr: Incomplete treble crochet worked until the specified loops remain on the hook
Step-by-Step Crochet Instructions
1. Make the 3-Round Classic Granny Square
Each completed granny square must measure 9 × 9 cm after light steam blocking. Use the selected hook size and adjust your tension as needed to reach this measurement.
Foundation Ring
- Tie a slip knot onto your crochet hook.
- Chain 4.
- Insert the hook into the fourth chain from the hook (the first chain you made).
- Yarn over and pull through both loops on the hook to form a small starting center ring.
Alternatively, you can use a magic ring if you prefer.
Round 1
- Chain 5. This counts as the first double crochet and a chain-2 corner space.
- Work directly into the center ring, encasing the yarn tail as you crochet.
- Work 3 double crochet stitches into the ring.
- Chain 2.
- Work another 3 double crochet stitches into the ring.
- Chain 2.
- Work another 3 double crochet stitches into the ring.
- Chain 2.
- Work 2 double crochet stitches into the ring to complete the initial cluster alongside the starting chain.
- Join the round by inserting the hook into the third chain of the starting chain-5. Yarn over and work a slip stitch.
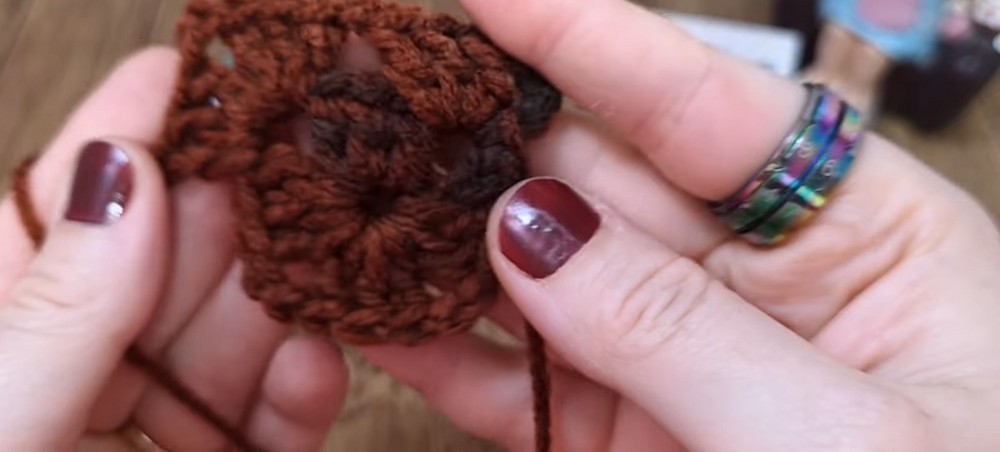
Stitch Count: 4 clusters of 3 double crochet stitches, giving 12 double crochet stitches in total, separated by 4 chain-2 corner spaces.
Round 2
- Slip stitch directly into the adjacent chain-2 corner space.
- Chain 5. This counts as 1 double crochet and a chain-2 corner space.
- Work 3 double crochet stitches into the same chain-2 corner space.
- Chain 1 along the side.
- In the next chain-2 corner space, work (3 dc, ch 2, 3 dc).
- Chain 1 along the side.
- In the next chain-2 corner space, work (3 dc, ch 2, 3 dc).
- Chain 1 along the side.
- In the final chain-2 corner space, work (3 dc, ch 2, 3 dc).
- Chain 1 along the side.
- Return to the very first corner space, where you started the round, and work 2 double crochet stitches to complete the first corner group.
- Slip stitch into the third chain of the starting chain-5 to close the round.
Stitch Count: 8 clusters of 3 double crochet stitches, 4 chain-2 corner spaces, and 4 chain-1 side spaces.
Round 3
- Slip stitch directly into the adjacent chain-2 corner space.
- Chain 5. This counts as 1 double crochet and a chain-2 corner space.
- Work 3 double crochet stitches into the same corner space.
- Chain 1.
- In the next chain-1 side space, work 3 double crochet stitches.
- Chain 1.
- In the next chain-2 corner space, work (3 dc, ch 2, 3 dc).
- Chain 1, work 3 double crochet stitches into the side chain-1 space, and chain 1 again.
- In the next corner space, work (3 dc, ch 2, 3 dc).
- Chain 1, work 3 double crochet stitches into the side chain-1 space, and chain 1 again.
- In the last corner space, work (3 dc, ch 2, 3 dc).
- Chain 1, work 3 double crochet stitches into the remaining side chain-1 space, and chain 1 again.
- In the initial starting corner space, work 2 double crochet stitches to finish the cluster.
- Slip stitch into the third chain of the starting chain-5.

Fasten Off with a Clean Needle Finish
- Cut the yarn, leaving an 8-10 cm tail.
- Pull the yarn loop out and thread the tail through a yarn needle.
- Pass the needle under the full V of the second stitch.
- Bring the needle back down through the center of the last chain to create a faux stitch edge.
- Weave the tail securely into the wrong side of the square.
Stitch Count: 12 clusters of 3 double crochet stitches, with 3 clusters along each side, 4 chain-2 corner spaces, and 8 chain-1 side spaces.
2. Block the Granny Squares
Block every completed motif before joining the sweater. This step helps the squares match in size and gives the finished panels straighter edges.
- Place each square on a blocking board or mat.
- Pin all four corners and the straight edges with T-pins.
- Adjust the square until it measures exactly 9 × 9 cm.
- Hold a garment steamer or steam iron approximately 2-3 cm above the motif.
- Apply steam gently without allowing the iron’s soleplate to touch the acrylic yarn directly.
- Leave the squares pinned until they have cooled and dried completely.
- Remove the pins only after the motifs are fully cool and dry.
Important Acrylic Yarn Note: Never press acrylic yarn directly with a hot iron. Direct contact can melt or flatten the fibers and change the texture of the crochet fabric. Keep the steamer or iron above the motifs as instructed.

3. Arrange the Sweater Panels
Once all the squares are blocked, arrange them flat with the right side facing up.
Front Panel
- Arrange the motifs 6 squares wide and 5 squares tall.
- Leave the central 2 motifs unworked at the top center to create the neck drop.
Back Panel
- Arrange an identical panel to match the front.
- Keep the motif placement aligned with the shoulder seams.
Shoulder Seam Alignment
Because the layout uses an odd number of vertical columns (5 rows) for the armhole drop, the center shoulder line rests directly over the fold of the top sleeve motif.
Sleeve Panels
Make 2 sleeve panels. Each sleeve is:
- 5 motifs long from the shoulder fold toward the wrist.
- 3 motifs around for the sleeve circumference.
Arrange the squares before joining so you can check the direction of the motifs and keep both sleeves consistent.

4. Join the Granny Squares with Flat Slip Stitch Seaming
The tutorial uses a continuous flat slip-stitch join worked from the right side of the motifs. The method picks up the back loop of one square and the back loop plus underlying third loop of the facing square to create a stable seam.
Position the Squares
- Place two motifs flat next to each other with their right sides facing up.
- Make a slip knot on your crochet hook.
- Insert the hook into the second chain of the corner chain-2 space of the right motif, picking up the back loop.
- Insert the hook into the corresponding corner chain of the left motif, picking up the back loop and underlying third loop for stability.
- Yarn over and pull through all loops to join the motifs.
Work Along the Seam
For each double crochet stitch and chain space down the seam:
- Insert the hook through the back loop of the front motif.
- Insert the hook through the back loop and third loop of the facing motif.
- Yarn over and draw a slip stitch loosely through all loops on the hook.
- Continue in the same way along the edges of the motifs.
Keep the slip stitches loose enough to allow the joined squares to lie flat.

Crossing 4-Corner Intersections
When four motif corners meet:
- Slip stitch through the first corner chain of the current pair.
- Chain 1 loosely across the cross-junction seam.
- Pick up the second corner chains of the next two motifs.
- Continue the back-loop slip-stitch join along the continuous row.
Joining Order
- Seam all vertical joins first across the complete body and sleeve layouts.
- Next, seam all horizontal lines.
- Once the panels are joined, fold the body with right sides together.
- Seam the body side seams using the same joining method.
- Join the sleeve underarm seams in the same manner.
5. Add the Sleeve Cuffs & Lower Hem Ribbing
The cuffs and bottom hem begin with a round of double crochet stitches. Alternating front-post and back-post double crochet stitches then create the ribbed texture.
Component 2 – Round 1: Foundation Double Crochet
- Attach the yarn at the cuff or bottom hem seam line.
- Chain 3. This counts as the first double crochet.
- Work 1 double crochet into the adjacent corner chain space.
- Work 1 double crochet into each double crochet stitch across the granny clusters.
- Work 1 double crochet into each chain-1 space.
- When you reach a place where two motifs join at a seam line, work 1 double crochet into the corner space, 1 double crochet directly into the slip-stitch join, and 1 double crochet into the adjacent corner space.
- Continue around the entire cuff or hem.
- Slip stitch into the third chain of the starting chain-3.

Round 2: Post Ribbing
- Chain 1. This does not count as a stitch; it is only for adjusting the starting height.
- Insert the hook from front to back to front around the post of the first double crochet.
- Work 1 front-post double crochet (FPdc).
- Insert the hook from back to front to back around the post of the next double crochet.
- Work 1 back-post double crochet (BPdc).
- Repeat the alternating sequence of 1 FPdc and 1 BPdc around the entire circumference.
- Slip stitch into the top of the first FPdc, skipping the initial chain-1.
Round 3 and Optional Additional Rounds
- Chain 1.
- Work 1 FPdc around every FPdc from the previous round.
- Work 1 BPdc around every BPdc from the previous round.
- Continue alternating the post stitches around the entire edge.
- Slip stitch to the first FPdc.
- Fasten off and weave in the yarn ends.
For a deeper, more defined ribbed finish, continue repeating Round 3 for the desired number of additional rounds.
6. Shape and Finish the Neckline
The granny-square neckline creates raw 90-degree inside corners. The tutorial uses a special partial-stitch reduction round to fill these stepped corners before adding the ribbing.
This shaping section uses partial double crochet and partial treble crochet stitches to bring the corner areas together.
Neckline Round 1 – Filling the Corners
- Join the yarn at the center back neckline.
- Work 1 double crochet into each stitch and chain-1 space until you reach 1 stitch before an inside neckline corner.

Corner Shaping Cluster
Work the following sequence at the inside corner:
- Work a partial double crochet into the last double crochet before the corner, leaving 2 loops on the hook.
- Yarn over twice and work a partial treble crochet into the corner chain space. Pull through 2 loops twice, leaving 2 loops on the hook.
- Yarn over and pull through all 3 loops on the hook.
- Yarn over twice and insert the hook into the seam join. Work a partial treble crochet, leaving the loop on the hook.
- Yarn over twice and insert the hook into the next corner chain space. Work another partial treble crochet, leaving the loop on the hook.
- Yarn over twice and insert the hook into the opposite seam join. Work a partial treble crochet.
- Yarn over and draw through all 4 loops on the hook.
- Work a partial treble crochet into the next corner space.
- Work a partial double crochet into the first double crochet of the next motif.
- Yarn over and pull through all loops.
Continue working regular double crochet stitches across the straight neckline edge. Repeat the corner shaping cluster at all four inside neckline turns.
Slip stitch to the first double crochet of the round.
Neckline Round 2 – Ribbed Decreases
- Chain 1.
- Work alternating FPdc and BPdc stitches across the straight sections of the neckline.
At each decreased corner section:
- Work a partial FPdc around the stitch immediately before the corner decrease.
- Work a partial BPdc around the entire multi-stitch cluster from the previous round.
- Yarn over and pull through all loops to consolidate the corner.
- Work a single consolidated post stitch through the center point.
- Pull the yarn slightly tighter to bring the neckline inward smoothly.
Continue alternating FPdc and BPdc stitches along the remaining straight section. Slip stitch to the beginning of the round, fasten off, and weave all remaining yarn tails neatly on the inside of the garment.
Finishing the Sweater
After the motifs have been joined and the neckline, cuffs, and hem are complete, check the seams and edges.
- Make sure the front and back panels are aligned at the shoulders.
- Check that the sleeve panels are joined evenly and that both underarm seams are secure.
- Confirm that the neckline shaping lies smoothly, especially at the four inside corners.
- Weave in any remaining yarn tails on the wrong side of the sweater.
The finished sweater combines the familiar granny-square pattern with a flat slip-stitch joining technique and textured post-stitch ribbing. Matching the blocked squares before assembly helps the panels line up, while the shaped neckline gives the joined motifs a more comfortable finished opening.