
Crochet a breezy, boho-inspired short sleeve cardigan with lightweight yarn, customizable panels, and playful tassels—perfect for summer layering or lounging.

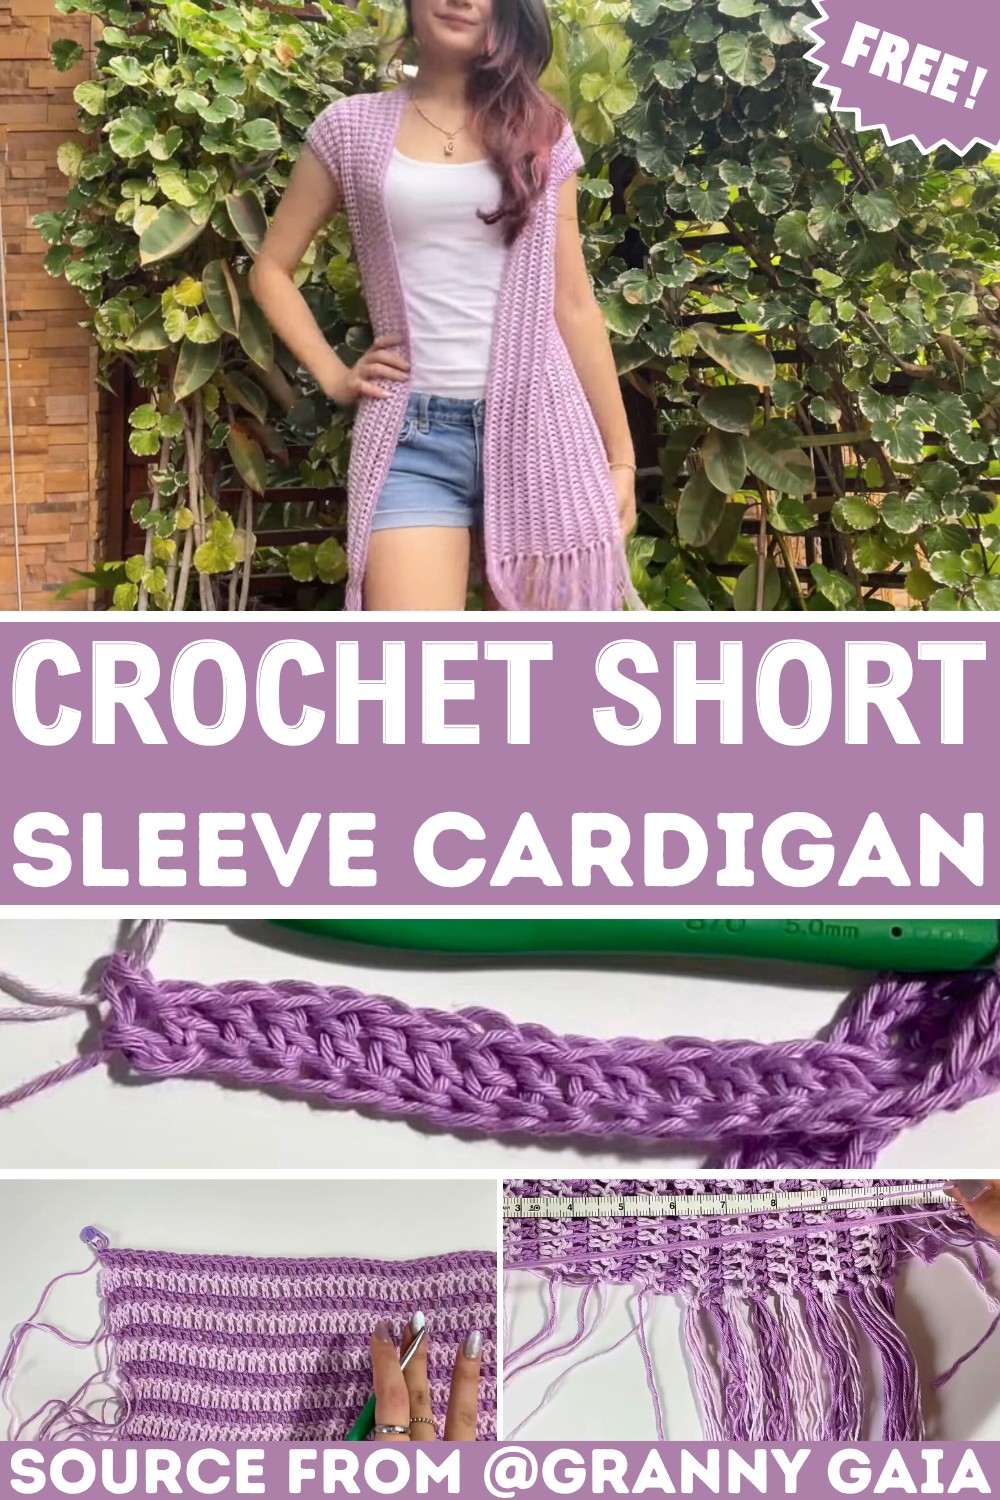
This short-sleeve crochet cardigan is light, stylish, and perfect for summer. Designed with tassels at the bottom, it’s a fun and airy addition to your wardrobe. You can throw it over a dress, pair it with jeans, or style it for a casual day out.
Crochet Short Sleeve Cardigan
One of the best parts about this crochet cardigan pattern is how beginner-friendly it is. The cardigan is made using just two panels, which means you can customize the length and width to fit you perfectly. You’ll also love how quick it is to make, thanks to easy double crochet stitches. And if you don’t like weaving in ends, don’t worry. Many loose ends are turned into tassels, making it even simpler to finish.
Credit Granny Gaia
Key Features & Construction Overview
- Beginner-Friendly Design: Made of just two rectangular panels.
- Flexibility in Stitch Choice: Suggested double crochet for speed, but any stitch works.
- Customizable Fit: Designed as a made-to-measure pattern, allowing you to choose any length or width.
- Optional Tassels: Adds style while minimizing weaving in ends.
- Lightweight Materials: Sport-weight cotton yarn paired with a 5 mm hook for a breathable summer vibe.
This short-sleeve cardigan is constructed entirely from two rectangular panels, making it a wonderfully accessible pattern for beginners. The process starts with measuring and creating a foundation row using foundation double crochet stitches. While this method creates stretchier starting chains and helps achieve clean, even edges, you can opt for standard chains if preferred. You’ll work rows of double crochet to create each panel, making color changes as desired for striped patterns before finishing off the rows. Both panels are made identical to ensure symmetry.

The pattern is made-to-measure, making it easy for you to adapt the cardigan to your body shape, whether you want a cropped look or a more flowing, longer style. Gaia thoughtfully details how to calculate the width of your panels by dividing your chest circumference and neck width by four, so you end up with a perfectly proportioned garment. Once the two panels are complete, they’re joined at the back with a simple but effective seaming method, which uses a variation of slip stitches combined with double crochet for a neater, almost seamless look on the right side.

The sides are stitched together in a customizable way to create armholes that suit your desired sleeve fit. You’re guided on marking points for stitching, ensuring optimal symmetry and the perfect amount of coverage for your arms. Whether you want an oversized feel or something snug under your arms, the pattern is flexible.

To finish off the design, optional tassels are added along the hem of the cardigan. Not only do these tassels create a playful, boho-inspired look, but they serve the clever function of incorporating the color change tails, dramatically reducing the number of ends you need to weave in—an ingenious idea that adds visual flair while saving time! Lastly, trimming ensures the tassels are even, giving the cardigan a polished, final appearance.

Video Tutorial
Step-by-Step Pattern
Materials
To recreate the cardigan, you’ll need the following:
- Yarn: #2 sport weight yarn (100% cotton, recommended for summer)
- Hook: 5.0mm crochet hook (for a flowy, breathable fabric)
- Optional tools:
- Scissors
- Stitch markers
- Needle (for weaving in ends)
- Measuring tape

Pattern Instructions
Part 1: Creating the Panels
Step 1: Begin the Foundation Row
- Make a slip knot, leaving a long tail for the tassels if desired.
- Create a foundation double crochet (FDC) to your desired length. Alternatively, you can use a traditional chain followed by a double crochet row.
Step 2: Build the Body with DC Rows
- After reaching your desired length, chain 2, turn, and double crochet into each stitch to create straight rows.
- For two-tone colors, change colors at the end of each row by bringing in the new yarn during the final pull-through of your last stitch.
- Repeat rows of double crochet, alternating colors or keeping it consistent, until the width matches your calculated panel width measurement.
Step 3: Make the Second Panel
- Once one panel is completed, repeat the same process to create a second, identical panel.
Part 2: Assembling the Cardigan
Step 4: Seam the Panels Together
- Lay the panels flat, wrong side facing up. Align them so one edge will create the back seam.
- Use the slip stitch double crochet join method to seam the panels together, stitch by stitch, until you reach the midpoint of the back. Secure and fasten off.
Step 5: Create Armholes
- Fold the panels in half. To create an armhole, measure your desired sleeve width around and mark the stopping point of the seam on both sides using stitch markers.
- Seam from the bottom edge of the garment upward, leaving the marked section unstitched.
Part 3: Adding the Decorative Tassels
Step 6: Prepare the Tassels
- Cut yarn into 12-inch strands (approx. 4 strands per tassel).
- Fold the strands in half to create a loop at one end.
Step 7: Attach the Tassels
- Insert your hook into the edge stitch (on the wrong side), pull the looped yarn through, and pull the loose ends through the loop to create the tassel.
- Tighten and align the tassels along the bottom edge of the garment.
Step 8: Trim the Tassels
- Drape the cardigan and ensure the tassels are even. Trim any uneven pieces for a polished finish.
Final Touches
- Weave in Loose Ends: Using your needle, weave in the remaining ends (there should only be about three, thanks to the tassel technique).
- Steam or Block the Cardigan (Optional): If the tassels or rows appear uneven, giving the cardigan a light steam can smooth the stitches and fibers.
Troubleshooting & Suggestions
Common Issues:
- Uneven Panels: If your foundation row feels tighter, try practicing the foundation double crochet stitch to ensure consistent tension. Alternatively, increase the starting chain slightly.
- Curling Foundation Row: Keep your loops tall enough when working foundation double crochet to avoid tightness.
- Color Changes: Secure each color change with a double knot to prevent unraveling, and leave tails long enough for tassels.
Creative Modifications:
- Add Texture: While the pattern calls for double crochet, you can use textured stitches such as the grit stitch or lemon peel stitch to give your cardigan extra visual interest.
- Experiment with Tassels: For a minimalist vibe, skip the tassels; for a bold look, use contrasting yarn colors for dramatic fringe.
- Alternative Uses: This pattern could easily be adapted into a sleeveless vest or even a beach cover-up by adjusting the armhole size or tweaking the panel dimensions.


