A beautifully textured and reversible crochet stitch, perfect for beginners, that only requires a simple one-row repeat to create scarves, blankets, cardigans, and more.

This crochet one-row repeat pattern is perfect for anyone, including beginners, who wants to create something that’s both beautiful and versatile. The stitch uses a one-row repeat pattern, making it easy to remember and simple to work on. It’s reversible, meaning your piece will look great from both sides, and it works wonderfully for items like blankets, scarves, hats, cardigans, or even headbands.
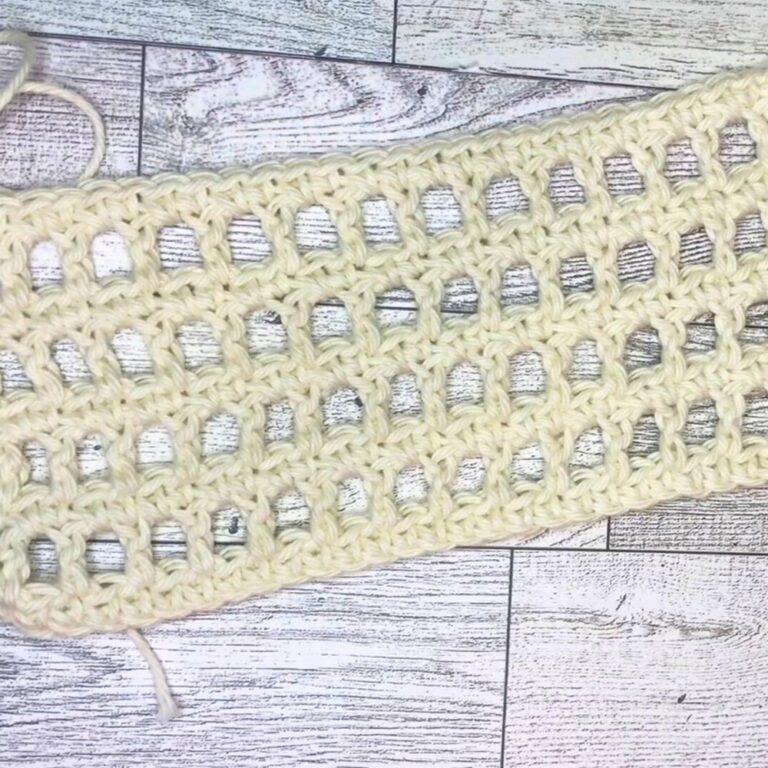
One Row Repeat Crochet Pattern
The making process of this crochet one-row repeat pattern is relaxing and fun. With a puff-like pattern that looks a bit like braids, this stitch creates a soft, neat design. You’ll only need to repeat one row throughout, which helps keep things simple. The stitch works beautifully with plain yarn, colorful variegated yarn, or even by alternating colors.
Credit Nati Crochet
Key Construction and Features:
- Beginner-Friendly: Works with only two main stitches—single crochet and a puff stitch variation.
- Reversible Design: Looks great from both sides, ideal for patterns where both sides are visible.
- One-Row Repeat: After the foundation row, you’ll repeat the same row throughout, making it easy to memorize.
- Customizable Texture: Adjust the puff stitch size or use different yarn weights for a variety of looks and feels.
- Versatile Use: Suitable for many patterns, from scarves and headbands to full-size blankets.
This easy, one-row repeat pattern begins with a foundation of simple single crochet stitches. To get started, chain an even number of stitches using any yarn and a matching hook size (the designer recommends a 4.0mm hook). Once you complete the foundation row of single crochets, the rest of the design is built using a combination of puff stitches and spaces, creating a textured, braided appearance.
The puff stitch is the highlight of this pattern. To create it, you’ll pull up loops three times in the same stitch, yarn over, and pull through all six loops, then secure with a chain. The spacing between each puff gives the design a breathable, open texture that balances the boldness of the puff stitch. For a cleaner finish, you’ll always chain two at the end of every row before turning your work.
The true beauty of the pattern lies in its simplicity: For each subsequent row, puffs are worked into the spaces between the puffs below. There’s no need to overthink placement, as the spaces are naturally easy to identify, making this a very meditative pattern once you settle into the rhythm. Additionally, if you want a smaller or larger puff effect, you can experiment with pulling up loops more or fewer times.
When finishing your pattern, you have the option to tie everything together with a single crochet row across the top. This step adds a clean, polished edge, especially if you’re planning on leaving it unbordered.
Video Tutorial
Step-by-Step Pattern
Materials
Here’s what you’ll need to get started:
- Yarn: Any yarn weight will work! This pattern looks great with thin, medium, thick, or chunky yarn. For this tutorial, a medium-weight yarn was used.
- Hook Size: A 4.0mm crochet hook was used, but you can adjust this based on your yarn and desired texture (see Notes for tips).
- Optional Tools: Scissors, a tapestry needle for weaving in ends.

Pattern Instructions
Foundation Row
- Start with an even number of chains. (For this example, 12 chains were used.)
- Skip the first chain. Into the second chain from the hook, work a single crochet (sc).
- Continue working 1 sc in each chain across the row.
- At the end of the row, chain 2 and turn your work.
The One Row Repeat
- Begin into the first stitch. You’ll now create a Puff Stitch:
- Yarn over, insert the hook into the stitch, and pull up a loop three times (you’ll have 6 loops on your hook).
- Yarn over again and pull through all 6 loops.
- Chain 1 to secure the puff.
- Skip the next stitch, then into the following stitch, repeat the puff stitch process:
- Yarn over, pull up a loop three times, resulting in 6 loops on your hook.
- Yarn over and pull through all 6 loops. Chain 1.
- Repeat this sequence (skip 1 stitch, puff into the next) all the way across the row.
- At the end of the row:
- Work a puff in the second-to-last space/stitch.
- Chain 2 and turn your work.
Repeating the Pattern
- Now you’re repeating the row you just completed:
- Work into the spaces between the puff stitches from the previous row.
- Yarn over, pull up loops 3 times into the space, complete a puff stitch, and chain 1.
- Move to the next space (skipping the puff stitch itself) and repeat the puff stitch process.
- Continue this row, repeating the sequence until the last space/stitch. Finish with a final puff stitch, chain 2, and turn.
Finishing Your pattern
- Once you’ve achieved your desired length for the pattern, you can finish with a row of single crochet for a neat edge:
- Chain 1 and turn your work.
- Work 1 sc into each stitch or chain, leaving the final row looking even.
- Fasten off by chaining 1, cutting the yarn, and using a tapestry needle to weave in the ends.
- Enjoy your finished pattern!
Tips for Customization
- Larger Puffs: If you want the puff stitches to appear bigger, yarn over and pull up loops 4 times instead of 3.
- Color Changes: For a striped look, alternate yarn colors every few rows.
- Quick patterns: As the pattern works up quickly, you can create scarves in 3–4 hours!

Troubleshoo ting and Suggestions
- Tight Stitches: If your chain stitches or puff stitch chains feel tight, loosen your tension or use a slightly larger hook. Keeping the chains at the top of the puff stitches loose will make it easier to work into them later.
- Consistent Loops: For neat puff stitches, try to keep each loop uniform in size as you pull them up. Pulling too tightly or unevenly could distort the design.
- Color Modifications: This pattern looks stunning in solid, variegated, or self-striping yarn. You can also alternate colors every few rows for a striped effect.
- Yarn Weight Options: This stitch works beautifully with yarns of any weight—from thin and lacy to thick and chunky. Thinner yarn creates delicate texture, while bulky yarn showcases the puff stitches with a bolder, squishier effect.
- pattern Variations: Use this stitch for headbands, blankets, table runners, or any other pattern that would benefit from a soft, textured design.