
The crochet hair rope combines function and style, creating a decorative braided accessory with sturdy base circles for lightweight, yet fun hair decoration or use as a purse charm. Perfect for beginners and intermediate crocheters, this pattern introduces creative ways to combine circles and rope techniques into a cohesive design.
Crochet hair rope is a unique and stylish way to decorate and add flair to your hair. Soft, lightweight, and customizable, they can be made to perfectly match your outfits, making them a great accessory for everyday wear or special occasions.
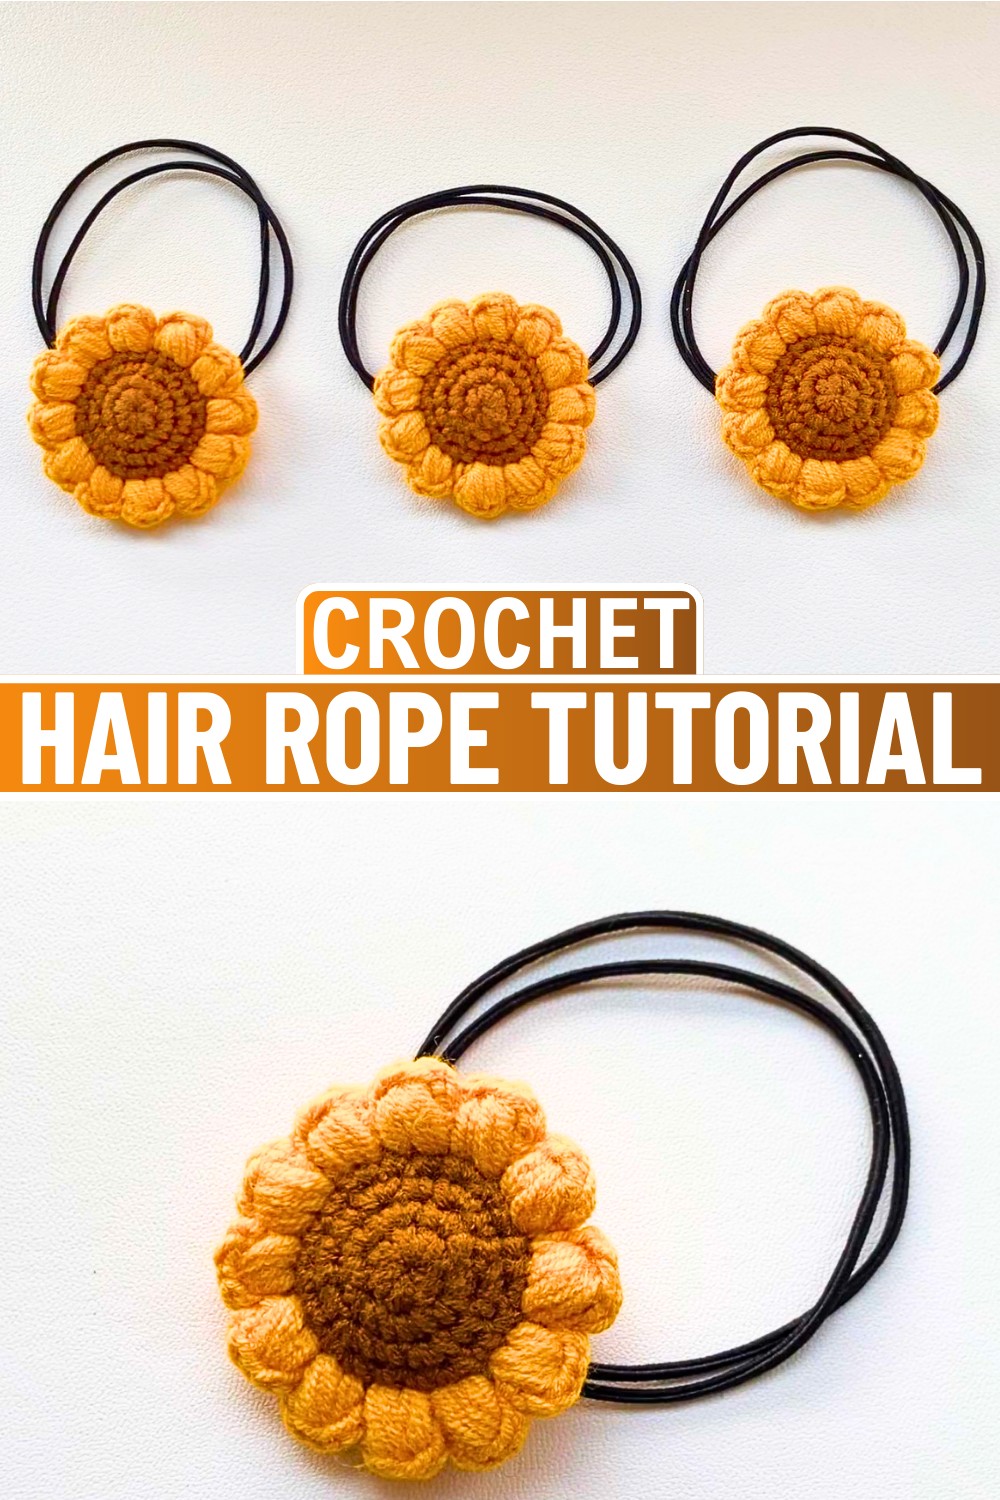
Free Crochet Hair Rope Pattern
Creating a crochet hair rope is simpler than it seems. Using just basic stitches, soft yarn, and a small hook, you can bring this accessory to life quickly. The milk cotton yarn makes it smooth and comfortable while giving the finished rope a neat and delicate look. For beginners, this design is a wonderful stepping stone into easy crochet patterns, with results that are pretty and practical. Anyone can make one and have fun using it in everyday life.
Credit Ada’s Handmade
Key Features of the Pattern:
- Two Crochet Base Circles: Simple flat circles form the foundation of this piece, crocheted in joined rounds with single crochet stitch increases.
- Braided Rope Detail: A clever rope design connects the circles, using partial double crochets pulled through multiple loops to create a textured, woven look.
- Customizable Finish: Opportunity to add embellishments like beads, as well as adjust the rope length, for a unique twist on the pattern.
- Beginner-Friendly Techniques: Includes fundamental stitches like magic circles, single crochet, and slip stitches.
The first step in this pattern is crocheting two identical circles, which serve as sturdy anchors for the hair rope. Starting with a magic loop, each circle is worked in joined rounds using increases to achieve a flat, uniform shape. The sequence of stitches creates smooth edges with a foundation of 24 stitches in the final round. This step will help you practice controlling your tension for neatly-formed flat rounds.

Once the two circles are complete, it’s time to incorporate the standout element: the braided rope detail. Working into the base of one circle, you’ll chain two and begin crocheting partial double crochets. The key here is to leave loops on your hook across two stitches before pulling through them all at once, creating the signature braided texture. This step is repeated in segments between slip stitches, ensuring the rope emerges consistently and securely.

After the first rope section is complete, the second circle is attached by continuing the rope design. This ties the elements together seamlessly, creating a cohesive piece that gives the hair rope its decorative functionality. Depending on your preference, you can modify the design at this stage to create more loops or extend the rope for an added statement.

With all components joined, the piece is polished with a neat finish. Loose yarn ends are tucked or woven in with a yarn needle, and any embellishments, such as beads or metallic threads, can be added to the circles or braided rope for a playful flair.
Video Tutorial
Materials & Tools Needed
- Yarn: 4-ply milk cotton yarn
- Hook: 2.0mm crochet hook
- Other Supplies: Scissors, yarn needle (optional for finishing)
Finished Size & Customization Ideas
- The finished size depends on the number of chains and repetitions you make for the hair rope length.
- You can customize the color or create multicolor ropes by switching colors before specific rounds (not demonstrated explicitly in the scrape but is a potential idea).
- Adjust the thickness or texture by using different types of yarn or hooks.
Pattern Abbreviations & Terminology
All instructions use US Crochet Terms:
- sc: single crochet
- inc: increase (2 single crochets in the same stitch)
- sl st: slip stitch
- ch: chain
- magic loop: a way of starting a crochet pattern by forming an adjustable loop
- round: refers to a circular set of stitches

Step-by-Step Detailed Instructions
This pattern consists of two base circles and a connecting rope worked into them.
PART 1: Crocheting the Round Bases
First Circle
- R1: Create a magic loop, then crochet 6 single crochet (sc) into the loop. Pull the yarn to tighten the loop. Slip stitch (sl st) into the first stitch to close the round. Chain 1 (ch 1).
- Total stitches: 6 sc
- R2: Work 2 single crochet (sc) into each stitch around. Slip stitch (sl st) into the first stitch to close the round. Chain 1 (ch 1).
- Total stitches: 12 sc
- R3: Work (1 single crochet, 1 increase) in repetition around the circle. This creates a sequence of single crochet followed by 2 single crochet in a stitch. Repeat 6 times. Slip stitch (sl st) into the first stitch and chain 1 (ch 1).
- Total stitches: 18 sc
- R4: Work (2 single crochet, 1 increase) in repetition around the circle. This creates a sequence where you crochet 2 single crochets in separate stitches, followed by 2 single crochets in the next stitch. Repeat 6 times. Slip stitch (sl st) into the first stitch, chain 1 (ch 1), and cut the yarn.
- Total stitches: 24 sc
Second Circle
Follow steps 1–4 above to make an identical circle.
PART 2: Connecting the Rope
- Attach yarn to one of the completed bases.
- Begin by chaining 2 (ch 2).
- In the first stitch, crochet 3 loops into the same stitch by working partial double crochets that are not completed (yarn over, insert, pull through, and hold loops).
- Move to the next stitch and crochet another 3 loops in the same stitch. You should now have 6 loops on the hook.
- Yarn over and pull through all 6 loops at once to create a braided effect.
- Chain 3 (ch 3) to lock the rope design for this segment.
- Slip stitch (sl st) into the next stitch.
- Repeat steps 2–6 across the base circle until you’ve connected the rope design for this round.
Repeat PART 2 with the second circle, connecting to the same rope sequence or creating multiple connected ropes, depending on customization.
Finishing Techniques
- Weave in any loose yarn ends with a yarn needle for a clean finish.
- If desired, add embellishments like beads or decorative edges for variety.
Troubleshooting and Suggestions
- Common Issues:
- Uneven Circles: Keep your tension consistent to avoid lumpy or uneven shapes in the base circles. If the edges curl up, try gently blocking your work by pinning it to your desired shape and lightly steaming it.
- Rope Loops Not Uniform: Practice leaving even loops while making the partial double crochets. Recheck that you have the correct number of loops on your hook before pulling through, as this is critical to achieving a smooth braid.
- Creative Modifications:
- Change the Look: Try using different yarn types or weights to alter the look of your hair rope. A thicker yarn will yield a chunkier texture, while a metallic or variegated yarn adds visual interest.
- Color Combinations: Crochet the circles in contrasting colors or alternate rope sections between different hues for a vibrant, playful effect.
- Extra Embellishments: Add beads, buttons, or small appliqués to the base circles for a personal touch. Alternatively, try edging the circles with a crab stitch for a decorative border.
- Versatile Uses: Beyond a hair rope, you can adapt this pattern into a keychain, bag accessory, or playful toy embellishment. Just shorten or lengthen the rope to suit your desired functionality.


