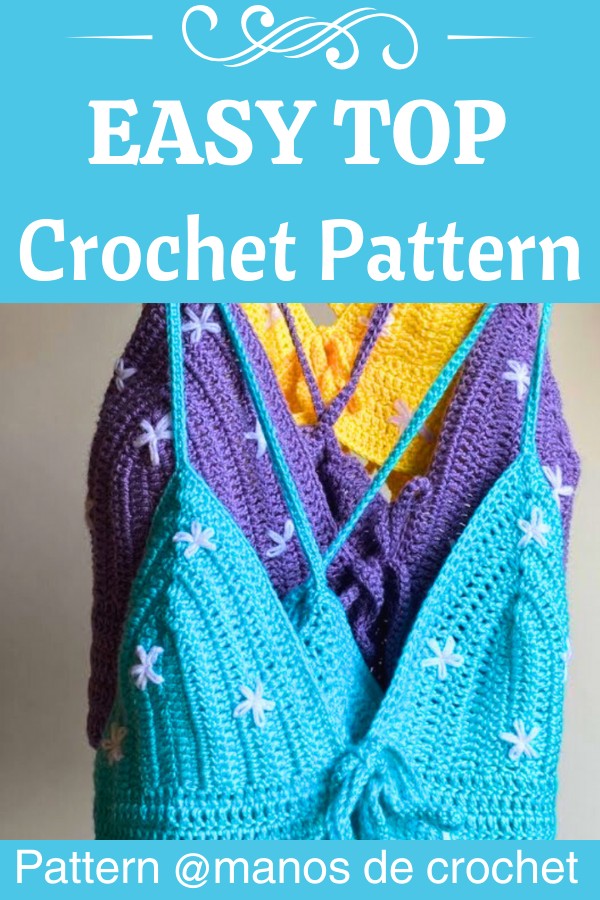
A breezy, customizable crochet top with delicate hand-embroidered daisies, perfect for sunny days, layering, or as a standout handmade piece for your wardrobe.

This crochet top is stylish, cute, and designed to fit perfectly in any size. What makes it special are the embroidered daisies that add a cheerful, playful vibe to the design. It’s a wearable piece great for sunny outings, casual events, or simply to brighten up your wardrobe.
Free Crochet Daisy Top Tutorial
The Crochet Top Pattern is easy to follow and uses simple techniques to create two main parts. Once finished, the pieces are tied with cords for a comfortable fit. Adding the embroidered daisies is simple and makes the top feel one-of-a-kind. Beginners can enjoy learning these steps while creating something practical and beautiful.
Credit manos de crochet
Key Features and Construction at a Glance:
- Made in two separate pieces: two triangular cups and a main body section.
- Uses double crochet stitches as the foundation with single crochet for edging and straps.
- Features adjustable straps and front ties for a tailored fit.
- Embellished with simple yet charming hand-embroidered daisies using a wool needle and contrasting thread.
- Easily customizable for different sizes by adjusting chain length and stitch counts.
This charming crochet daisy top begins with creating two triangular cups. The tutorial provides instructions on making these cups, with double crochet stitches forming their structure. The process is straightforward and adaptable—you can size the cups to your preference before moving on to the body. After completing the first cup, you chain additional stitches, connecting seamlessly to the second cup without cutting the yarn. This creates a smooth transition that eliminates extra sewing.

The main body of the top is worked in rows of double crochet stitches, building up a sturdy yet breathable fabric. A few rounds of single crochet add a clean finish at the edges while enhancing the overall shape and durability. The straps are constructed using long chains (around 160 stitches), which are then reinforced with single crochet for added comfort and strength. The same simple method is used to create ties for the front, bringing functional adjustability to the design.
Once the base of the top is complete, the standout feature of this pattern makes its appearance—hand-embroidered daisies! These delicate flowers are crocheted with a wool needle and white thread, stitched directly onto the cups and lower edge of the top. With five easy petals made from simple loops, they add a whimsical, vintage-inspired flair that transforms the piece into a true statement item.

Finishing touches include weaving in the ends, securing the embroidery knots thoroughly, and ensuring all straps and ties are evenly placed for a polished, professional look. The two pieces are tied together at the front and crossed at the back for a playful, bow-adorned fit perfect for summer outings—or even as a unique gift!
Video Tutorial
Materials & Tools Needed
- Yarn: Yarn of your choice.
- Crochet Hook: 3.5mm crochet hook.
- Scissors
- Tapestry/Wool Needle: For sewing ends and embroidering daisies.
- Measuring Tape: To customize the size based on your measurements.
Finished Size & Customization Ideas
- Default Size in Tutorial: Small (S). Adjustments can be made by increasing the number of chains, rows, or stitches for larger sizes.
- Customization Ideas:
- Adjust the cup size by increasing the initial chain length (refer to “cups”).
- Change the length of the top by increasing or decreasing the number of rows in the body section.
- Embroider additional details, such as extra daisies or alternating petal colors.
Pattern Abbreviations & Terminology
- ch: chain
- dc: double crochet
- sc: single crochet
- sl st: slip stitch
- sp: space
(Pattern uses US terminology)

Step-by-Step Crochet Instructions
Cup Section
- Create the Cups (From Previous Video Tutorial):
- Start by crocheting an individual cup.
- Crochet a second cup (if you’ve not already done so).
(Note: Specific cup details aren’t included in the transcript, as the cups are made in the prior video.)
joining the Cups
- Chain Join Between Cups:
- With one completed cup, make 25 chains (this is for an S size; adjust for larger sizes), creating the space between the cups.
- Begin the body section without cutting the thread.
Body Section
- First Row of Double Crochets:
- Chain 2 after making the cup-to-cup chain.
- Work 1 dc into each chain from the cup-to-cup join, starting from the third chain from the hook.
- When you reach the other cup, continue working 1 dc across the bottom of the cup.
- Subsequent Rows:
- At the end of the row, chain 2 and turn.
- Continue working 1 dc in each stitch (skipping the turning chain). Repeat this row 6 times or until the desired length is reached.
- Finish the last row by chaining 1 and cutting the thread.
Edge Finishing
- Single Crochet Border:
- Work sc along the top edge of the cups and the chain space in between.
- At the corners of the cups, work 1 sc, chain, and another 1 sc to give the edges a neat turn.
Straps
- Create Straps:
- Chain 160 for each strap. This chain count works well for sizes S and M. Adjust to the desired length for larger sizes.
- Return by working 1 sc into each chain until you return to the base of the strap.
- Attach Straps:
- Attach the completed straps to the top corners of the cups using slip stitches.
Cord for Front Adjustment
- Front Adjustment Cord:
- Chain 70 for the front lace-up cord.
- Return by working 1 sc into each chain.
- Repeat for the second cord.
- Hook both cords at the front, crossing them, and tie them to secure the top.
Embroidered Daisies
- Embroider Decorative Daisies:
- Use a wool needle and white thread to create the daisies.
- Insert the needle into the fabric to make the petals from a central point:
- Insert the needle at Point A.
- Pull the thread.
- Form each petal by looping the thread from Point A to the desired petal tip and back.
- Work 5 evenly spaced petals for each daisy.
- Secure with a knot after completing each flower.
Finishing Touches
- Final Steps:
- Add additional daisies or decorations as desired.
- Weave in all yarn ends.
- Block the top (optional) to ensure even, crisp stitches.
Tips for Customization
- Sizing Changes:
- Adjust the number of rows in the body section or chains between the cups.
- Straps can be lengthened or shortened to your desired fit.
- Color Customization:
- Use ombre or variegated yarn for a unique look.
- Alternate petal colors or make multicolored daisies.
- Extra Details:
- Add beads or other embellishments to the center of the daisies.
- Consider scalloped edges for a decorative border.
Troubleshooting and Suggestions:
Common Challenges:
- Keeping even edges: While working in double crochet rows, be diligent about turning chains—some aren’t used as stitches, which can affect the edges. Use stitch markers if needed to stay aligned.
- Tension problems for consistent petals: When embroidering the daisies, maintain even thread tension to keep the petals uniform. Practice on scrap fabric first if you’re new to thread embroidery.
Customization Options:
- Different colors: Instead of white daisies, experiment with colorful flower embroidery or try multi-colored stripes for the base of the top.
- Add coverage: Lengthen the body section with additional rows to transform the top into a crop tank or even a full-length camisole.
- Optional embellishments: Add beads or sequins to the center of the daisies for extra sparkle, or trim the edges with a lacy border for added charm.