
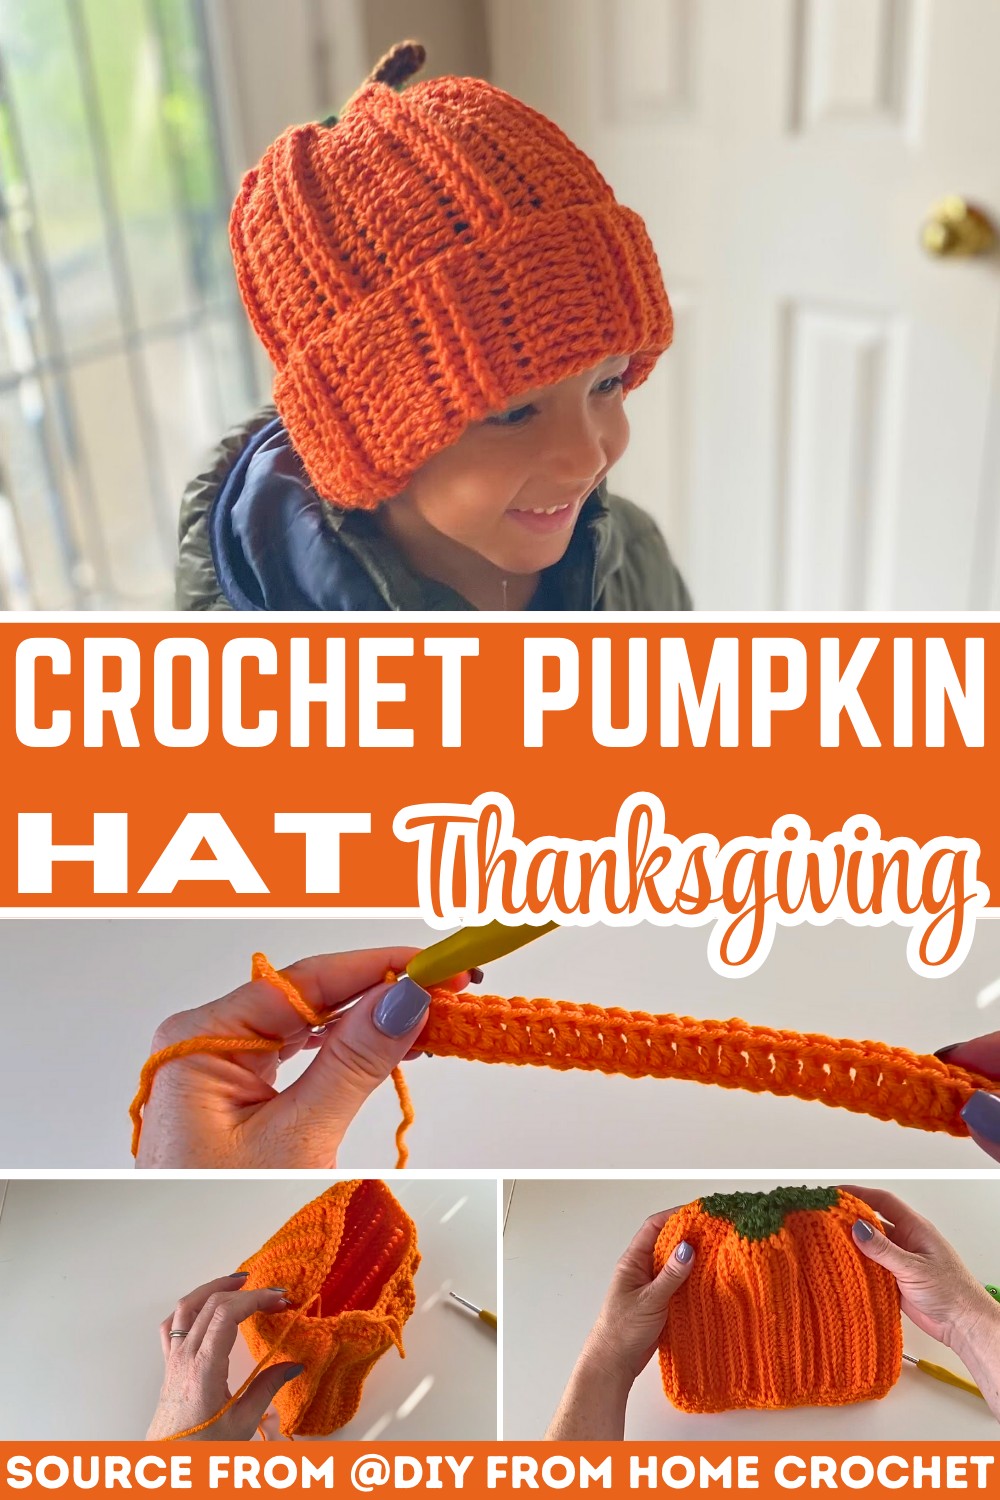
This adorable pumpkin-themed crochet hat features textured ribbing reminiscent of a pumpkin’s ridges and is topped with a playful stem, making it perfect for seasonal celebrations or cozy autumn outings.

Bring a splash of autumn charm with this cozy crochet pumpkin hat. Perfect for kids and adults, it’s stylish and fun to wear. With its bright orange ribbing and stem detail, it’s a great way to celebrate the fall season. Whether you make it for Halloween, a family outing, or just for fun, this hat adds personality and seasonal flair.
Easy Crochet Pumpkin Hat pattern
This crochet pumpkin hat pattern is beginner-friendly, offering a simple and rewarding process to create something unique. It uses basic techniques like double crochet and slip stitches, and the ribbing detail gives the hat its pumpkin-like texture. You can customize the stem color (green or brown) and even add a jack-o-lantern face for extra fun. It’s not just a wearable accessory; it’s a creative way to enjoy crochet and spread autumn vibes.
Credit DIY FROM HOME CROCHET
Key Features & Construction Summary:
- Materials: Bright orange yarn for the body of the hat, green or brown yarn for the stem accent, and a 5mm crochet hook.
- Base Construction: Worked flat with a combination of double crochets, front post double crochets, and back post double crochets to create the pumpkin-like ribbing texture.
- Assembly: The work is folded in half and seamed with slip stitches to form the hat.
- Detailing: Includes a neat single crochet edging and a drawstring closure for shaping the top.
- Stem Design: Crocheted separately and attached to complete the pumpkin look, with optional customization for color and style.
Starting with a simple chain foundation, the hat’s height is determined by the number of chains in the starting row. Rows of double crochet, alternating with front post and back post double crochets, create a stunning textured ribbing that replicates the ridges of a pumpkin. The clever use of post stitches gives the hat its unique appearance, while ensuring the inside remains smooth for comfort.

As the rows progress, the hat’s circumference comes to life. This pattern includes a repeat sequence that alternates ribbing placement in order to maintain the design on the correct side of the fabric. Once the desired number of rows (or circumference measurement) is achieved, the piece is folded in half with the inside facing outward and seamed with slip stitches to form the base of the hat.

The finishing touches give this pattern its charm! After the ribbed base is completed, single crochet edging is worked along the bottom for a polished look. The top of the hat is gathered using a drawstring-like method and then reinforced with a few extra stitches for durability.
The whimsical stem, crocheted separately, is designed with a chain base and rows of half-double crochet. For a natural, slightly crooked shape, the stem’s form is adjusted during finishing by weaving the yarn ends back through the stitches. It is then secured to the hat’s crown, creating the distinctive pumpkin design.

Video Tutorial
Materials & Tools Needed
- Yarn:
- Orange (main color for the body of the hat)
- Green or Brown (for the stem and finishing touches)
- Optional: Black yarn for embellishments like eyes or nose (if turning into a jack-o-lantern)
- Hook: 5mm crochet hook (Size H-8)
- Measuring tape (to check hat sizing if needed)
- Yarn needle (for weaving in ends and sewing parts together)
- Scissors
Finished Size & Customization Ideas
- Finished Size: Toddler-sized hat (circumference: 18 inches, height determined by starting chain). Adjustable using a size chart or varying the number of rows based on the recipient’s head measurements.
- Customization Ideas:
- Stem Colors: Use green for a traditional pumpkin stem or brown for a realistic look.
- Add a jack-o-lantern face by sewing on black shapes for eyes, a nose, and a mouth.
- Alter the size by following the size chart or checking circumference as you work.
Pattern Abbreviations & Terminology
- Ch: Chain
- DC: Double Crochet
- FPDC: Front Post Double Crochet
- BPDC: Back Post Double Crochet
- HDC: Half Double Crochet
- HDC Dec: Half Double Crochet Decrease
- SC: Single Crochet
- Sl St: Slip Stitch
Terminology: US-based crochet terms are used.

Step-by-Step Crochet Instructions
Body of the Hat
- Foundation Chain:
- Start with a slip knot and chain 25 (this is the height of the hat; adjust chain length for different sizes).
- Row 1: Double Crochet (DC):
- DC in the 2nd chain from your hook and in every chain across.
- Total stitches = 24.
- Chain 2 and turn your work.
- Row 2: Front Post Double Crochet (FPDC):
- Work a FPDC around each post of the DC stitches from the previous row.
- At the end of the row, DC in the last stitch to maintain a straight edge.
- Chain 2 and turn.
- Row 3: Back Post Double Crochet (BPDC):
- Work a BPDC around each post of the FPDC stitches from the previous row.
- DC in the last stitch at the end of the row.
- Chain 2 and turn.
- Row 4: Regular Double Crochet:
- Work 1 DC into every stitch across.
- Chain 2 and turn.
- Repeat Pattern:
- From here, continue alternating rows:
- FPDC, BPDC, regular DC.
- Ensure the ribbing appears on one side (the outside of the hat).
- As you go, switch the ribbing direction (i.e., switch FPDC and BPDC in alternate sections).
- From here, continue alternating rows:
- Size Check:
- For the toddler size, complete 42 rows or until the hat measures 18 inches in circumference.
- Refer to a size chart for other sizes.
- Closing the Seam:
- Once the rows are complete, fold the piece in half (with the right sides facing inward) and line up the short edges.
- Slip stitch across the edges to close the seam and create a tube for the hat.
- Fasten off.
Top Closure
- Single Crochet Rounds:
- Turn the hat inside out and attach orange yarn at the top.
- Work SC evenly around the top of the hat to neaten the edge.
- Complete 2 rounds of SC.
- Fasten off.
- Gather the Crown:
- Thread a long tail of yarn through a yarn needle.
- Weave the yarn through every 2nd or 3rd stitch at the top.
- Gently pull it tight, like a drawstring, to close the top of the hat.
- Secure with a few stitches and weave in the tail on the inside.
Bottom Edge Finishing
- Edge Cleanup:
- Attach orange yarn to the bottom seam.
- Work HDC evenly around the bottom edge.
- Complete 2 rounds of HDC.
- Fasten off and weave in ends.
Stem
- Foundation Chain:
- With green or brown yarn, create a slip knot and chain 8.
- First Side:
- Work HDC in the 2nd chain from the hook and in each chain across (7 stitches).
- Opposite Side:
- Turn your work and work HDC along the opposite side of the chain.
- Slip stitch in the first stitch to close.
- Shaping the Stem:
- Use a yarn needle to thread one tail through the stitches on each side, weaving in and out to give the stem a slightly tapered, realistic look.
- Attach Stem:
- Position the stem on top of the hat.
- Use the remaining tails to sew the stem securely to the crown.
- Weave in all ends.
Customization
- Jack-O’-Lantern Face (Optional):
- Cut small shapes (triangles, ovals, or crescent moons) from black felt or sew them using black yarn for a jack-o’-lantern.
- Curly Vine Details (Optional):
- Use green yarn to create a curly vine.
- Chain 15–20, then work 2 SC in each chain. It will naturally curl. Attach it next to the stem.
Finishing
- Ensure all loose ends are woven in with a yarn needle.
- Block the hat lightly if needed to shape it.
Troubleshooting & Suggestions:
Tips for Common Challenges:
- Ribbing Alignment: Pay close attention to alternating front post and back post stitches and ensure they align consistently with previous rows. Flip your work periodically to check the ribbing placement.
- Seaming Straight Edges: When slip stitching the hat closed, keep your stitches loose to prevent puckering.
- Gathering the Top: Be sure to space your weave evenly around the top to create a smooth finish when closing the hat.
Creative Modifications:
- Color Variations: Experiment with different shades of orange for the body, or opt for alternatives like white or gray for unique seasonal flair! The stem can also be customized in brown, green, or even a fun variegated yarn.
- Embellishments: Add a face to turn the hat into a jack-o’-lantern by stitching triangles and a smile in black yarn for a playful Halloween accessory.
- Versatility: Scale the hat up or down with sizing adjustments to suit adults, children, or even pets!


