Colorful Crochet Granny Stitch Sweater Pattern with Custom Fit
Learn how to turn basic granny clusters into a wearable crochet sweater with customizable panels, sleeves, cuffs, and a polished border.
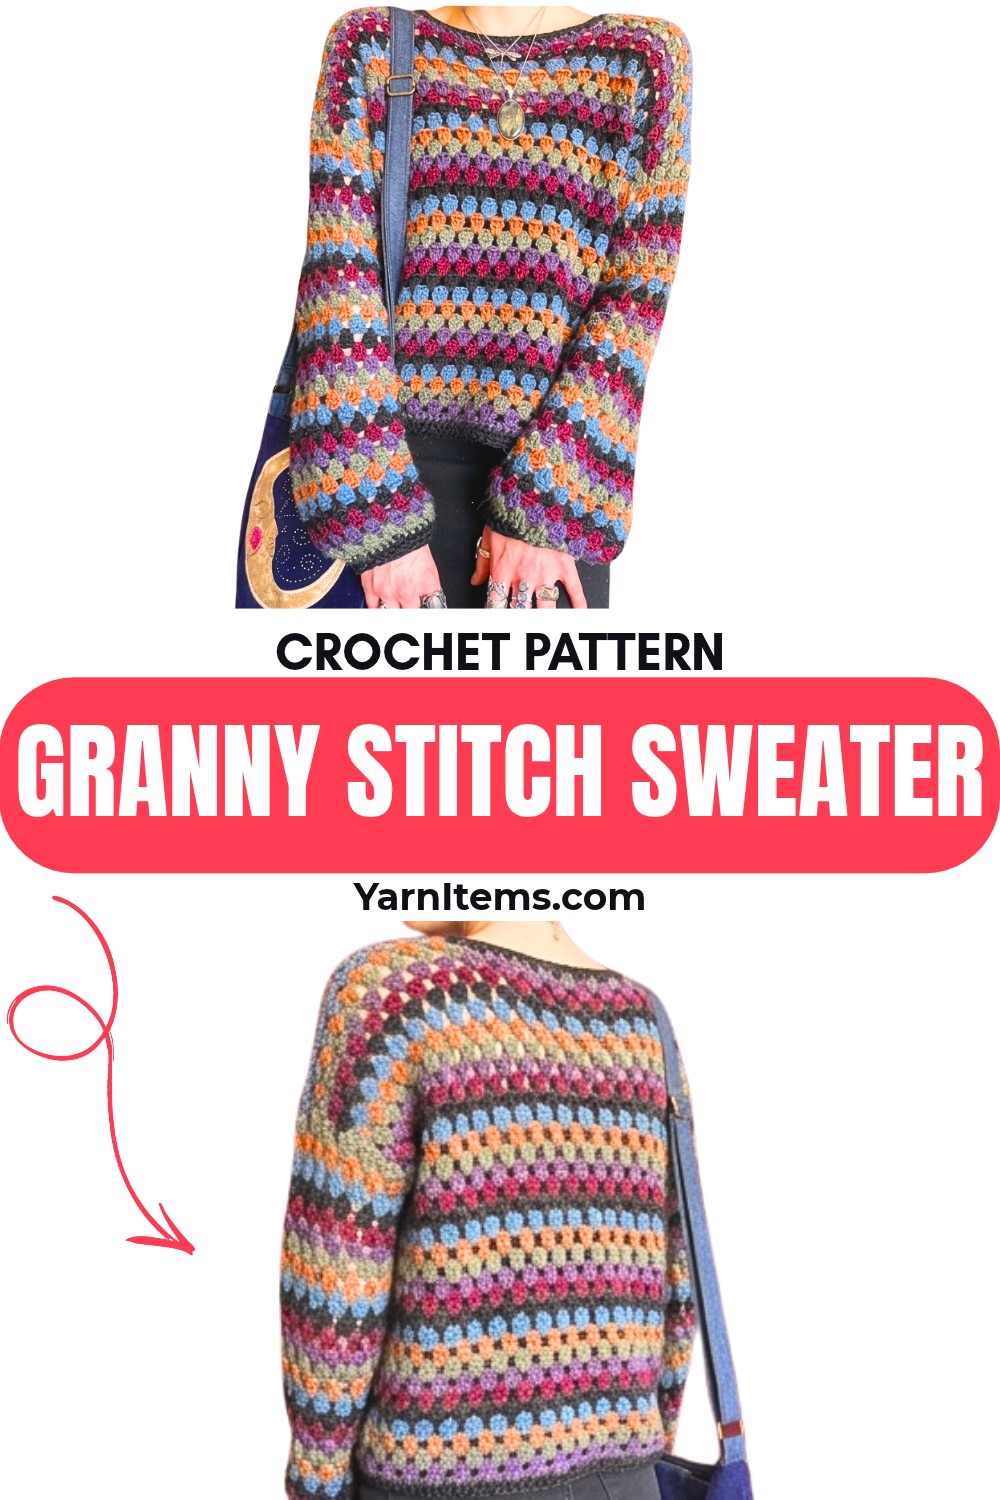
Colorful granny clusters give this crochet sweater its cheerful texture, while worsted or Aran-weight yarn creates a warm fabric that still works beautifully with multiple colors.
Two matching rectangular crochet panels form the front and back, then simple shoulder and side seaming turns them into a wearable shape. You can keep the silhouette close to the body or add an inch or two beyond your shoulder width for the relaxed, boxy fit shown in the tutorial.
Getting the fit right starts before the first crochet granny row. Your foundation chain determines the panel width, the marked side seams control the armholes, and the neckline is shaped only after the main body rows are complete.
Once those crochet pieces are joined, the sleeves are worked directly around the armholes, while hdc borders and optional cinched cuffs give the sweater its finished shape.
Credit Hannah Drapinski
Materials & Tools Needed
- Crochet Hook: 6.5 mm hook. The tutorial sizes up from the yarn’s recommended 5.5 mm hook to create a softer, more fluid drape.
- Yarn: Worsted/Aran-weight yarn in multiple colors. The tutorial uses a stash-buster palette with an alpaca blend, which works especially well for drape and wet blocking.
- Notions: Stitch markers, a tapestry needle for seaming and weaving in ends, and scissors.
Choosing Your Size
This sweater is designed around your own measurements rather than a fixed finished size.
Begin with a foundation chain that is divisible by 3, then add 2 additional chains before beginning the single-crochet base row.
For a closer fit, make the foundation chain long enough to reach from shoulder to shoulder. For a loose, boxy silhouette like the sample, extend the chain about 1–2 inches beyond your shoulder width.
The tutorial uses 69 chains before adding the extra 2 chains.
Armhole size is adjusted later by changing the position of the side-seam stitch markers. Placing the markers higher creates a smaller arm opening, while moving them lower gives the sleeve opening more room.
Pattern Abbreviations
US crochet terms are used throughout:
- ch = chain
- sc = single crochet
- dc = double crochet
- hdc = half double crochet
- hdc dec / hdc2tog = half double crochet decrease
- st(s) = stitch(es)
- sl st = slip stitch
- sp = space
- rep = repeat

How to Work an Hdc Decrease
Yarn over, insert the hook into the stitch, and pull up a loop; yarn over, insert the hook into the next stitch, and pull up another loop; yarn over and pull through all 5 loops on the hook.
Front and Back Panels
Make 2 identical panels.
Both panels begin as simple granny-stitch rectangles. The neckline is created near the top, so it is helpful to finish the main body rows before deciding exactly where the neck opening should sit.

Foundation Chain & Base Row
Step 1
Create a slip knot and chain a multiple of 3 until the chain reaches your desired width across the chest and shoulders. The sample uses 69 chains.
Step 2
Once you reach the desired multiple of 3, add 2 more chains.
Step 3
Place 1 sc in the second chain from the hook; place 1 sc in every chain across; ch 2 and turn.
Check the width of this base before moving into the granny rows. If the chain is already too short or too wide for your intended fit, this is the easiest point to adjust it.
Granny Stitch Body
Row 1
In the same stitch as the turning ch-2, place 1 dc; skip 2 sts, then place 3 dc in the next st; rep from * across until the final st; place 2 dc in the final st; cut yarn if changing colors.
The 2 dc at each end create the edge structure needed for the following rows, so avoid replacing them with a regular 3-dc cluster.
Row 2
Join new color; ch 2, turn; place 3 dc in the first space between clusters; place 3 dc in every space across; place 1 dc in the final st, which is the top of the previous row’s ch-2; cut yarn if changing colors.
That final dc mirrors the beginning of the row and keeps the panel edges even.
Row 3
Join new color; ch 2, turn; place 1 dc in the same st as the ch-2; place 3 dc in every space across; place 2 dc in the final st, which is the top of the previous row’s ch-2; cut yarn if changing colors.
Body Repeat
Continue alternating Row 2 and Row 3 until the panel reaches your desired sweater length, stopping just before the shoulder section.
Length Check: Hold the panel against your body before beginning the neckline. The main body should reach the point where you want the shoulder area to begin. Checking now prevents the neckline from being placed too high or too low.
Shape the Shoulder Panels and Neck Hole
Once the main body is complete, the neckline is formed by dividing the upper portion of the panel into two shoulder sections.
Step 1: Mark the Neckline
Hold the panel against your body and place stitch markers where you want the neck opening to begin and end.
Count the cluster spaces on both sides of the intended opening. Keep the left and right shoulder sections as even as possible so the neckline sits centrally when the front and back are joined.
Step 2: First Shoulder Row
Continue from your existing row repeat. The tutorial leaves off on a Row 3 repeat.
Join yarn; ch 2, turn; place 3 dc in each space until reaching the stitch marker; in the stitch containing the marker, place 1 dc; cut yarn.
This creates the first shoulder section while leaving the center opening unworked.

Step 3: Second Shoulder Row
Join the new color; ch 2, turn; place 1 dc in the same st as the ch-2; place 3 dc in each space until the final st; place 2 dc in the final st; cut yarn.
Step 4: Final Shoulder Row
Join the new color; ch 2, turn; place 3 dc in each space until the final st; place 1 dc in the final st; ch 1 and cut yarn.
Step 5: Opposite Shoulder
Repeat Steps 2–4 on the opposite side of the panel to form the second shoulder strap.
Repeat the entire panel and shoulder process to make the identical back panel.
Neckline Check: Place the two completed panels on top of each other and compare the shoulder widths and center opening before seaming. Matching them now makes the shoulder seam much easier to align.
Join the Shoulders
Lay the front and back panels flat together.
Thread a tapestry needle with a scrap of yarn that matches the top row.
Shoulder Seam
Use a whip stitch through both loops of the V stitches on the top/right side only. Do not weave back and forth. Pinch the granny clusters gently as you work so the clusters on the front and back remain aligned.
Secure the yarn when the seam is complete.
Matching the clusters is more important than pulling the seam tightly. Excess tension can make the shoulder line pucker.
Set the Armholes and Seam the Sides
Try the sweater on before permanently closing the side seams.
Place stitch markers where you want the armholes to begin. Move the markers higher for a smaller opening or lower for a roomier sleeve opening.
Side Seams
Starting at the bottom hem, whip stitch upward along each side until reaching the armhole marker; stop and secure the yarn.
Because these side edges do not have the same obvious V-stitch line as the shoulder seam, pay close attention to the color blocks. Match corresponding color sections as you seam so the granny pattern meets cleanly on both sides.
Turn the sweater right side out after both sides are secured.
Fit Check: Try the sweater on before adding the borders or sleeves. Check that you can move your arms comfortably and that the side seams sit where you intended. This is the easiest stage for changing the armhole position.

Neckline Border
Use the border color, shown in black in the tutorial.
Neckline Round 1
Join yarn at the shoulder neckline; ch 1, 1 hdc in the same st; place 1 hdc in each st around; at each corner or seam drop where a shoulder connects to the body panel, work 1 hdc dec; continue evenly along the raw front neckline edge; work another hdc dec at the next seam/corner; continue around the back neckline and sl st to the first hdc to join.
The decreases at the shoulder-to-body corners help the border turn neatly instead of creating loose, floppy corners.
Neckline Round 2
Ch 1, 1 hdc in the same st; place 1 hdc in every stitch around; sl st to join; ch 1 and cut yarn.
Neckline Check: Lay the sweater flat after the second round. The neckline should curve smoothly without obvious waves or pulling. If the edge ripples, the border stitches may be too densely placed; if it pulls inward, the spacing may be too tight for the edge.
Bottom Hem
Join yarn at the bottom side seam.
Hem Round 1
Ch 1, 1 hdc in the same st; place 1 hdc in each stitch around; work an hdc dec exactly at each of the two side seams; sl st to join.
Hem Round 2
Ch 1, 1 hdc in the same st; place 1 hdc in every stitch around; sl st to join; ch 1 and cut yarn.
The decreases at the side seams help the hem maintain a clean shape instead of becoming loose at the points where the front and back panels meet.
Work the Sleeves in the Round
Sleeves are worked directly around the armholes.
Sleeve Round 1
Join yarn at the armpit side seam; ch 2; skip the 1-dc rows and place a 3-dc cluster beneath each 2-dc row; at the top shoulder seam, place 2 dc on the right side of the seam and the third dc on the left side to join the two panels smoothly; continue placing clusters in the skipped spaces around the other side; at the beginning, place 2 dc in the same space as the ch-2, with the ch-2 counting as the third dc; sl st to the top of the ch-2; cut yarn.
The shoulder seam needs special attention here. Splitting the three dc across both sides of the seam prevents a visible gap from forming where the two panels meet.
Sleeve Round 2
Join the new color at the top of the previous ch-2; ch 2; place 2 dc in the same starting space to complete the first cluster; place 3 dc in every space around; sl st to join; cut yarn.
Sleeve Round 3
Join the new color; ch 2; skip directly to the next space because there is no gap at the base of the starting stitch; place 3 dc in the next space; place 3 dc in every space around; at the end, place 2 dc in the space containing the starting ch-2 to complete that cluster; sl st to join; cut yarn.

Sleeve Repeat
Continue alternating Round 2 and Round 3 until the sleeve reaches your preferred length.
Sleeve Length Check: Measure from the underarm toward the wrist as you work. Try the sweater on before adding the final rounds so you can stop at exactly the length you want.
Optional Cinched Sleeve Cuffs
For a closer-fitting sleeve opening, add the three-round hdc cuff.
Cuff Round 1
Join black yarn; ch 1, 1 hdc in the same st; 1 hdc in the next 2 sts; in the 4th st work a hdc dec; repeat around, decreasing in every 4th stitch; sl st to join.
Cuff Round 2
Ch 1, 1 hdc in the same st; in the 2nd st work a hdc dec; repeat around, decreasing in every 2nd stitch; sl st to join.
Cuff Round 3
Ch 1, 1 hdc in the same st; 1 hdc in the next st; in the 3rd st work a hdc dec; repeat around, decreasing in every 3rd stitch; sl st to join; ch 1 and cut yarn.
Repeat the complete sleeve and cuff process on the second armhole.
Finishing & Wet Blocking
Weave in all remaining ends securely with the tapestry needle.
Wet blocking is especially useful when working with alpaca or wool-blend yarn. Gently wet the finished sweater, shape it to the desired dimensions, and allow it to dry completely while laid flat.
Blocking can help the granny clusters settle into a flatter, more even fabric while allowing the yarn to show more of its natural drape.
Before wearing, check the shoulder seams, side seams, sleeve lengths, neckline, and cuffs one final time. The finished sweater should feel comfortable through the shoulders and armholes while maintaining the relaxed shape you chose at the beginning.