How to Crochet a Large Bucket Hat With Detailed Pattern
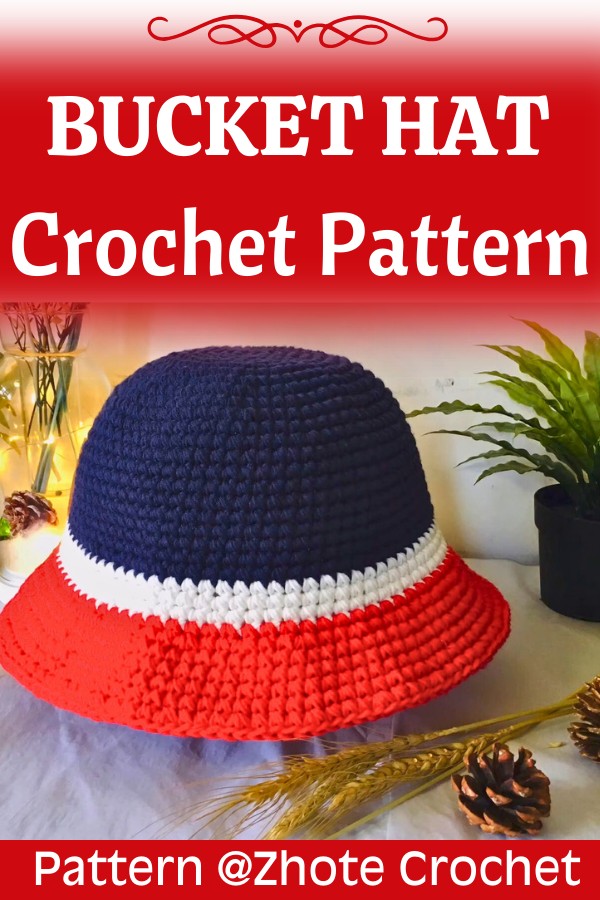
This stylish crochet bucket hat is a versatile accessory perfect for sunny days or as a trendy year-round statement piece.

A crochet bucket hat is a fun and functional accessory that anyone can enjoy. This bucket hat is lightweight, comfy, and perfect for shielding your face from the sun in style. You can personalize it with your favorite colors to complement your outfits or keep it simple for a timeless look. This crochet hat isn’t just practical, it’s a handmade piece you’ll be proud to wear.
Crochet Bucket Hat With Full Pattern
This crochet bucket hat pattern is designed to be beginner-friendly, requiring only basic crochet techniques. Using basic crochet stitches, you’ll create a crochet hat that’s both stylish and easy to make. You’ll love how simple it is to stitch together. You can even make multiple hats for family and friends; they’ll love the handmade touch.
Credit Nala Crochet
Key Features of This Pattern:
- Worked in the round using basic stitches—ideal for beginners and fun for experienced crocheters.
- Crown shaping is achieved through gradual increases.
- Wide brim created with strategic stitch increases for a flared look.
- Customizable fit with a simple stitch count adjustment.
- The hat can be adapted for different color combinations or textures to match your style.
The Overview:
If you’re ready to add a handmade twist to your wardrobe, this crochet bucket hat is a delightful pattern. Beginning from the top of the crown, the design grows outward in smooth, concentric rounds. Using simple stitches like single crochet or double crochet (common for beginner-friendly bucket hat patterns), the crown is shaped with even increases to achieve a rounded cap that hugs the top of your head comfortably.

Once the crown is complete, the sides are built with straight rounds—no increases here, which creates a neat vertical shape. This defines the “bucket” of the hat and allows lots of creative freedom. Are you envisioning a solid-tone classic look? Or perhaps a striped pattern to stand out? Either way, the choice is yours, and the pattern gives you plenty of room to experiment.

The star of the design is the wide brim, crocheted by working calculated stitch increases into each round. This creates that signature flared look bucket hats are known for. The brim can be customized to suit your style—keep it short for a subtle curve or extend it for extra shade and drama. Change the brim’s edge to include a finishing stitch like slip stitches or even a contrasting color for added personality.

Finally, the beauty of this pattern lies in its adaptability. You can take this base design and make it uniquely yours. Whether you add embellishments like appliques, embroidered designs, or even crochet flowers, this hat is an ideal blank canvas.

Video Tutorial
Materials & Preparation
-
Yarn: 5-Ply Milk Cotton Yarn (holding two strands together as one)
-
Hook: 5.0 mm
-
Other Tools: Stitch marker, scissors, tapestry needle, measuring tape
Part 1: The Crown (The Flat Top)
Worked in a continuous spiral. Place your stitch marker in the very first stitch of every round and move it up as you go.
Round 1
-
Stitch Pattern: Magic Ring (MR), chain 1 (does not count as a stitch), then work 7 single crochet (sc) stitches directly into the ring.
-
Step-by-Step:
-
Make a magic loop.
-
Pull up a loop and chain 1 to secure.
-
Work 7 sc into the ring.
-
Grab the yarn tail and pull it firmly to close the center hole tightly.
-
-
Stitch Count: 7 sts
Round 2
-
Stitch Pattern: Work an increase (inc) into every stitch around.
-
Step-by-Step:
-
Remove the marker, work 2 sc into the very first stitch of the previous round. Replace your marker in the first sc you just made.
-
Work 2 sc into each of the remaining 6 stitches.
-
-
Stitch Count: 14 sts
Round 3
-
Stitch Pattern: Repeat
[1 sc, 1 inc]7 times. -
Step-by-Step:
-
Work 1 sc in the first stitch.
-
Work 2 sc in the next stitch.
-
Repeat this sequence (1 sc, then 2 sc in the next) all the way around.
-
-
Stitch Count: 21 sts
Round 4
-
Stitch Pattern: Repeat
[2 sc, 1 inc]7 times. -
Step-by-Step:
-
Work 1 sc in each of the first 2 stitches.
-
Work 2 sc in the next stitch.
-
Repeat this sequence around.
-
-
Stitch Count: 28 sts
Round 5
-
Stitch Pattern: Repeat
[3 sc, 1 inc]7 times. -
Step-by-Step:
-
Work 1 sc in each of the first 3 stitches.
-
Work 2 sc in the next stitch.
-
Repeat this sequence around.
-
-
Stitch Count: 35 sts
Round 6 (Staggered)
Note: We split the first block of single crochets here (2 sc at the start, 2 sc at the end) to stagger the increases. This prevents the circle from growing straight corners and turning into a hexagon.
-
Stitch Pattern: 2 sc, 1 inc, then repeat
[4 sc, 1 inc]6 times, ending with 2 sc. -
Step-by-Step:
-
Work 1 sc in each of the first 2 stitches.
-
Work 2 sc in the next stitch (increase made).
-
Now, work 4 sc, then work an increase. Repeat this block 6 times.
-
Work 1 sc in each of the remaining 2 stitches to finish the round.
-
-
Stitch Count: 42 sts
Round 7
-
Stitch Pattern: Repeat
[5 sc, 1 inc]7 times. -
Step-by-Step:
-
Work 1 sc in each of the first 5 stitches.
-
Work 2 sc in the next stitch.
-
Repeat this sequence around.
-
-
Stitch Count: 49 sts
Round 8 (Staggered)
-
Stitch Pattern: 3 sc, 1 inc, then repeat
[6 sc, 1 inc]6 times, ending with 3 sc. -
Step-by-Step:
-
Work 1 sc in each of the first 3 stitches.
-
Work 2 sc in the next stitch.
-
Work 6 sc, then work an increase. Repeat this block 6 times.
-
Work 1 sc in each of the remaining 3 stitches.
-
-
Stitch Count: 56 sts
Round 9
-
Stitch Pattern: Repeat
[7 sc, 1 inc]7 times. -
Step-by-Step:
-
Work 1 sc in each of the first 7 stitches.
-
Work 2 sc in the next stitch.
-
Repeat this sequence around.
-
-
Stitch Count: 63 sts
-
Measurement Check: At this point, the radius of your flat circle should measure approximately 6.5 cm from the center to the edge.
Round 10
-
Stitch Pattern: Work 1 sc in every stitch around (no increases).
-
Stitch Count: 63 sts
Round 11 (Staggered)
-
Stitch Pattern: 4 sc, 1 inc, then repeat
[8 sc, 1 inc]6 times, ending with 4 sc. -
Step-by-Step:
-
Work 1 sc in each of the first 4 stitches.
-
Work 2 sc in the next stitch.
-
Work 8 sc, then work an increase. Repeat this block 6 times.
-
Work 1 sc in each of the remaining 4 stitches.
-
-
Stitch Count: 70 sts
Round 12
-
Stitch Pattern: Work 1 sc in every stitch around (no increases).
-
Stitch Count: 70 sts
Round 13
-
Stitch Pattern: Repeat
[9 sc, 1 inc]7 times. -
Step-by-Step:
-
Work 1 sc in each of the first 9 stitches.
-
Work 2 sc in the next stitch.
-
Repeat this sequence around.
-
-
Stitch Count: 77 sts
-
Measurement Check: The crown is now complete. The flat circle’s radius should measure 9 to 9.5 cm across (or up to 10 cm for an extra-large head).
Part 2: The Body (Side Walls & Stripes)
Rounds 14 to 21 (Main Color / Red)
-
Stitch Pattern: Work 1 sc in each stitch around for 8 consecutive rounds.
-
Instructions: Maintain your continuous spiral. Do not increase. This forms the downward curve of the hat.
-
Stitch Count: 77 sts per round
-
Transition: After completing Round 21, work a slip stitch (sl st) into the next stitch, pull the yarn through, cut it, and weave in the tail to create a clean join.
Round 22 (Color B / White)
-
Stitch Pattern: Join White yarn, chain 1, then work 1 sc in every stitch around.
-
Step-by-Step:
-
Insert your hook into any stitch from Round 21. Pull up a loop of your white yarn (remember to keep holding two strands together!).
-
Chain 1.
-
Work 1 sc in the same stitch, then work 1 sc in each stitch around.
-
Slip stitch to the very first sc of the round to join.
-
-
Stitch Count: 77 sts
Rounds 23 and 24 (Color B / White)
-
Stitch Pattern: Chain 1, work 1 sc in each stitch around, slip stitch to join.
-
Stitch Count: 77 sts per round
-
Transition: At the end of Round 24, slip stitch to join, fasten off, and cut the white yarn.
Rounds 25 and 26 (Main Color / Red)
-
Stitch Pattern: Join Red yarn, chain 1, work 1 sc in each stitch around, slip stitch to join.
-
Instructions: Repeat the same joining method used for the white stripe, working 2 total rounds in red.
-
Stitch Count: 77 sts per round
-
Measurement Check: The total height of the hat from the very center top of the crown down to the bottom of the red edge should be roughly 17 to 18 cm.
Part 3: The Brim (The Flare)
We transition back to working in a continuous spiral without slip stitch joins.
Round 27 (Brim Increase Round)
-
Stitch Pattern: Repeat
[2 sc, 1 inc]all the way around. -
Step-by-Step:
-
Work 1 sc in each of the first 2 stitches.
-
Work 2 sc in the next stitch.
-
Repeat this pattern around the entire edge. (Note: If the math doesn’t line up perfectly at the very end of this round, don’t worry—simply finish with normal single crochets).
-
-
Stitch Count: ~102 sts
Rounds 28 to 31 (Brim Even Rounds)
-
Stitch Pattern: Work 1 sc in each stitch around for 4 rounds (no increases).
-
Stitch Count: ~102 sts per round
Round 32 (Brim Final Flare Round)
-
Stitch Pattern: Repeat
[3 sc, 1 inc]all the way around. -
Step-by-Step:
-
Work 1 sc in each of the first 3 stitches.
-
Work 2 sc in the next stitch.
-
Repeat this pattern all the way around.
-
-
Stitch Count: ~127 sts
Finishing Touches
-
The Last Stitch: At the end of Round 32, slip stitch into the next stitch to smooth down the edge step.
-
Fasten Off: Cut your yarn, leaving a 15 cm tail. Pull the tail completely through the last loop.
-
Weave in Ends: Thread your tapestry needle with the leftover yarn tails. Weave them securely back and forth through the stitches on the inside of the hat to hide them and prevent them from unraveling. Trim any excess.