V-Neck Crochet Sweater Pattern for Children Ages 6–7
Create a classic V-neck crochet sweater for kids with shaped panels, roomy HDC sleeves, and textured ribbing that gives every edge a polished finish.
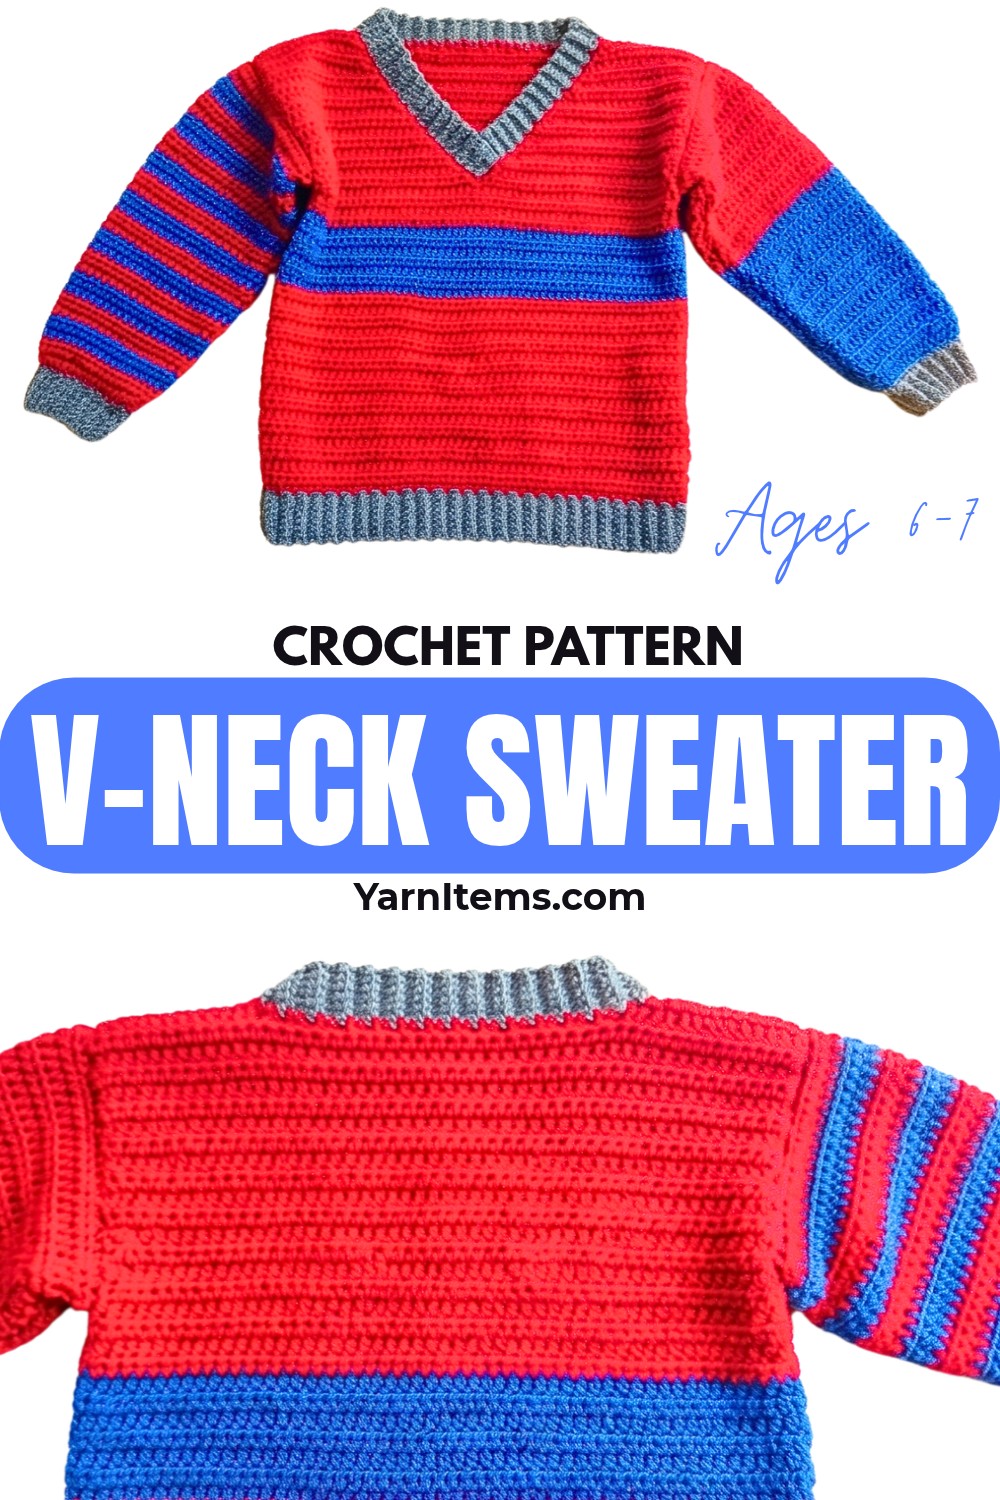
This V-neck crochet sweater is designed for a 6–7-year-old child, with simple HDC fabric forming front and back panels before shaped shoulders bring both sections together. Sleeves widen gradually toward their upper edge, while ribbing adds stretch and definition around cuffs, neckline, and hem.
The crochet pattern gives measurements for a 26-inch chest, with each front or back panel measuring about 13 inches wide. Starting chains can be adjusted to match half of a child’s chest measurement, making it easier to adapt width before shaping begins. Body and sleeve length can also be changed by adding or removing rows before decreases or increases start.
Credit Mom’s Crochet & Craft
Materials & Tools
- 3.50 mm crochet hook
- Yarn suitable for a 3.50 mm hook
- Maroon main color
- Contrasting colors for stripes and borders
- Tapestry or yarn needle
- Scissors
- Measuring tape
- Stitch markers
Tutorial is sized for a 6-7-year-old child, with target chest circumference of 26 inches and panel width of 13 inches.
Adjust Width Before Crocheting
For another size, measure the child’s chest circumference and divide the measurement in half. Use the resulting number as the target width for each front and back panel, then create a foundation chain long enough to reach that measurement.
Body length and sleeve length can also be changed by adding or removing rows before shaping begins.
Because front neckline shaping starts after main panel rows are complete, it helps to decide desired body length before reaching decrease section.
Abbreviations
Ch: Chain
St(s): Stitch(es)
SC: Single Crochet
HDC: Half Double Crochet
HDC2tog: Half Double Crochet Two Together
Sl St: Slip Stitch
BLO: Back Loop Only

Crochet Front Panel
Begin with ch 61.
Adding several extra chains at foundation stage can provide a little working room. Extra chains can be unraveled later once the correct width has been confirmed.
Foundation: Ch 61.
Row 1: Sk first ch, work 1 SC in each stitch across. (60 SC)
Starting with SC gives the bottom edge more stability and helps prevent excessive stretching compared with HDC fabric above.
Row 2: Ch 1, turn; work 1 HDC in first st and each st across. (60 HDC) Place final HDC between ch-1 and first SC of previous row.
Rows 3-29: REP Row 2; ch 1 does not count as a stitch. Panel should measure approximately 9.5 inches high from foundation.
Keep side edges straight throughout these rows. Consistent stitch placement matters here because neckline shaping depends on having an even 60-stitch panel.

Shape First Side of V-Neck
Mark the 30th stitch to identify panel center. First half will now form one side of V-neck.
Row 30: Ch 1, turn; HDC in first 28 sts, then HDC2tog across 29th and 30th sts to decrease by 1.
Row 31: Ch 1, turn; skip first st, then HDC across remaining stitches.
Row 32: Ch 1, turn; HDC until last 2 sts, HDC2tog across final 2 sts.
Rows 33–45: Alternate decrease methods from Rows 31 and 32, decreasing 1 stitch along neck edge on every row for 16 rows total; finish with exactly 14 sts for shoulder.
Neck-edge decreases create a diagonal V shape. Keep decreases on the correct edge rather than alternating sides accidentally, since shoulder width depends on finishing with 14 stitches.
Shape Second Side of V-Neck
Work opposite half from center marker.
Row 30: Join yarn at 30th stitch from opposite side; ch 1, HDC in next st and HDC across to end.
Row 31: Ch 1, turn; HDC across until final 2 sts at neck edge, HDC2tog.
Rows 32-45: Continue same neck-edge decrease method for 16 rows total, matching first side; finish with 14 sts for shoulder.
Compare both sides before moving forward. Diagonal edges should mirror each other, with matching shoulder widths.
Crochet Back Panel
Repeat front panel foundation and plain rows:
Foundation: Ch 61.
Row 1: Sk first ch, SC across. (60 SC)
Rows 2–43: Ch 1, turn; HDC across all stitches. Continue without neckline decreases.

Shape Back Shoulders
Row 44 – Shoulder 1: Ch 1, turn; HDC in first 13 sts, HDC2tog across 14th and 15th sts. (14 sts)
Row 45: Ch 1, turn; HDC in each of 14 sts; fasten off.
Row 44 – Shoulder 2: Count 15 sts inward from opposite edge and join yarn at 15th st; ch 1, HDC in next st and across to end.
Row 45: Ch 1, turn; HDC across until final 2 sts, HDC2tog across final 2 sts. (14 sts)
Both back shoulders should finish with 14 stitches, matching front shoulders for joining.
Shape Sleeves
Make 2 sleeves.
Foundation: Ch 41, creating a starting width of approximately 9 inches.
Row 1: Sk first 2 chains; HDC in 3rd ch from hook and each ch across. (39 HDC)
Row 2: Ch 1, turn; 2 HDC in first st, HDC across to final st, 2 HDC in final st. (41 HDC)
Rows 3–29: Continue HDC rows, increasing by 2 stitches on every 4th row by placing 2 HDC in the first and last stitches; by Row 29, upper sleeve width should measure approximately 10.5 inches.
Mark increase rows as you work if needed. Both sleeve pieces should receive identical increases so upper edges remain symmetrical when attached.
Join Front and Back Shoulders
Place front and back panels together with right sides facing inward.
Shoulders: Slip stitch 14 front shoulder stitches to corresponding 14 back shoulder stitches on both sides.
Keep stitch pairs aligned from first stitch through final stitch. Matching these sections evenly helps the neckline sit centrally after turning the sweater right side out.

Attach Sleeve
Find the exact center stitch along the top edge of each sleeve and align it with the corresponding shoulder seam.
Pin sleeve along armhole, stretching sleeve 18 rows down front panel and 18 rows down back panel.
Join sleeve to body using slip stitches.
Repeat same alignment process for second sleeve. Stitch markers placed at sleeve center and armhole ends can help maintain even placement while joining.
Close Side and Underarm Seams
Keep sweater inside out and fold body in half.
Side & Underarm Seams: Starting at bottom hem, slip stitch front and back side edges together continuously upward through underarm, then continue down sleeve toward cuff.
Place stitch markers periodically along edges so corresponding rows stay aligned.
Check sleeve and body rows as you work. Matching row positions prevents twisting and keeps side seam visually straight.
Shape Sleeve Cuffs
Attach yarn around sleeve cuff edge.
Base Round: Ch 1; 1 SC in next 3 spaces, skip 1 space, 1 SC in next 3 spaces, skip 1 space; REP around cuff; SL ST to join.
This decrease sequence gently narrows cuff circumference before ribbing begins.
Cuff Ribbing
Ribbing Row 1: Ch 7; sk first ch, SC in next 6 chains; SL ST into next 2 sts along cuff edge; turn.
Ribbing Row 2: Skip 2 SL STs; BLO SC in 6 sts; ch 1, turn.
Ribbing Row 3: BLO SC in 6 sts; SL ST into next 2 sts along cuff; turn.
Continuation: REP Rows 2–3 around entire cuff; SL ST or sew first and final ribbing rows together to close cuff.
BLO stitches create raised horizontal ribs. Keep tension even because tighter ribbing will make cuff opening smaller.
Repeat for second sleeve.
Add V-Neck Collar
Join main body color at shoulder seam or center V so foundation join can remain discreet.
Base Round: Ch 1; work SC evenly around neckline, using roughly 28 SC down one front V side, 1 SC at shoulder seam, 3 SC along back edge, SC across back while skipping 1 stitch after every 4th SC to cinch back neckline, 3 SC along opposite back edge, 1 SC at shoulder seam, and 28 SC down opposite V side; SL ST to join.
Even spacing matters more than forcing an identical number into every section. Back-edge skips help neckline sit closer to body rather than falling too loosely.
V-Neck Ribbing
Join ribbing color.
Ribbing Row 1: Ch 6; sk first ch, SC in next 5 chains; SL ST into next 2 sts along collar edge; turn.
Ribbing Row 2: Skip 2 SL STs; BLO SC in 5 sts; ch 1, turn.
Ribbing Row 3: BLO SC in 5 sts; SL ST into next 2 sts along collar edge; turn.
Continuation: REP Rows 2–3 around entire neckline.
At center V, sew overlapping ribbing ends together neatly with tapestry needle. Keep joining stitches secure but flat so crossover does not become bulky.

Finish Bottom Hem
Bottom border is worked separately across front and back panels to avoid creating bulky joining seam.
Front Hem Ribbing
Join yarn at bottom corner of front panel.
Ribbing Row 1: Ch 8; sk first ch, SC in next 7 chains; SL ST into next 2 sts along bottom edge; turn.
Ribbing Row 2: Skip 2 SL STs; work BLO SC across ribbing stitches; continue following same ribbing method across front panel.
Continuation: Repeat BLO SC ribbing sections across entire front bottom edge; fasten off.
Back Hem Ribbing
Repeat same process along back panel, beginning at bottom corner and working ribbing across entire edge.
Once both sections are complete, sew front and back ribbing side ends together with tapestry needle. This joins hem edges cleanly while avoiding extra thickness along middle joining area.
Final Finishing
Secure all remaining yarn ends with tapestry needle, working tails into wrong side of sweater before trimming excess.
Turn sweater right side out and check:
- Both shoulders are joined evenly.
- Sleeve centers align with shoulder seams.
- Side seams run straight through underarms.
- V-neck crossover lies neatly at center.
- Cuffs match in width and length.
- Bottom ribbing sits evenly around body.
Once borders are sewn closed and loose ends are secured, sweater is ready to wear.

A Quick Fit Check Before Finishing
For sample sizing, front and back panels target approximately 13 inches each, giving approximately 26 inches around chest when joined.
If adapting sizing, measure chest width before beginning neckline shaping. For longer or shorter garments, adjust plain body rows before shaping begins. Sleeve length can likewise be changed before sleeve shaping reaches its final row.
These checks are especially useful because shoulder, sleeve, and neckline proportions all depend on panel dimensions. Matching measurements early makes final joining much easier.