Lily of the Valley Crochet Flower Bouquet Blanket Pattern
Here’s a floral crochet border that transforms a simple circle with leafy V-stitches and dimensional Lily of the Valley flowers.

A simple circular crochet base takes on a completely different character once the green V-stitch round and dimensional Lily of the Valley flowers are added around its edge. The crochet flowers form small raised cups with a ruffled rim, giving the border texture that stands out rather than sitting flat against the base.
This crochet pattern also gives you a useful stopping point: finish the base at Round 5 for a small coaster, or continue the established increase pattern toward a larger blanket base. Once you reach the green border, the V-stitches create the spaces where the flowers are built, so keeping those spaces easy to identify will make the floral edging much easier to follow.
Credit Diy crochet-crosia
Choose Your Finished Size First
The base is designed to give you two clear options before the floral border begins.
- Small Coaster: Stop the base pattern at Round 5 for a small coaster size.
- Large Blanket: Continue the established base increase pattern up to 26 rows, approximately 12 inches / 30 cm from the middle, for a larger blanket base.
- Flower Colors: Keep the flowers in one color or change shades around the border. Using a different color for every flower creates a rainbow bouquet effect.
The important point is to complete the desired size of the circular base before moving on to the green border.
Materials & Tools Needed
- Yarn: Medium weight (4-ply) wool yarn in a base color, green for the leaves/stems, and a flower color such as white, pink, or yellow
- Hook: 4.0 mm crochet hook
- Additional Tools: Scissors and a yarn needle for weaving in ends
Pattern Abbreviations
- ch = Chain
- dc = Double Crochet
- sl st = Slip Stitch
- v-st = V-Stitch – 1 dc, ch 1, 1 dc worked into the same stitch
- cl = Cluster / dc3tog – yarn over, insert hook, pull up loop, yarn over, pull through 2 loops; repeat this 3 times in the same space until 4 loops are on the hook, then yarn over and pull through all loops
- st(s) = Stitch(es)
- inc = Increase – 2 dc worked into the same stitch

Step-by-Step Crochet Pattern
The Base – Coaster or Blanket
Start with your chosen base color yarn.
The first five rounds establish the circular base through regular increases. If you are making the coaster, Round 5 is your stopping point. If you want a larger blanket base, keep following the same increase rhythm rather than changing the established pattern.
Round 1: Make a magic circle (alternatively, ch 5 and sl st to the first ch to form a ring). Ch 3 (this counts as your first dc). Work 11 dc into the circle. Join with a sl st to the top of the beginning ch 3. (Stitch Count: 12 dc)
Round 2: Ch 3. Work 1 dc in the same joining st. Work 2 dc in every st around. Join with a sl st to the top of the beginning ch 3. (Stitch Count: 24 dc)
Round 3: Ch 2 (this does not count as a st moving forward). Work 2 dc in the same st. Work 1 dc in the next st. Work 2 dc in the next st, 1 dc in the next st. Repeat from * around. Join with a sl st to the first true dc. (Stitch Count: 36 dc)
Round 4: Ch 2. Work 2 dc in the same st. Work 1 dc in each of the next 2 sts. Work 2 dc in the next st, 1 dc in each of the next 2 sts. Repeat from * around. Join with a sl st to the first dc. (Stitch Count: 48 dc)
Round 5: Ch 2. Work 2 dc in the same st. Work 1 dc in each of the next 3 sts. Work 2 dc in the next st, 1 dc in each of the next 3 sts. Repeat from * around. Join with a sl st to the first dc. (Stitch Count: 60 dc)

If You Want the Larger Blanket Base
Continue the same increase pattern for additional rounds. Round 6 would use an increase followed by 1 dc in the next 4 sts; Round 7 would use an increase followed by 1 dc in the next 5 sts, and so on.
Continue until you reach your desired dimensions. The supplied pattern gives 26 rows, approximately 12 inches / 30 cm from the middle, as a larger blanket-base option.
Base check: The important pattern change is the number of regular dc stitches between increases. As the rounds grow, that spacing increases by one stitch each round.
Green Part – The Leaves
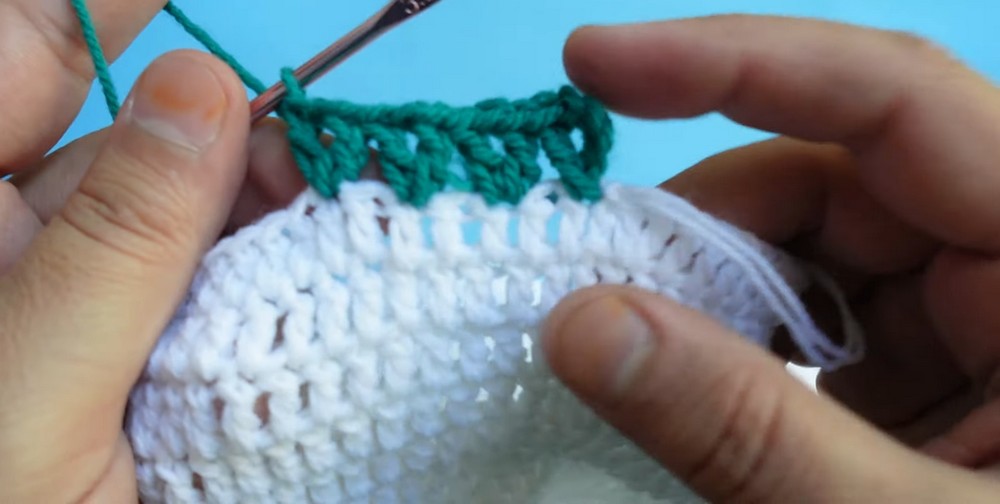
Fasten off the base color and attach the green yarn to any stitch on the edge.
This round creates the V-stitch spaces that will later hold the flowers. For the Round 5 coaster base, the 60 dc stitches become 30 V-stitches, with each V-stitch formed over the space created by two base stitches.
Round 6: Ch 4 (this counts as 1 dc and a ch 1 space). Work 1 dc in the exact same st to complete your first v-st. Skip the next dc st. In the next st, work a v-st (1 dc, ch 1, 1 dc). Repeat from * around. Join with a sl st to the 3rd chain of the beginning ch 4. (Stitch Count: 30 v-sts for the Round 5 coaster size)
Where the Flowers Go
The middle ch-1 space of each V-stitch is the working space for a flower. This gives you a clear visual guide for the floral border: rather than searching for individual base stitches, look for the small open space in each green V.
For the coaster size, the flower pattern skips two V-stitches and begins the next flower in the third V-stitch, creating 10 evenly spaced flowers around the edge.
Flower Part – Lily of the Valley
Fasten off the green yarn and attach your flower color yarn into the middle ch-1 space of any green V-stitch.
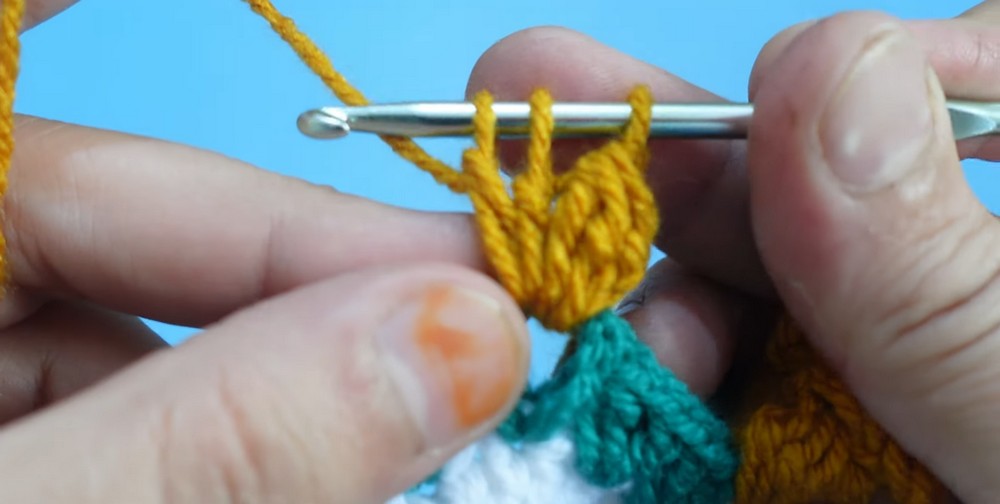
The flower is made inside one V-stitch space. Five clusters are first built there, then the active loop is pulled through the top of the first petal to gather them into a raised cup.
Step 1: Ch 2. In the same v-st space, work a cluster (dc3tog). The initial ch-2 and this cluster count as your first flower petal.
Step 2: Work 4 more identical clusters in the exact same v-st space. You will now have 5 clusters total inside the single v-st.
Step 3: Remove your hook from the active loop. Insert the hook into the top of the very first petal you made, grab the dropped active loop from the 5th petal, and pull it tightly through. This pulls the petals together into a 3D cup/popcorn shape. Ch 1 to secure it.
Step 4 – Flower Edging: Ch 3, sl st into the top of the first cluster. Ch 3, sl st into the top of the next cluster. Repeat this around the top edge of the flower to create a ruffled, bell-like rim, making approximately 5 to 6 small ch-3 loops. Sl st to finish the flower.
Flower shape check: After pulling the fifth petal through the first, the five clusters should gather into a raised cup rather than remaining spread flat. The ch-3 loops then form the small ruffled edge around that cup.
Step 5: Skip the next 2 v-sts. In the 3rd v-st space, begin your next flower by making 5 clusters, joining them into a cup, and adding the ch-3 edges. Repeat this process around the entire border. For the coaster size, you will have 10 flowers evenly spaced around the edge.
Keep the Flower Spacing Consistent
Once the first flower is complete, the repeated instruction is simple: skip two V-stitches, then use the third V-stitch for the next flower.
That spacing is what keeps the flowers distributed around the circular edge rather than crowding together. If you are working the coaster size, use the 10-flower count as a useful check as you move around the border.
Finishing the Piece
This design does not require separate sewn-together pieces. The green border is crocheted directly onto the circular base, and each flower is worked directly into a green V-stitch space.
Once the final flower is complete, fasten off securely. Use your yarn needle to carefully weave all loose ends into the back (wrong side) of the work so the finished piece remains clean and tidy.
There is no additional sewing or piecing required.
Color Ideas for the Floral Border
The structure stays the same even when you change the flower colors, so this is an easy place to personalize the finished piece.
You can keep all the flowers in one shade for a coordinated border, alternate two colors for a patterned edge, or change the color at every flower to create a rainbow bouquet effect.