Crochet Granny Square Top Pattern – Puff, Cluster & Bobble Detail
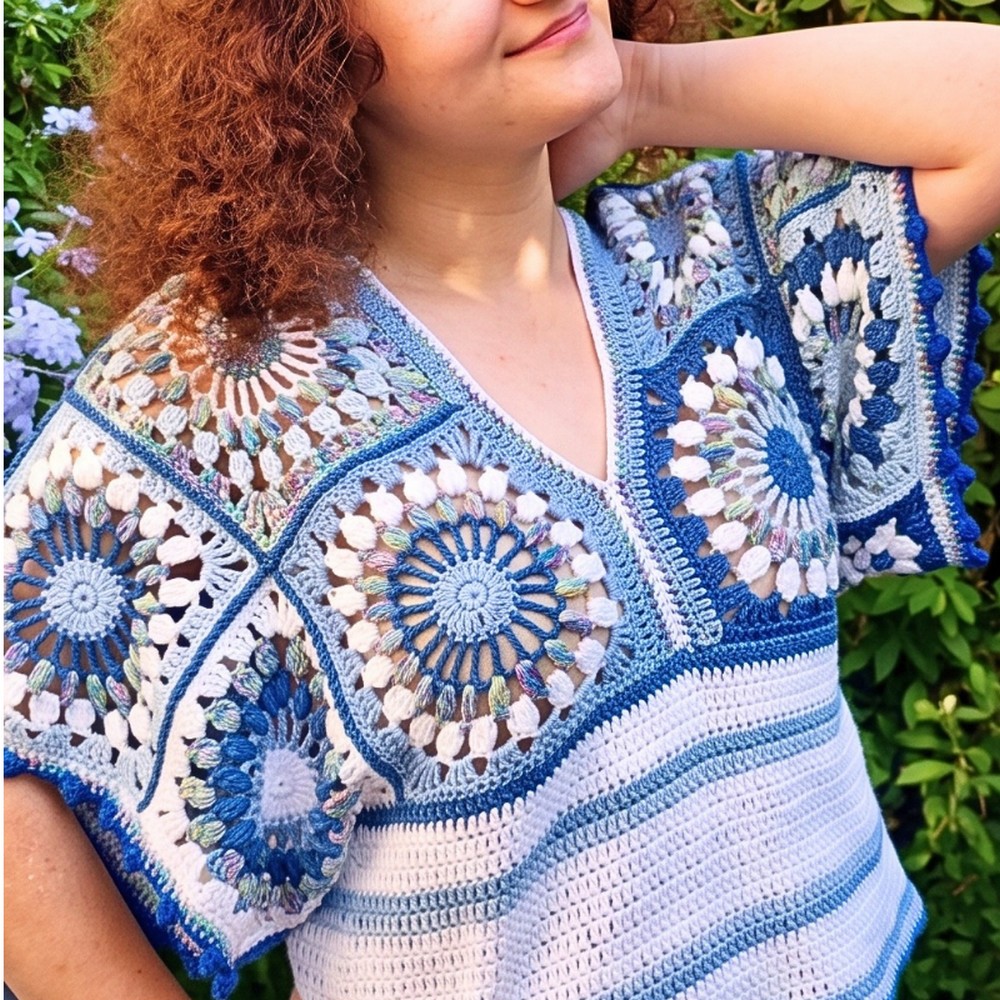
This crochet granny square top combines puff-and-cluster texture with playful bobble sleeves, while its center shaping lets you adjust the fit around your bust.
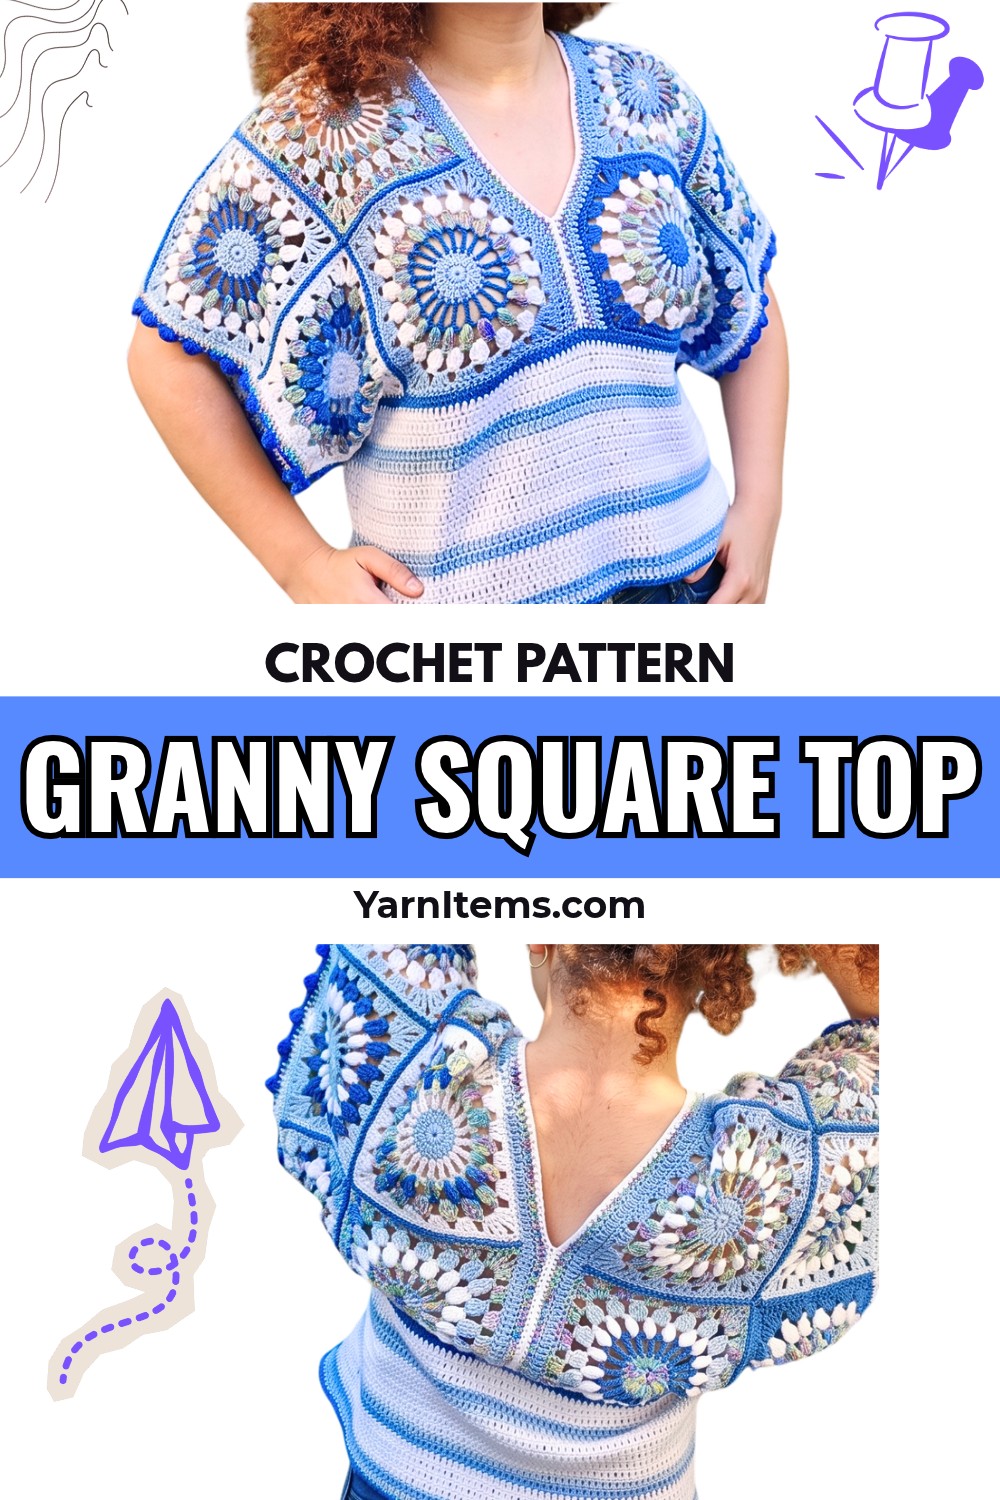
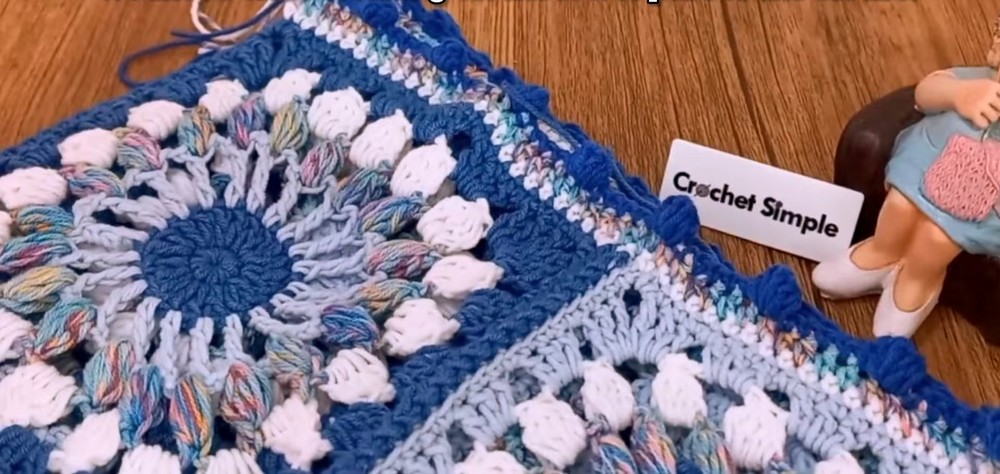
Texture is what makes this crochet granny square top stand out: each square moves from a simple center through treble stitches, puff stitches, and clusters before opening into a clean four-corner shape. Once the squares are joined, the same decorative joining stitch continues through the garment, while bobbles give the crochet sleeves a soft, playful edge.
The sample uses 16 identical squares in a 4×4 arrangement for an approximately 88 cm (34.5-inch) bust. You can adjust the fit through the center seams and underarm placement, and the lower edge can stay cropped or continue into a longer blouse. The tutorial below starts with one complete square, then follows the exact order needed to turn the finished crochet squares into the wearable top.
Credit Simple Crochet
Materials & Tools
- Yarn: YarnArt Jeans or a similar lightweight yarn such as Alize Cotton Gold, Kartopu, or Gazzal
- A cotton or bamboo blend is recommended for a cool, breathable top
- 3.5 mm crochet hook (US E/4)
- Yarn needle
- Scissors
- Stitch markers
- Measuring tape
Size & Fit Planning
The demonstrated top uses 16 identical granny squares arranged in a 4×4 grid, with 8 squares forming the front and 8 forming the back.
The sample is designed around an 88 cm (34.5-inch) bust. The joined-square width establishes the starting size, while additional rows along the center seams can provide more room through the body.
When adjusting the fit, approximately 2–3 cm can be borrowed from the underarm/sleeve squares to bring the garment more comfortably around the torso.
The lower length is also flexible. Keep the edging around 15–20 cm for a longer blouse, or stop sooner for a shorter crop-top shape.
For a seasonal color change, alternating orange, black, and purple squares can give the same design a Halloween-inspired appearance.
Pattern Abbreviations
- MR: Magic Ring
- ch: Chain
- sc: Single Crochet
- hdc: Half Double Crochet
- dc: Double Crochet
- tr: Treble Crochet
- sl st: Slip Stitch
- sp: Space
- BLO: Back Loop Only
- Puff st: Yarn over, insert hook into the stitch, pull up a loop; repeat 5 times in the same stitch, pull through all loops on the hook, then ch 1 to secure. The securing ch 1 counts as part of the puff stitch.
- dc4tog: 4-dc cluster worked in one space. Yarn over, insert hook into the space, pull up a loop, and pull through 2 loops, leaving the final loop on the hook. Repeat 3 more times in the same space, then yarn over and pull through all 5 loops.
- 5-dc Bobble: Work 5 partial double crochets in the same stitch, leaving the final loop from each on the hook, then yarn over and pull through all 6 loops.
Make the Granny Squares
Make 16 identical squares. If you change colors between rounds, weave in each end securely as you finish that round so the squares are ready for assembly later.
Center
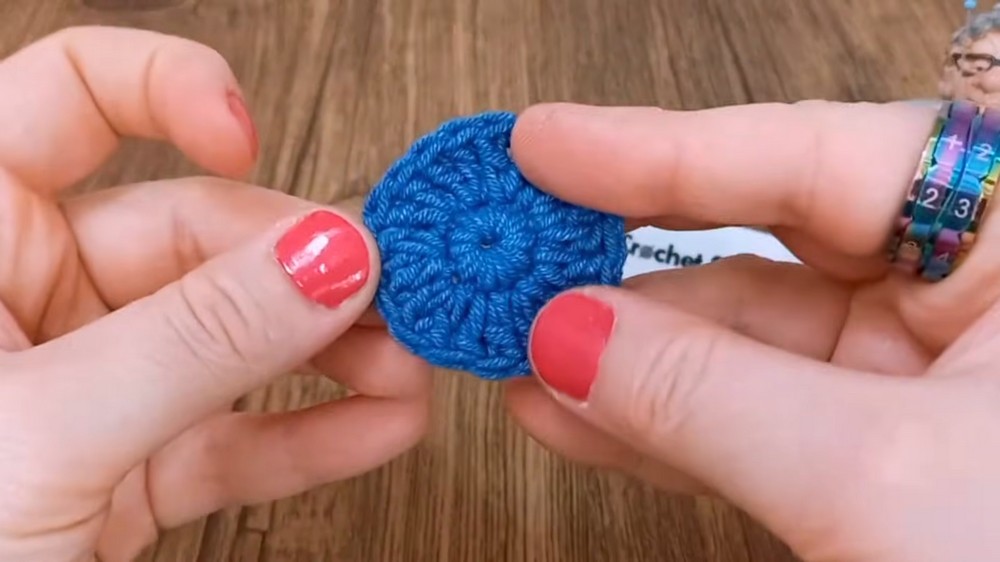
Round 1: Ch 4 and sl st into the first ch to form a ring, or begin with an MR; ch 1; work 10 sc into the ring; sl st to the first sc to join; pull the starting tail firmly to close the center hole. (10 sc)
Keep this first circle reasonably flat. It will become the center from which the later textured rounds expand.
Double Crochet Expansion
Round 2: Ch 2, which does not count as a stitch; work 2 dc in the first st, the same stitch where the round joined; work 2 dc in every remaining st around; sl st to the first dc to join; fasten off and use an invisible join with a yarn needle. (20 dc)
The doubled stitches expand the small center evenly. Before moving on, check that the round lies flat rather than forming a cup.
Treble Texture
Attach new yarn to any stitch.
Round 3: Ch 4, counting as the first tr, or use a standing tr; ch 2; repeat [1 tr in the next st, ch 2] around; sl st to the top of the first tr to join; fasten off. (20 tr, 20 ch-2 spaces)
The important feature here is the spaces between the treble stitches. Those spaces become the working locations for the puff stitches in the following round.
Puff Stitches
Attach new yarn to any ch-2 space.
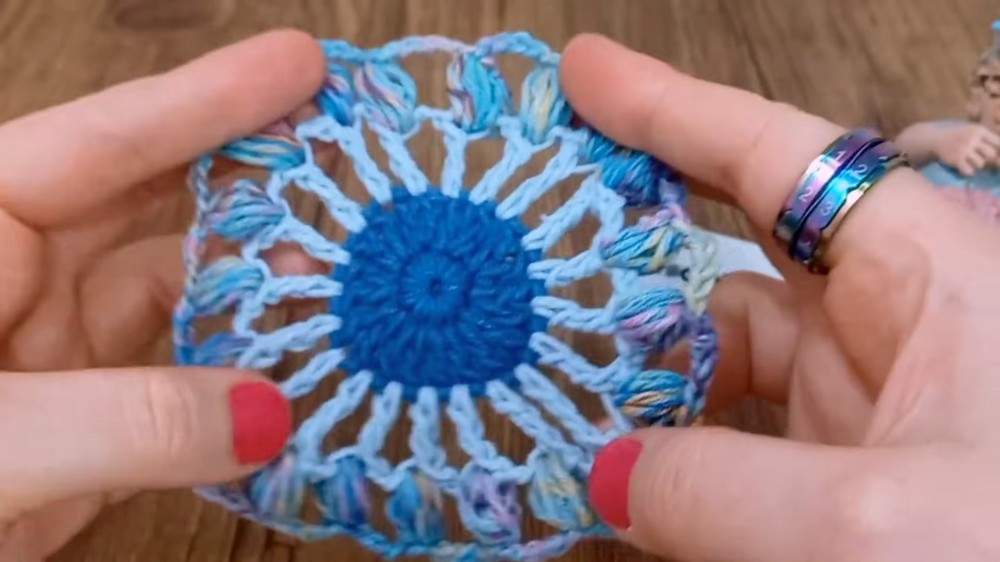
Round 4: Work 1 Puff st in the space, ch 3; repeat [1 Puff st in the next space, ch 3] around; sl st to the top of the first Puff st to join; fasten off. (20 Puff sts, 20 ch-3 spaces)
Keep the puff stitches sitting outward rather than pulling them tightly into the previous round. Their raised texture should remain visible.
Cluster Texture
Attach new yarn to any ch-3 space.
Round 5: Work 1 dc4tog cluster in the space, ch 4; repeat [1 dc4tog cluster in the next ch-3 space, ch 4] around; sl st to the top of the first cluster to join; fasten off. (20 clusters, 20 ch-4 spaces)
At this point, the motif is still circular. The larger ch-4 spaces provide the room needed to turn that circle into a square in the next round.
Square Off the Motif
Attach new yarn to any ch-4 space.
Round 6: In the corner space, work (1 dc, 2 tr, ch 2, 2 tr, 1 dc), ch 1; along the side, work [(3 dc, ch 1) x4]; in the next corner space, work (1 dc, 2 tr, ch 2, 2 tr, 1 dc), ch 1; repeat the side-and-corner sequence around; sl st to the first dc to join. Each side has 18 sts and 5 ch-1 spaces, plus the 4 corner ch-2 spaces.
The tall stitches in the corner groups create the four corners, while the four 3-dc blocks along each side fill the space between them. Check that all four corners are equally defined before starting the final round.
Stabilize the Square
Move with sl sts to a corner ch-2 space.
Round 7: Ch 1; work (1 sc, ch 2, 1 sc) in the corner space; work 1 sc in every stitch and every ch-1 space across the side; in the next corner ch-2 space, work (1 sc, ch 2, 1 sc); repeat around all 4 sides; sl st to the first sc to join; fasten off and weave in the end. (25 sc between the corner ch-2 spaces per side)
The final round gives the motif a consistent outer edge for joining.
Block Before Joining
Block all 16 squares before assembling the top.
Make sure every square is completely flat and matches the others in width and height. This step matters because even small differences between squares become much more noticeable once several motifs are joined together.
Join the 16 Squares
Arrange the squares into a 4×4 grid, with 4 squares across and 4 squares tall. According to the supplied arrangement, the right 8 squares form the front and right sleeve, while the left 8 form the back and left sleeve.
Lay the squares out before joining so you can check the color placement and orientation.
Decorative Square Seams
Place two squares with their wrong sides facing each other.
Insert the hook into the BLO of the second chain of the corner space on both squares. Pull up a loop and ch 1.
Then repeat across the joining edge: insert the hook through the BLO of the next stitch on the front square and the matching stitch on the back square, yarn over, pull through all loops as a slip stitch, then ch 1.
Continue this [sl st, ch 1] joining method across the edge.
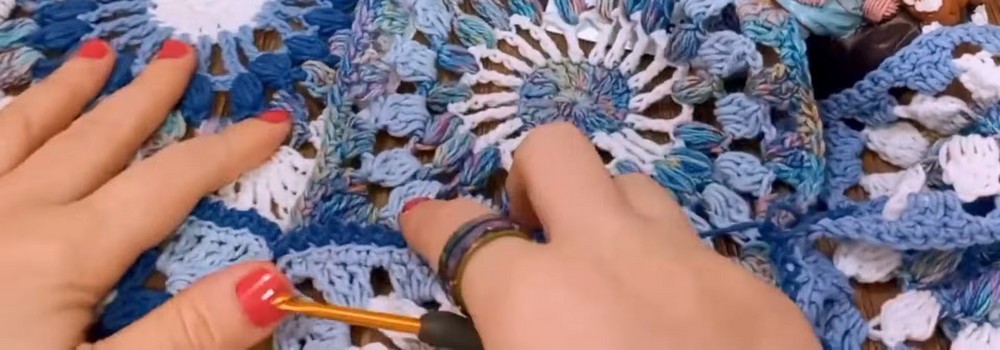
Join the vertical and horizontal seams in the same manner. Keep the top center seam open for the neckline.
The repeated ch-1 sections give the seams a visible decorative texture rather than making them disappear completely.
Adjust the Bust and Neckline
If the joined squares need additional width through the center of the body, add rows along the center edges before closing the top shoulder seams.
Row 1: Attach yarn to the top corner of the neckline edge; ch 3; work 1 dc in every stitch down the edge, including 1 dc through each joining seam.
Row 2: Turn; ch 1; work 1 hdc in every st across.
Row 3: Turn; ch 1; work 1 sc in every st across.
Repeat Rows 1–3 for the opposite center panel.
This added section lets you increase the space through the center without changing the size of the individual granny squares.
Once the desired width is reached, fold the top at the shoulders and match the front and back panels. Sew or slip stitch the shoulder seams together, stopping at the point that gives you the neckline opening you want.
Finish the Sleeves
The sleeve edging uses a bobble round worked from the wrong side so that the raised bobbles appear on the outside.
Round 1: Attach yarn at the underarm edge; ch 1; work 1 sc evenly around the entire armhole; sl st to join; fasten off.
Round 2: Attach a new color; ch 1; work 1 hdc in each st around; sl st to join.
Round 3: Turn the work so you are crocheting from the wrong side; ch 1; repeat [1 sc in the next 5 sts, 1 5-dc Bobble in the next st, sl st tightly into that same st] around the sleeve; sl st to join and fasten off.
Working this final round from the wrong side is what pushes the bobbles outward toward the visible side of the sleeve.
Shape the Underarms and Body
Before beginning the lower body, measure the bust around the wearer.
Use a stitch marker to mark a point 2–3 cm inward from the sleeve edge on the underarm area. This small amount of width is borrowed from the sleeve section so the joined front and back sit more comfortably around the torso.
Seam the underarm from this marker upward to the sleeve edge.
Once both underarms are positioned, begin the lower body.
Body Round 1: Attach yarn at the bottom edge marker; ch 3, counting as 1 dc; work 1 dc in every stitch around the entire bottom edge, including 1 dc through all connecting seams; sl st to join.
Following Rounds: Continue working dc rounds for approximately 15–20 cm, or stop once the top reaches your preferred length. Change colors every few rounds if you want a striped lower section.
Final Edge: Finish the bottom hem with the same [sl st, ch 1] decorative stitch used for the square seams.
The lower section can therefore remain short for a crop-top silhouette or continue downward for a longer blouse.
Before weaving in the last ends, try the garment on and check the neckline, bust width, sleeve opening, and overall length. Make any fit adjustments while the relevant area is still accessible rather than relying on blocking to change the size.