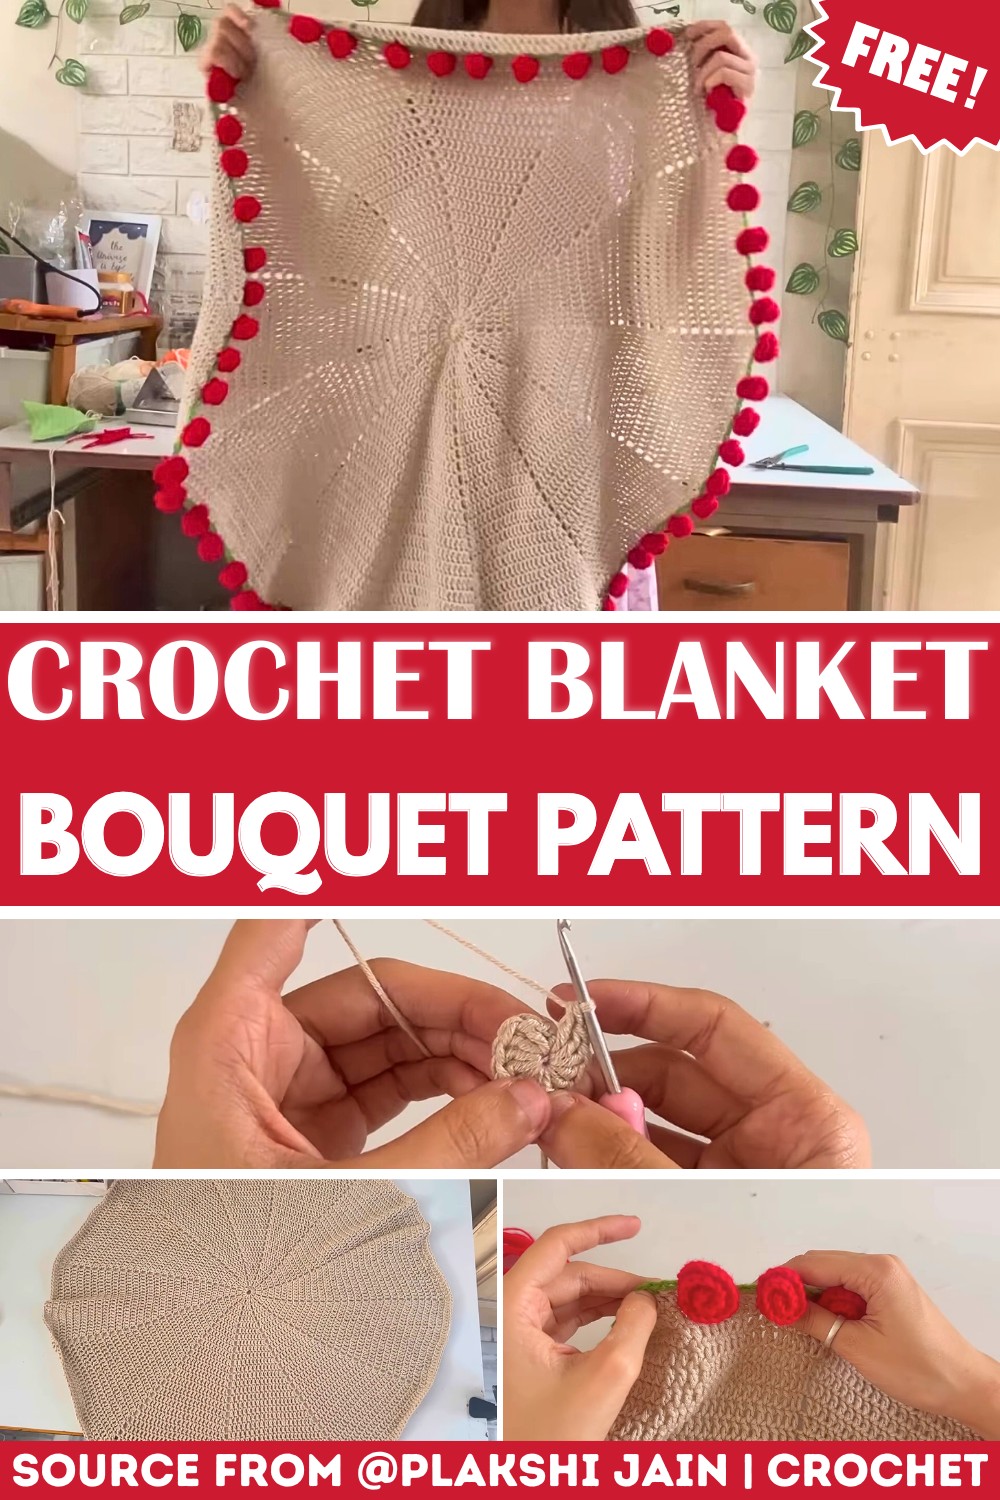
This beautiful blanket combines vibrant blooms and lush texture, creating a cozy bouquet you’ll love to display in your home or gift to someone special.

A Crochet Blanket Bouquet is more than just a blanket; it’s a soft and decorative masterpiece filled with colorful roses stitched around the edges. This design combines the warmth of a cozy blanket with the charm of a flower bouquet. It’s perfect for adding a cheerful, creative touch to your home or gifting to someone special as a heartfelt gesture.
Crochet Blanket Bouquet
What sets this blanket apart is its unique combination of a classic crochet base with bright green and red accents to resemble leaves and roses. It’s surprisingly simple to make, even for beginners, thanks to basic crochet techniques and clear explanations. The blanket’s design allows you to adjust the size and customize the colors, making it versatile enough for any space or occasion.
If you display it on a couch, drape it over a bed, or use it to keep warm, this blanket is as functional as it is beautiful. Beginners will love learning how to crochet roses and seeing their hard work come to life in this creative design.
Credit Plakshi Jain | Crochet
Key Features & Construction
- Main Design: A circular blanket, worked from the center outward, featuring expanding rounds of double crochet.
- Green Border: A lattice-like green edging crocheted with single crochets and chains to create a subtle framing effect.
- Rose Embellishments: 3D crocheted roses are strategically placed along the border, adding charm and visual interest.
- Materials: Made using polyester-viscose yarn (or cotton/acrylic alternatives) with a 3–3.5 mm crochet hook.
- Skill Development: Introduces beginners to foundational techniques, such as magic rings, double crochets, slip stitches, and chains, while also offering creative assembly methods for experienced crocheters.
Expanded Overview
This pattern begins with a classic magic ring, setting up a beautifully tight center for the blanket. Using double crochet stitches, you’ll work in the round, continuously increasing to form a smooth circular shape. Each round builds on the last, creating a layered texture that transitions seamlessly. You’ll repeat the increase pattern until your blanket reaches the desired size, making it easy to customize based on your preferences.

Once the main body of the blanket is complete, you’ll add a decorative green border. This section introduces a rhythm of single crochet stitches spaced by small chain loops, creating a delicate lattice-like effect. This border adds color contrast and provides an elegant base for the finishing touches.

The highlight of this design is the 3D crocheted roses, which give the blanket a bold and unique look. Each rose is created separately by making a simple chain of 14 stitches and working clusters of double crochets back along the chain. This technique naturally curls into a flower shape, creating a gorgeous spiral texture. You’ll then attach each rose to the green border, alternating positions to achieve balance and symmetry.

The combination of the circular blanket, vibrant green edge, and lush red roses creates a visually stunning piece that truly resembles a bouquet. Despite its intricate appearance, the steps are simple enough for beginners, making this a rewarding pattern for anyone who’s ready to try something decorative and three-dimensional.

Video Tutorial
Step-by-Step Pattern
Materials
To create the “Crochet Blanket Bouquet,” you’ll need the following:
- Yarn:
- Primary color: Polyester-viscose yarn (or any medium-weight yarn like cotton or acrylic)
- Green yarn for leaves
- Red yarn for roses
- Hook Size:
- 3 mm or 3.5 mm crochet hook
- Optional Tools:
- Scissors
- Tapestry needle for weaving in ends
- Stitch markers for keeping track of your rounds
Pattern Instructions
Step 1: Create the Center of the Blanket (Rounds of Double Crochets)
- Start With a Magic Ring:
Make a magic ring and secure it with a slip knot. - Chain and Work Into the Ring:
- Chain 2 to secure the magic ring.
- Work 12 double crochets (dc) into the ring.
- Pull the tail to close the ring, and you’ll have a circle.
- Close With a Slip Stitch:
Once the 12 double crochets are complete, join the round with a slip stitch into the top of the chain. - Begin Round 2:
- Chain 2, then make 2 double crochets into each stitch.
- Chain 1, skip the following stitch, and continue working 2 double crochets into the next.
- Repeat this pattern until the round is complete. Join with a slip stitch.
- Repeat Rounds:
- Continue the increase pattern for subsequent rounds:
- Round 3: Work 1 double crochet into the first stitch and 2 double crochets into the second. Chain 1 and repeat the sequence around.
- Round 4 and beyond: Increase by one double crochet between every increase (i.e., 1 double crochet, 1 double crochet, 2 doubles in the next stitch). Continue until your blanket reaches the desired diameter.
- Continue the increase pattern for subsequent rounds:
- Switch to Green Yarn:
- After completing the main body, begin a round with green yarn.
- Insert your hook into any stitch, join the green yarn with a slip stitch, and chain 1.
- Work single crochets (sc) evenly along the round, chaining 2 between every group of stitches. Skip 2 stitches for each chain space.
Step 2: Create the Roses
- Form the Base of the Flowers:
- Take the red yarn and attach it to any stitch from the green round (within the single crochet spaces).
- Work a 14-chain loop connected by slip stitches in the base chain spaces.
- Create Petals:
- In the first chain of the loop, make 3 double crochets.
- Repeat this in every chain along the row to create the petals. The stitched petals will curl naturally to form a rose shape.
- Secure the Rose:
- To finish the rose, fold the petal row into a spiral. Sew the overlapping layers together from the back.
- Repeat for Additional Roses:
Continue placing roses intermittently across the green round, skipping spaces to leave gaps.
Step 3: Finishing Touches
- Border (Optional):
Create a decorative border using the green yarn and your preferred edging technique (e.g., scallops or picots). - Fasten Off & Clean Up:
- Secure all remaining ends and use your tapestry needle to weave them in.
- Trim any excess yarn cleanly.
Troubleshooting and Suggestions
Common Challenges:
- Magic Ring Struggles: If the magic ring feels tricky to work with, start with a chain-4 loop and substitute it for the ring. Though it won’t be as tight, it will still work.
- Counting Errors: Keeping track of double crochet increases is crucial for maintaining a flat circle. Use stitch markers to mark the first stitch of each round for clarity.
- Rose Shape Flattening: If your roses don’t curl naturally, ensure your tension is consistent, and avoid skipping stitches when making double crochets along the chain.
Creative Twist Ideas:
- Color Variations: Experiment with pastel shades for a springtime feel or try bold jewel tones for a statement piece.
- Alternative Uses: Transform the pattern into a table centerpiece, a wall hanging, or even a round pillow by adjusting the size.
- Extra Embellishments: Add leaves to accompany the roses or use beads in the flower centers for added sparkle.