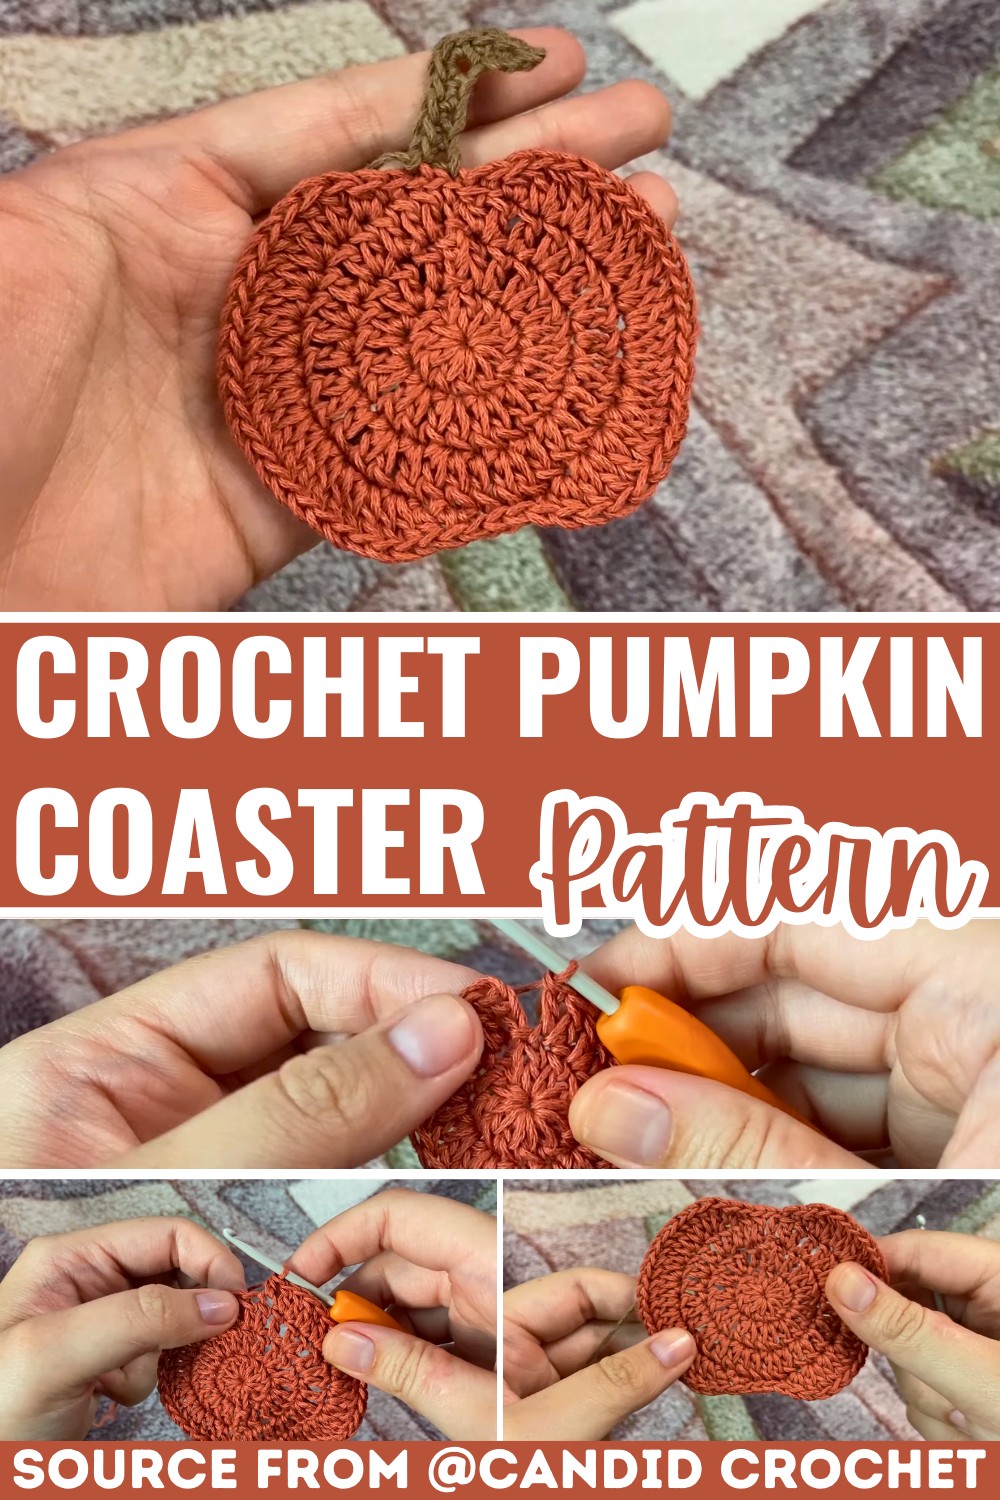
This charming pumpkin coaster is a festive and functional addition to your autumn décor and perfect for Halloween and Thanksgiving celebrations.

A crochet pumpkin coaster is a delightful and simple creation that brings festive fall vibes right into your home. Perfect for Halloween or Thanksgiving, these adorable coasters are not only functional but also a warm decorative touch for your table. Use them under mugs, glasses, or small bowls to make your gatherings extra special. With their charming pumpkin shape, they’re sure to brighten anyone’s day.
Crochet Pumpkin Coaster Tutorial
The process to make this pumpkin coaster is simple and beginner-friendly. Starting with a basic circle, the coaster transforms step-by-step into a cute little pumpkin. You’ll even create a small stem in your choice of brown or green yarn to add the finishing touch. With just a few easy crochet stitches, you can have your pumpkin coaster ready in no time.
Credit Candid Crochet
Key Features and Construction Highlights
- Starts with a magic ring foundation for a seamless circular base.
- Built with double crochet stitches for a sturdy yet lightweight texture.
- Features subtle shaping to create the iconic pumpkin curves.
- An optional stem is added separately using single crochet stitches for extra character.
- A great beginner-friendly pattern while offering fun details for more experienced crocheters.
Construction Overview
This pumpkin coaster begins with a classic magic ring, creating a tidy, no-hole center. To build the base, you’ll work three rounds of double crochet increases in the round. These rounds gradually expand the circle, forming the foundation of your pumpkin shape. The designer cleverly alternates the increases in each row to ensure an even, circular base without rippling.

The final round is where the magic happens! By varying stitch heights (single crochet, half-double crochet, and double crochet) and strategically folding clusters of double crochets, you create the playful, plump edges that mimic the curves of a real pumpkin. This subtle shaping gives the coaster its pumpkin-inspired silhouette.

Once the body is complete, the stem is added in a contrasting color, such as earthy brown or vibrant green. It’s created by crocheting a short chain directly onto the pumpkin and working single crochets, culminating in a tiny tweak to mimic a natural stem. The result? A coaster packed with personality and charm!

To finish, simply weave in your ends and smooth out the coaster. It’s quick, satisfying, and perfect for gifting or sprucing up your seasonal tablescape.

Video Tutorial
Step-by-Step Pattern
Materials
- Yarn:
- Orange yarn for the pumpkin body
- Brown or green yarn for the stem (choose as preferred)
- Hook:
- Size H/8 (5.0 mm) crochet hook
- Notions:
- Yarn needle for weaving in ends
- Scissors
Pattern Instructions
Foundation
- Start with a Magic Ring:
- Wrap the yarn around your fingers to create a ring and secure it.
- Make a slip knot to fix the ring.
- Round 1:
- Chain 3 (counts as first dc).
- Make 11 more double crochets into the magic ring (total 12 dc).
- Pull the loose end to close the ring and join with a slip stitch in the top of the chain 3.
Pumpkin Body
- Round 2:
- Chain 3 (counts as first dc), make 1 dc in the same stitch.
- Continue with 2 dc in each stitch around (total 24 dc).
- Join with a slip stitch in the top of the starting chain 3.
- Round 3:
- Chain 3 (counts as first dc), make 1 dc in the next stitch.
- 2 dc in the next stitch, then 1 dc in the next stitch. Alternate around (total 36 dc).
- Join with a slip stitch in the top of the starting chain 3.
Pumpkin Top
- Round 4:
- Begin with a slip stitch in the first stitch, and sl st in the next stitch.
- In the next stitch, do 1 sc, and 1 hdc.
- Creating the Pumpkin Shape:
- Side 1: In the next 11 stitches, make 2 dc in each stitch (total 22 dc).
- Top Middle: In the next stitch, 1 hdc, 1 sc.
- 3 slip stitches in the next 3 stitches to start the next side.
- Side 2:
- Similar to the first side, make 1 sc, 1 hdc in the new stitch.
- 22 dc across the next 11 stitches.
- End with 1 hdc, 1 sc, and finish with 1 last slip stitch to secure.
Stem
- Attach Stem Yarn:
- Insert your hook in the second slip stitch from the last three of previous step.
- Attach brown yarn, and pull through.
- Stem Chains:
- Chain 9: Skip the first chain on return.
- Single crochet in the second chain from the hook and each remaining chain.
- In the last chain, make 3 sc to create a turning curve.
- Finish Stem:
- Continue single crocheting down the other side, back to the pumpkin.
- Secure with a slip stitch in the next pumpkin stitch.
Finishing Touches
- Weave in all yarn ends to secure and trim excess yarn.
- Enjoy your cozy pumpkin coaster!
Pattern Question
Question: How do I adjust the pumpkin coaster size?
Answer: To increase or decrease the size, modify the number of stitches in the magic ring and adjust the increases in subsequent rows accordingly.
Troubleshooting and Suggestions
- Magic Ring Challenges: If you’re struggling to perfect your magic ring, consider substituting it with a chain-4 loop. While it may leave a small hole in the center, it’s a simpler option for beginners.
- Stitch Consistency: Working in the round can sometimes create uneven edges. To avoid this, count your stitches at the end of each round to ensure you’ve followed the increase pattern properly.
- Yarn Choices: For added coziness, try using a thick cotton yarn, which offers excellent absorption for spills and keeps the coaster durable.
- Color Variations: While traditional pumpkin colors like orange, green, and brown are classic, feel free to experiment with pastels or metallic yarns for a modern, whimsical touch.
- Creative Modifications: Skip the stem for a simpler coaster, or add embroidery details like vines or jack-o-lantern faces for extra flair. You could even use this pattern as an applique for bags, blankets, or seasonal décor!