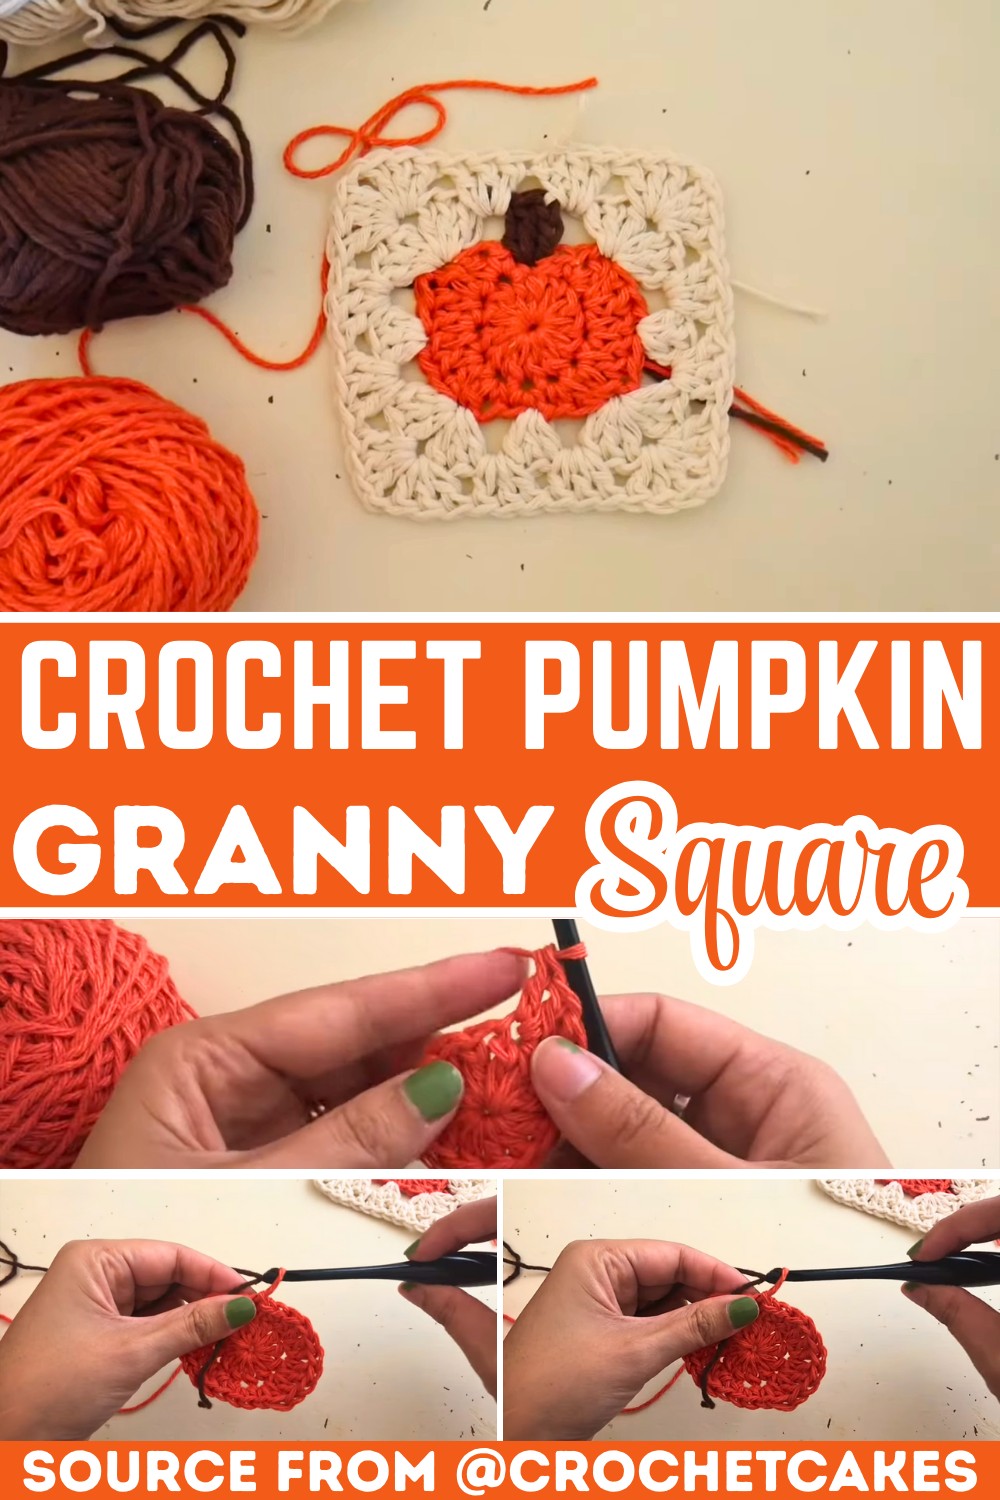
The pumpkin granny square blends the warmth of classic granny stitching with a festive pumpkin motif, making it perfect for autumn decorations, cozy blankets, or seasonal gifts.

This Pumpkin Granny Square is a fun and creative crochet piece perfect for autumn. Set against an off-white background, the crochet pumpkin adds a cheerful pop of seasonal charm. If you use it to create cozy blankets, table runners, or colorful coasters, this granny square is sure to brighten your space.
Crochet Pumpkin Granny Square
Crochet Granny squares are loved for their simplicity and versatility, and adding a pumpkin motif makes this pattern extra special. You’ll work with three yarn colors: orange for the pumpkin, brown for the stem, and a lighter shade for the background, giving it a warm and rustic look. The process is easy to follow, with clear color transitions, making it a wonderful design for crochet beginners and experts alike.
Credit crochetcakes
Key Features and Construction Overview:
- Pumpkin Foundation: Build your design around the central pumpkin motif, working granny stitches and corners to shape the square.
- Granny Stitch Basics: Alternating rounds of granny corners (for shaping) and granny stitches (for filler) establish the iconic granny square look.
- Seamless Rounds: Each round closes neatly with slip stitches for a polished edge.
- Blocking for Perfection: Adding a final block ensures edges are crisp and squares fit seamlessly in multi-square patterns.
- Versatility: Use finished squares for any number of creative, seasonal patterns, from coasters to large afghans.
Expanding on the Process
The granny square begins with a pre-stitched pumpkin motif at the center (assumed based on the description). The first round introduces classic granny square techniques, starting with a granny corner worked as 3 double crochets, chain 1, 3 double crochets into the same space. After skipping two stitches to create the proper spacing, you work a granny stitch (3 double crochets in the same space). This alternating pattern of granny corners and stitches continues around the pumpkin, creating the foundational structure of the square.

As you progress to the second round, the granny square truly begins to take shape. Start directly below the slip stitch of the first round with a standing double crochet, which mimics the height of a standard granny stitch. From there, spaces between the previous round’s stitches are filled with additional granny stitches, preserving the pattern’s open, airy texture. Corners are emphasized with granny corners (3 double crochets, chain 1, 3 double crochets), creating the classic squared edges.

Each subsequent round builds outward, with granny stitches filling in the spaces between and anchoring the pattern. A slip stitch into the top of the first stitch from each round ties it all neatly together, keeping everything secure. Once the square meets your desired size, finish off by cutting the yarn, tightening the final slip stitch, and weaving in the ends.

The completed square can then be blocked, a process where you lightly moisten the square and pin it into shape before letting it dry. This ensures a clean, even finish and sharp edges, making it easier to join multiple squares if desired.

Video Tutorial
Step-by-Step Pattern
Materials
Here’s everything you’ll need to make your pumpkin granny square:
- Yarn:
- Orange worsted-weight yarn (for the pumpkin)
- Brown worsted-weight yarn (for the stem)
- Off-white worsted-weight yarn (for the granny square background)
- Hook: 5 mm crochet hook
- Optional Tools:
- Scissors
- Yarn needle (for weaving in ends)
- Stitch markers (optional but helpful for beginners)
Pattern Instructions
Foundation Steps:
Round 1: Pumpkin’s Base
- Begin with a magic loop. You can use any other adjustable start if preferred.
- Chain 1 to lock the magic loop.
- Work a stacked single crochet (acts as a double crochet):
- Insert your hook into the left leg of the single crochet, YO, and pull up a loop.
- Work 11 more double crochets into the magic loop for a total of 12 double crochets.
- Pull the magic loop closed tightly.
- Slip stitch into the top of the first double crochet to close the round.
Round 2: Shaping the Pumpkin
- Into the stitch you slip-stitched into, work a single crochet.
- Continue as follows:
- Single crochet + double crochet into the next stitch.
- Double crochet increase (2 double crochets in one stitch) into the next three stitches.
- Double crochet + single crochet into the next stitch.
- Single crochet increase (2 single crochets in one stitch).
- Double crochet + single crochet in the next stitch.
- Finish with 3 double crochet increases.
- Work the final single crochet into the base of the stitch worked at the beginning of Round 2.
- Slip stitch to the first single crochet of the round to close.
You should end up with 24 stitches forming the pumpkin shape.
Adding the Stem
- Switch to brown yarn.
- Slip stitch to the first single crochet of the previous round.
- Chain 3 to start the round (counts as the first double crochet).
- Work 2 double crochets into the first stitch (same stitch as the chain 3).
Switch to the main color yarn (off-white).
Starting the Granny Square
Round 1 of the Granny Square:
- Skip two stitches and work a granny corner:
- Work 3 double crochets, chain 1, then 3 double crochets into the same stitch.
- Skip two stitches and work a granny stitch (3 double crochets in the same stitch).
- Repeat this pattern:
- Skip two stitches, work a granny corner.
- Skip two stitches, work a granny stitch.
- Work granny stitches and corners around the pumpkin to complete.
- Slip stitch into the top of the chain 3 to close the round.
Expanding the Granny Square
Round 2 of the Granny Square:
- Insert your hook into the space right under the slip stitch from Round 1.
- Start with a standing double crochet (counts as first stitch).
- Between each previous granny stitch, work a granny stitch directly into the space.
- In each corner space, work a granny corner:
- 3 double crochets, chain 1, 3 double crochets.
- Repeat the pattern, alternating between granny stitches and granny corners across the round.
Finish by slip stitching into the top of the initial standing double crochet.
Finishing Touches
- Cut your yarn and tighten the slip stitch.
- Weave in any loose ends using a yarn needle.
- Block your square to even out edges and stitches.
Creative Uses
Now that your pumpkin granny square is complete, here are some ideas for using it:
- Make multiple squares for a table runner or blanket.
- Use single squares as seasonal coasters or framed décor.
- Combine squares into pillows or tote bags for a cozy autumn look.
Troubleshooting and Suggestions
- Dealing with Loose Edges: If edges seem floppy or uneven, check your stitch tension and make sure your double crochets are consistent in height. Blocking the finished square will also help smooth everything out.
- Slip Stitch Tips: Prevent gaps at the end of rounds by working your slip stitches snugly. If they seem too tight, try using a slightly larger hook just for the slip-stitching step.
- Color Transitions: If your pumpkin involves color changes (like for the stem), practice carrying your unused yarn neatly to avoid tangling or bulk.
Creative Modifications
- Play with Colors: Go for traditional orange and green hues, or try more unconventional shades like pale pastels or deep jewel tones to suit your aesthetic.
- Pumpkin Variations: Add embroidered details like spiraling vines or a jack-o’-lantern face for a Halloween twist.
- Textures and Materials: Use chunky yarn to create oversized squares for cozy blankets, or go with cotton thread for smaller, more delicate coasters.
- Beyond the Basics: Combine squares into a whimsical banner for your mantel, or stitch them together to create a stunning table runner or even a reusable tote bag.