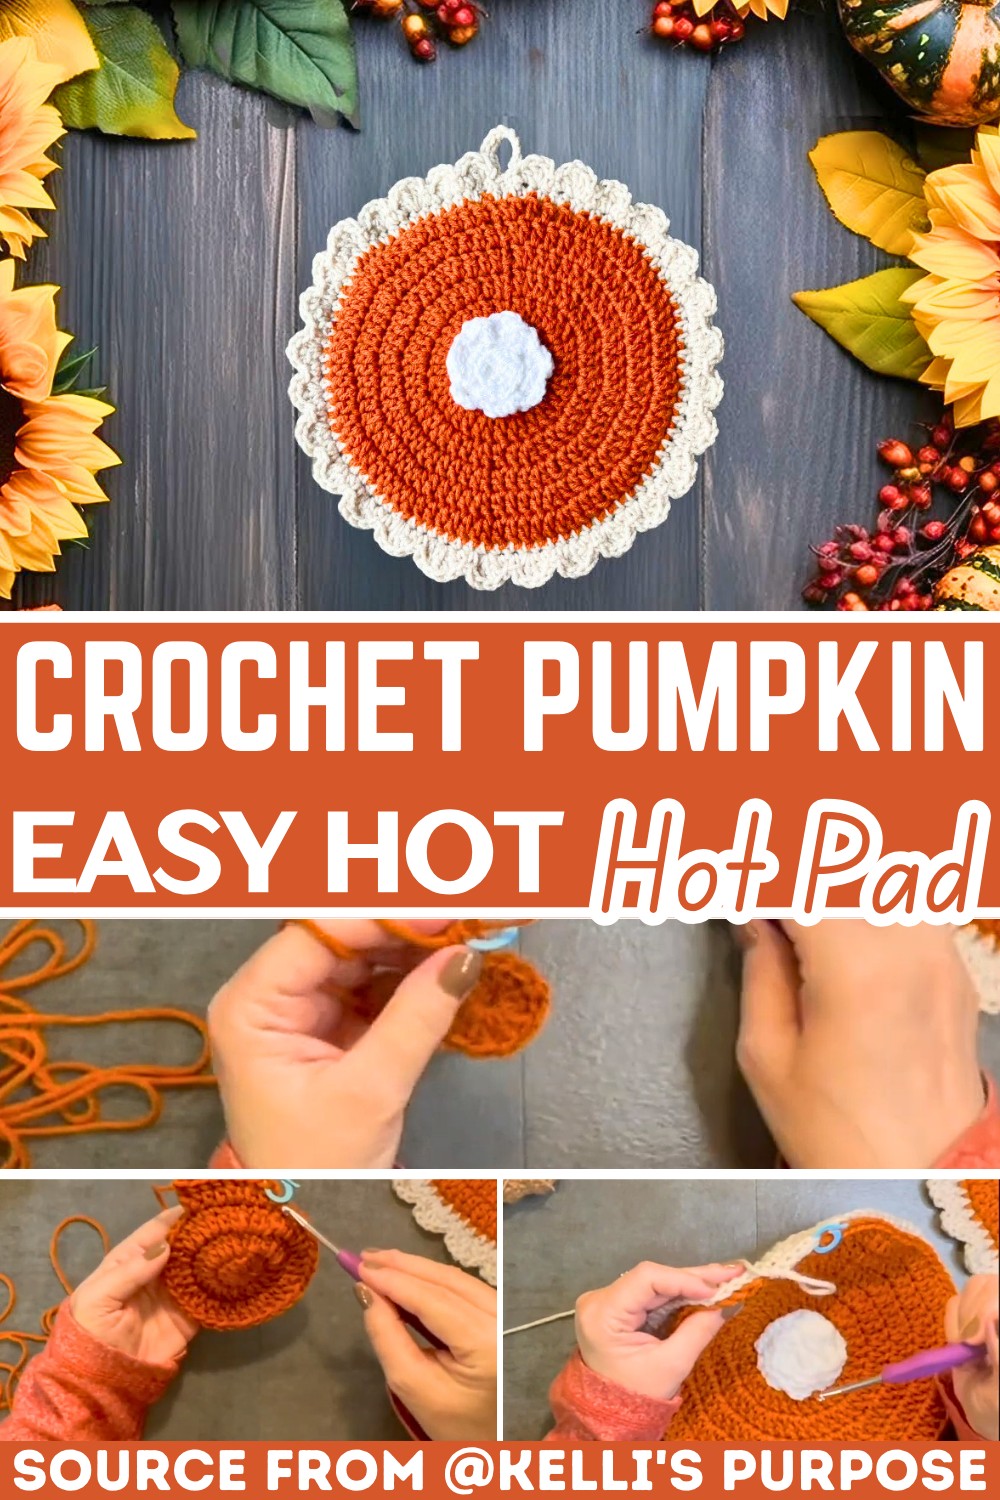
This cute pumpkin pie hot pad is a double-layered circle with whipped cream and a ruffled crust, perfect for protecting your countertops in fall.

A pumpkin pie hot pad is such a cute and functional addition to your home, especially during the fall season. Shaped like a delicious slice of pumpkin pie, this pattern has a charming design complete with whipped topping and crust detail. You can use it as a table decoration, a play setting, or even scale it down to smaller coasters. It’s warm, festive, and a fun way to enhance the holiday spirit around your kitchen or dining area.
Crochet Pumpkin Pie Hot Pad Pattern
What makes this pattern special is its double-layered design, which adds extra thickness to protect your countertops when handling hot items. It is surprisingly simple to make, using basic crochet techniques to bring the pie shape to life. The soothing simplicity of the whipped topping and crust makes each stitch enjoyable. Pairing burnt pumpkin and linen-colored yarn helps give it that baked-pie feel, but you can personalize the colors to match your style.
Credit Kelli’s Purpose
Key Features and Construction Overview:
- Worked in the round using a magic circle and double crochet to form a flat pumpkin-orange circle.
- Built up with simple increase rounds to create a sturdy, evenly shaped base.
- A separate “whipped topping” swirl is crocheted as a long chain, then worked back with half double and single crochet, coiled, and sewn to the center.
- A second circle (the crust layer) is made and then joined to the pumpkin layer using half double crochet through both layers.
- A textured crust edge is formed with repeated groups of double crochets and single crochets around the outer rim.
- Finished with a small hanging loop made from a short chain and slip stitches at the end.
- Uses worsted weight yarn (burnt pumpkin and linen) and a 5.0 mm hook, plus a yarn needle for sewing and weaving in ends.
Making the Pumpkin Pie Hot Pad
The pumpkin pie hot pad begins with a magic circle and rounds of double crochet, forming a neat, flat orange circle for the “filling.” The designer works in continuous increase rounds, spacing double crochet increases (two stitches in the same stitch) between sections of regular double crochets. This keeps the circle lying flat while it grows, and it’s very beginner-friendly because the increases follow a simple pattern: more and more single double crochets between each increase as the rounds progress.

Once the pumpkin layer is complete, attention turns to the whipped topping. Using the contrasting yarn, you create a long, fairly loose chain of about 50 stitches. This chain is then worked back with a combination of half double crochet (three in each chain for part of the strip) and single crochet (one in the next two chains), which causes the strip to begin naturally curling and ruffling. After the strip is finished, it’s coiled into a spiral and sewn together so it holds its “whipped cream” shape before being stitched securely onto the center of the pumpkin circle.

The crust layer is made as a separate circle in the linen color, again worked in the round with double crochet increases so it matches the size of the pumpkin layer. Instead of fastening off completely, the crust circle is left live on the hook. The pumpkin and crust layers are then held together, wrong sides facing, and joined all the way around by working half double crochet stitches through both layers at once. This creates a double-thick, padded hot pad that offers extra protection from heat while also feeling satisfyingly substantial in the hand.

After the two layers are joined, the pattern moves into the decorative crust edging. Around the outer edge, you work clusters of four double crochets into a single stitch, followed by two single crochets (one in each of the next two stitches). Repeating this pattern all the way around creates a wavy, scalloped “pie crust” that frames the pumpkin filling beautifully. At the very end of the round, the pattern adjusts slightly (using three double crochets instead of four in the final repeat) to keep the edging smooth, then slips into the starting stitch to close the round.

The last touch is a simple hanging loop. After finishing the edging, you chain a short loop (around 12 chains), then slip stitch back into the same spot to form a sturdy hanger. The remaining end is pulled to the back, tied off, and woven in, staying hidden between the layers. The result is a charming, functional hot pad that can also double as a festive place setting or, when made smaller, as a coaster.

Video Tutorial
Step-by-Step Pattern
Materials
To create this crochet pumpkin pie hot pad, you will need the following materials:
- Yarn:
- Burnt Pumpkin (for the pie filling, #4 medium worsted weight yarn)
- Linen (for the crust, #4 medium worsted weight yarn)
- White (for the whipped cream topping, #4 medium worsted weight yarn)
- Crochet Hook: 5.0 mm
- Optional Tools:
- Stitch marker
- Yarn needle
- Scissors
Pattern Instructions
Follow these detailed steps to create your pumpkin pie hot pad:
Pie Base
Round 1:
- Start with a magic circle.
- Chain (ch) 3 (does not count as a stitch).
- Place 12 double crochet (dc) into the magic circle.
- Pull the tail of the magic circle to tighten it and close the center.
- Slip stitch into the first double crochet to join the round.
- Chain 2 to begin the next round.
Round 2:
- Double crochet 2 times in each stitch around (this is an increase round). You’ll end the round with 24 stitches.
- Slip stitch to the first stitch and chain 2.
Round 3:
- Work the pattern: 1 dc in the first stitch, 2 dc in the next stitch (this is an increase every other stitch).
- Continue this pattern around the circle. You’ll end with 36 stitches.
- Slip stitch to the first stitch and chain 2.
Round 4:
- Work the pattern: 1 dc in the next 2 stitches, 2 dc in the next stitch (increase every third stitch).
- Continue this pattern around to end with 48 stitches.
- Slip stitch to the first stitch and chain 2.
Round 5:
- Work the pattern: 1 dc in the next 3 stitches, 2 dc in the next stitch (increase every fourth stitch).
- You’ll have 60 stitches at the end of this round.
- Slip stitch to the first stitch and chain 2.
Note: Continue increasing each round if you want a larger pie base, adjusting the repetitive pattern as necessary.
Crust Layer
- Repeat the steps for the pumpkin pie base to form the crust layer in Linen-colored yarn.
- After completing the final round of your crust, do not fasten off. You’ll use half double crochets to attach the crust to the pie.
Whipped Cream Topping
- In White yarn, create a slip knot and chain 50 loosely.
- Starting from the second chain from the hook, work:
- 3 hdc into the first chain.
- 1 sc into the next 2 chains.
- Repeat this pattern until the end of the chain.
- The chain will naturally begin to curl. Coil it further to form a spiral for the whipped cream.
- Secure the spiral using loose stitches with a yarn needle, keeping it together as one piece.
- Position the whipped cream in the center of the pumpkin pie base and sew it in place.
Assembling the Layers
- Place the crust layer (Linen) behind the pie layer (Burnt Pumpkin), with the wrong sides facing each other.
- Insert your hook through the aligned stitches of both the pie and crust layers. Use the Linen yarn to work a half double crochet (hdc) through both layers all the way around.
- Slip stitch into the first half double crochet to close the border.
- Chain 1 and fasten off.
Decorative Crust Edge
- Reattach the Linen yarn to the edge using a slip stitch.
- In the first stitch:
- Work 3 double crochet (dc) to create the crust’s ruffled edge.
- Single crochet (sc) in the next stitch, and repeat:
- 4 dc in one stitch, followed by 2 sc in the next stitches.
- Continue this pattern around.
- In the final stitch:
- Work 3 dc (instead of 4) and slip stitch to the first stitch to close the round.
- Chain 12 to create a hanging loop and slip stitch back to close the loop.
Finishing Touches
- Weave in all loose ends using a yarn needle.
- Trim any extra yarn for a clean finish.
Troubleshooting and Suggestions
- Keeping the circle flat: If your pumpkin or crust circle starts to ruffle or cup, check your stitch counts on the increase rounds. Ruffling usually means too many stitches; cupping means too few or very tight tension. Try relaxing your tension slightly and recounting the increases.
- Even joining of layers: When joining the two circles with half double crochet, make sure each stitch on the front lines up with a stitch on the back. If you find a gap or the edge twists, pull back a few stitches and realign your layers before continuing.
- Securing the whipped topping: If your whipped cream swirl feels loose or floppy, add a few extra stitches through the layers when sewing it together and onto the hot pad. Focus on catching the outer edges of the spiral so it doesn’t uncoil with use.
- Neat crust edging: The crust scallops look best when your double crochets are consistent in height. If one scallop seems taller or shorter than the rest, you can gently tug and block it with your hands once the pad is finished to even things out.
Creative modifications:
- Try different “flavors”: use cream and brown for a classic pie, deep orange and tan for pumpkin, or reds and neutrals for a “cherry” or “apple” vibe.
- Add a tiny faux “cinnamon sprinkle” effect by weaving a few stitches of darker yarn lightly across the top.
- Make smaller versions by stopping a round or two earlier on both layers for coordinating coasters or mug rugs.
- For extra heat protection, use cotton yarn instead of acrylic, or insert a thin layer of heat-resistant batting between the two circles before joining.
- Turn it into a decorative wall piece by making the hanging loop slightly longer and adding a little bow or tag at the top.