Crochet Pumpkin Table Mat Perfect for Festive Decor
A pumpkin-shaped table mat can change the feel of a table with just a few rounds of crochet. This pattern shows how the familiar pumpkin form gradually takes shape through simple stitches and easy construction, creating a piece that’s both decorative and useful. Follow along to see how each section builds the finished crochet design from the center outward.
Crochet Pumpkin Table Mat Pattern

Made for crocheters who enjoy seasonal home pieces, this tutorial keeps the process clear without overwhelming you with complicated steps. As the pattern grows, the pumpkin details become more defined until the table mat is ready to use or display. By the final round, you’ll have a handmade crochet piece that adds a distinctive fall accent to your table.
Credit Crochet Mili
Materials & Tools Needed
- Yarn: 3 colors of medium-weight yarn:
- Main Color (Orange or Yellow): For the pumpkin body
- Dark Brown/Black: For the border
- Green: For the stem and vine
- Crochet Hook: 4.25 mm
- Scissors
- Yarn Needle: For weaving in ends and joining pieces
Pattern Abbreviations & Terminology (US Terms)
- mr: Magic Ring
- ch: Chain
- st(s): Stitch(es)
- sc: Single Crochet
- hdc: Half Double Crochet
- dc: Double Crochet
- sl st: Slip Stitch
- ch-sp: Chain Space
Finished Size & Customization
- Size: Use as a fall table mat, trivet, or centerpiece.
- Custom Options:
- Smaller Coaster: Use lightweight fine yarn and a 2.5–3.0 mm hook.
- Large Floor Rug: Use chunky yarn and a larger hook (8.0–10.0 mm).

Step-by-Step Crochet Instructions
Main Pumpkin Body (Using Main Color)
- Round 1: Initial Circle Base
- Make a magic ring.
- Ch 3 (counts as the first dc), work 11 dc into the ring.
- Join with a sl st into the 3rd chain of the initial ch-3.
(Total: 12 dc)
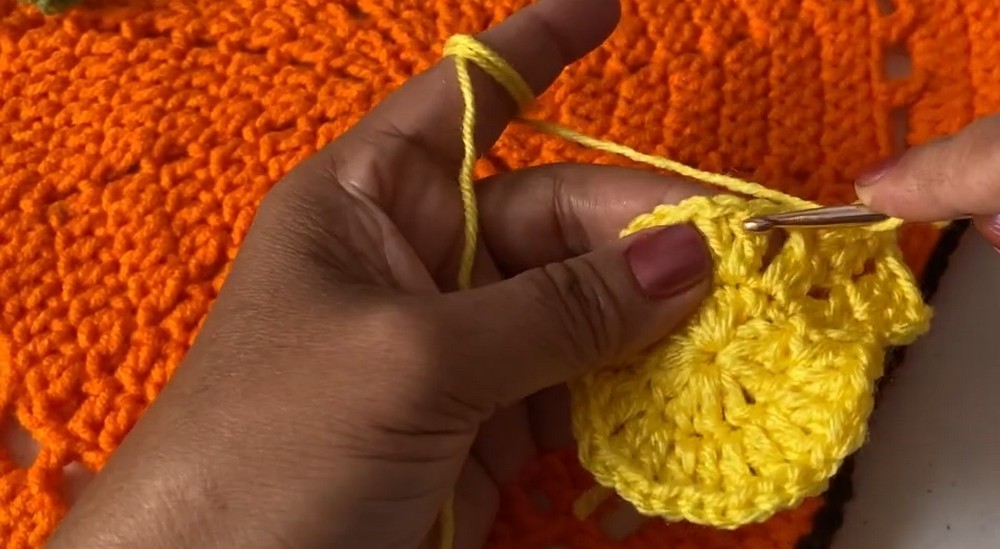
- Round 2: Increasing Clusters
- Ch 3, 1 dc into the same stitch.
- Ch 1, 2 dc into the next stitch, ch 1.
- Repeat from * to * all the way around. Join with a sl st into the 3rd chain of the initial ch-3.
(Total: 24 dc, 12 ch-1 spaces)
- Round 3: Expanding Sections
- Ch 3, 2 dc into the next stitch, ch 1.
- 1 dc into the next stitch, 2 dc into the next stitch, ch 1.
- Repeat from * to * all the way around. Join with a sl st into the 3rd chain of the initial ch-3.
(Total: 36 dc)

- Round 4: Increasing Row
- Ch 3, 1 dc into the next stitch, 2 dc into the next stitch, ch 1.
- 1 dc into each of the next 2 stitches, 2 dc into the next stitch, ch 1.
- Repeat from * to * all the way around. Join with a sl st into the 3rd chain of the initial ch-3.
(Total: 48 dc)
- Round 5: Increasing Row
- Ch 3, 1 dc into each of the next 2 stitches, 2 dc into the next stitch, ch 1.
- 1 dc into each of the next 3 stitches, 2 dc into the next stitch, ch 1.
- Repeat from * to * all the way around. Join with a sl st into the 3rd chain of the initial ch-3.
(Total: 60 dc)

- Round 6: Increasing Row
- Ch 3, 1 dc into each of the next 3 stitches, 2 dc into the next stitch, ch 1.
- 1 dc into each of the next 4 stitches, 2 dc into the next stitch, ch 1.
- Repeat from * to * all the way around. Join with a sl st into the 3rd chain of the initial ch-3.
(Total: 72 dc)
- Round 7: Increasing Row
- Ch 3, 1 dc into each of the next 4 stitches, 2 dc into the next stitch, ch 1.
- 1 dc into each of the next 5 stitches, 2 dc into the next stitch, ch 1.
- Repeat from * to * all the way around. Join with a sl st into the 3rd chain of the initial ch-3.
(Total: 84 dc)
- Round 8: Final Increase Body Round
- Ch 3, 1 dc into each of the next 5 stitches, 2 dc into the next stitch, ch 1.
- 1 dc into each of the next 6 stitches, 2 dc into the next stitch, ch 1.
- Repeat from * to * all the way around. Join with a sl st into the 3rd chain of the initial ch-3.
(Total: 96 dc)
- Round 9: Creating the Mesh/Pumpkin Shape Borders
- Ch 1, 1 sc into the same stitch, 1 sc into each of the next 7 stitches, 1 sc into the next ch-sp, 1 sc into the next stitch.
- Ch 4, skip 2 stitches, 1 dc into the next stitch, ch 4, skip 2 stitches, 1 dc into the next stitch, ch 3, skip 2 stitches, 1 dc into the next stitch.
- Repeat this mesh sequence 11 more times around.
- Then: ch 4, skip 2 stitches, 1 sc into the next stitch (repeated 14 times total around for structural accents), 1 sc into the next 12 stitches.
- Join with a sl st into the first sc.
- Round 10: Filling the Edges
- Ch 1, 1 sc into the same stitch, 1 sc into each of the next 9 stitches.
- 1 hdc, 3 dc into the next ch-sp, 1 dc into the top of the next dc, 3 dc into the next ch-sp, 1 dc into the top of the next dc.
- Repeat this across 10 more chain spaces.
- Work 3 dc and 1 hdc into the last ch-sp.
- 1 sc into each of the next 13 stitches.
- Join with a sl st into the first sc.
- Round 11: Final Body Round
- Ch 1, 1 sc into each of the next 10 stitches, 1 hdc into the next stitch, 1 dc into each of the next 54 stitches, 1 hdc into the next stitch, 1 sc into each of the next 12 stitches.
- Repeat this mirrored pattern.
- Join with a sl st into the first sc. Cut the yarn and fasten off.

Border (Using 2nd Color / Dark Brown)
- Join with dark brown yarn at the pumpkin edge.
- Work 1 sc into every hdc and dc stitch along the outer edge.
- For the sc stitches in dips/indentations, work sl st (to maintain the pumpkin shape).
- Join with a sl st, cut the yarn, and weave in ends.

Stem & Vine Details (Using Green Yarn)
Pumpkin Stem:
- Join green yarn at the top indentation.
- Row 1: Work 1 sc into each of the next 4 stitches.
- Rows 2–4: Ch 1, turn, 1 sc into each of the 4 stitches.
- Fasten off; secure the tail.

Curly Vine Part:
- Ch 25.
- Work 2 sc into the 2nd ch from the hook, then 2 sc into each chain (to create a tight curl).
- Cut the yarn, leaving a tail, and sew it to the stem base.