Beautiful Crochet Rose Hair Tie Tutorial – Easy Flower Accessory
This crochet rose hair tie combines delicate petals and optional leaves for a beautiful floral design that’s sure to elevate any hairstyle.

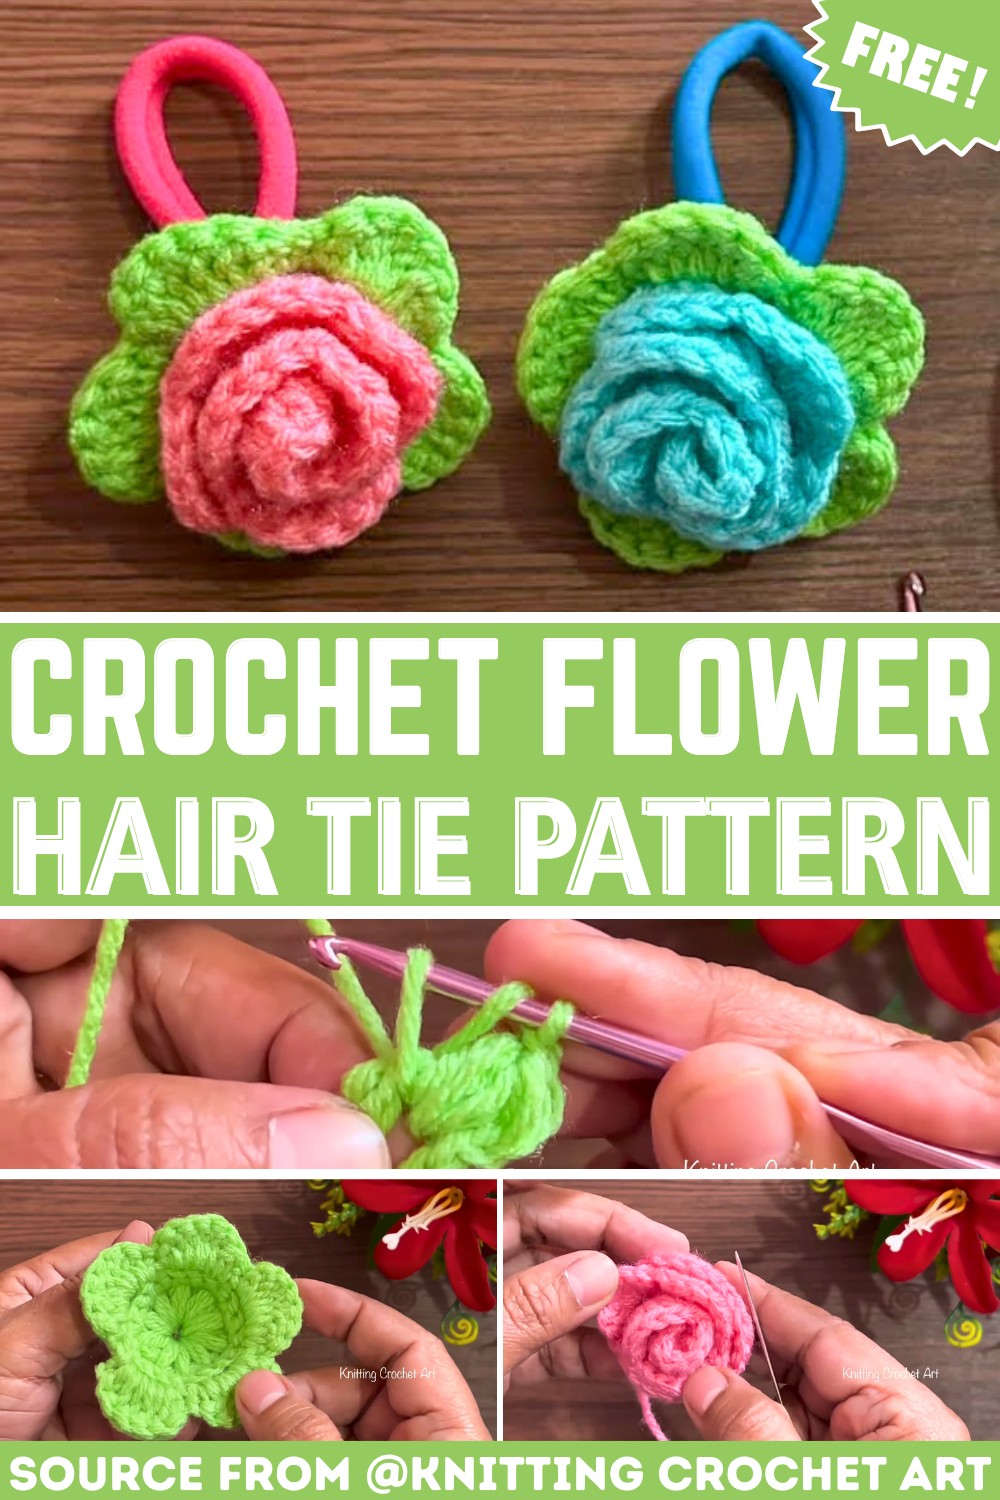
Looking for a way to add a beautiful, handmade touch to your hair accessories? This crochet rose hair tie is the perfect choice. It’s soft, stylish, and so unique. Imagine wearing a delicate little flower in your hair; it’s not just an accessory, it’s a splash of charm for any casual or special occasion. With its gentle petals and pretty shape, this crochet rose is sure to stand out.
How to Make a Crochet Flower Hair Tie
The best part? You can make it yourself! Crocheting this rose is simple and fun. It’s all about turning yarn into something lovely step by step. Attach the finished rose to a hair tie, and you’ve got a cute piece that’s both functional and fashionable. It’s great for keeping your hair in place while adding a pop of color and personality.
Credit Knitting Crochet Art
Key Features and Steps:
- Central Ring: Start with a magic circle as the foundation for the rose.
- Petal Formation: Crochet layered petals around the circle using double and treble crochet stitches for a soft, dimensional effect.
- Attaching to Elastic: Secure the flower to a hair tie for practical use.
- Optional Leaves: Add charming green leaves for a natural touch.
- Finishing Details: Weave in loose ends and trim excess yarn for a polished look.
The piece begins with the central ring, formed either by a magic circle or a chain-and-loop alternative. This sets the foundation for the rose’s signature shape. Once the ring is tightened, single crochets fill in the circle to create evenly spaced anchor points for the petals. This base ensures a sturdy and clean structure for the rest of the flower.

The magic really takes shape in Step 2, where the petals are crocheted one by one. Using vibrant yarn, each petal starts with a chain and is built out using progressively taller stitches: double crochet and treble crochet. These alternating stitch heights give the petals their curved, layered look. The pattern is worked symmetrically, ending with slip stitches to anchor each petal securely and creating a lovely radial bloom around the ring.

In Step 3, the crocheted flower is attached to the hair tie. By whip-stitching the flower base around the elastic band, the tie remains both functional and firmly decorated. This step allows a seamless match between accessory and flourish, making the hair tie durable yet stylish.
For an added flair, Step 4 gives you the option of including leaves, constructed with quick chains and simple stitches to mimic the shape of a natural leaf. These can be sewn onto the base to bring extra charm and dimension to the finished piece.

Finally, a few finishing touches wrap it all up: weaving in ends with a tapestry needle, trimming any stray threads, and shaping the petals gently for a professional-looking accessory.
Video Tutorial
Step-by-Step Pattern
Materials
To create your Crochet Flower Hair Tie, gather the following:
- Yarn: Choose lightweight cotton yarn or acrylic yarn in desired colors (e.g., pink for the flower and green for leaves).
- Hook: Size 3.0mm (or as suggested for your yarn) crochet hook.
- Hair Tie: A plain elastic hair tie (preferably in a matching or neutral color).
- Scissors: For cutting yarn.
- Tapestry Needle: For weaving in ends.
- Optional Tools: Stitch markers and a ruler/measuring tape.

Pattern Instructions
Step 1: Create the Central Ring
- Begin with a magic circle. If unfamiliar, start by chaining 4 and closing the loop with a slip stitch.
- Chain 1, then crochet 10 single crochets (sc) into the ring.
- Tighten the magic circle and join with a slip stitch into the first sc.
Step 2: Make the Flower Petals
- Switch to your flower color (e.g., pink). Attach the yarn to any stitch.
- For each petal:
- Chain 3 (counts as the start of the petal).
- In the same stitch: Crochet 1 double crochet (dc) followed by 2 treble crochets (tr).
- Work back down with 1 dc and 1 slip stitch into the same stitch to complete the petal.
- Repeat this pattern around the entire ring, making 5 petals (one in each stitch). Join with a slip stitch at the end.
Step 3: Attach the Flower to the Hair Tie
- Position the flower over the hair tie.
- Using yarn and a tapestry needle, whip stitch around the base of the flower, securing it tightly to the elastic.
step 4: Optional Leaves (for Extra Detail)
- Switch to green yarn and chain 6.
- Starting in the second chain from the hook, work:
- sc, hdc, dc, hdc, sc (creates a leaf shape).
- Attach leaves to the base of the flower as desired using your tapestry needle.
Step 5: Finishing Touches
- Weave in all loose ends with the tapestry needle.
- Trim excess yarn neatly.
Troubleshooting & Suggestions:
Common Issues:
- Loose Magic Circle: If you find your magic circle isn’t holding tight, try pulling the starting tail harder or knotting it before fastening off.
- Uneven Petals: To maintain consistency, count stitches carefully as you crochet each petal, ensuring the pattern stays uniform.
- Attaching to Hair Tie: Secure the flower evenly to avoid it wobbling on the elastic. Use a tight whip stitch around the base for stability.
Creative Modifications:
- Color Variations: Experiment with contrasting colors for the petals and leaves, or create an ombre effect by using gradient yarn.
- Additional Embellishments: Use small beads or sequins for sparkle or add a fabric button to the center of the rose.
- Adaptations: Skip the hair tie attachment and use the flower as a brooch, gift topper, or applique on textiles like bags or scarves.