Stripes Baby Blanket Tutorial for Comfort & Vibrant Piece
Imagine crafting a cozy yet practical striped baby blanket that seamlessly blends vibrant colors with comfort. In Shelly’s tutorial from Koala Knits and Knacks, you’ll learn to create a lightweight blanket perfect for strollers, car seats, or lap coverage. This unique project emphasizes thoughtful dimensions (21.5×27.5 inches) and versatility, making it ideal for young moms or grandparents looking for functional and eye-catching baby accessories.

Stripes Baby Blanket
Shelly’s tutorial takes an inventive approach, using a Sentro 40 knitting machine and Baby Delight yarn for easy color transitions and consistent stitch quality. With clear instructions on using waste yarn and her row-count method, even beginners can ensure even tension. This step-by-step blanket guide includes clever tricks, such as rolling up panels during knitting to prevent stitch-dropping, ensuring a seamless, professional finish.
Pattern Highlights
Perfect Blanket Size
Shelly describes this blanket as slightly smaller than traditional stroller blankets, making it practical for car seats, lap coverage, and even breastfeeding on the go.
Row Counting and Color Changes
By cleverly marking 10-row increments and using white stripes as dividers, Shelly simplifies multi-color knitting without the need for a counter.
Credit Koala Knits and Knacks
Step-by-Step Pattern
Materials
To create this striped baby blanket, gather the following materials:
- Yarn: 4 different colors of 3-weight baby yarn (small amounts of each) and white yarn for separating stripes.
- Knitting Machine: Sentro 40 knitting machine.
- Waste Yarn: A scrap yarn in a contrasting color.
- Tension Tool: The built-in tensioner on the knitting machine or a handheld yarn tension guide.
- Stitch Counter (optional): Helps count rows.
- Crochet Hooks: 4 mm for seaming, 4.5 mm for the border.
- Darning Needle: To weave in loose ends.
- Measuring Tape: To check dimensions (final size approximately 21.5″ x 27.5″).
- Stitch Markers or Bobby Pins: To mark key points during joining and finishing.
- Scissors: To cut yarn.
Stitch Guide
Here’s a basic overview of the key techniques used for the blanket:
- Waste Yarn Setup: The waste yarn is used at the start and end of each panel. It’s knit for 7–8 rows and helps hold stitches when removing the work from the knitting machine.
- Changing Colors: Color changes occur every 10 rows (except white, which occurs every 15 rows). After knitting a few stitches with the new color, pull the yarn ends and knot them to maintain tension.
- Single Crochet (joining): Use this stitch to join the tubes into the final blanket. It creates a strong and tidy seam.
- Border Stitch: A slip stitch combined with a chain 3 creates a delicate, loopy border. It’s both easy and decorative!

Notes
- Customization: Adjust size by adding more panels or rows per panel. For a thicker blanket, use 4-weight yarn. Measurements may vary depending on the tension and yarn selected.
- Tension Tip: Maintaining even yarn tension is crucial. Roll your finished panel into a donut shape as you knit to avoid dropped stitches and maintain consistent tension.
- Color Variations: You can create endless combinations by choosing different color palettes. Keep white (or another neutral) as the divider for a clean, classic contrast.
- Sets for Gifting or Selling: This blanket pairs beautifully with a solid-colored version. A set of two makes for an excellent baby shower gift or market product.
Pattern Instructions
Let’s create this striped baby blanket step by step!
Panel Creation
- Setup with Waste Yarn:
- Begin with waste yarn. Carefully turn the machine to thread the waste yarn into the hooks. Knit 7–8 rows with the waste yarn.
- First Color Stripe (Color 1):
- Change from waste yarn to your first color. Tie a knot to secure the yarn in place. Using this color, knit 10 rows.
- Suggested Color: Purple (or your first chosen color)
- Second Color Stripe (Color 2):
- Switch to your second color following the same process as the first. Knit 10 rows.
- Suggested Color: Yellow (or your second color).

- Third Color Stripe (Color 3):
- Switch to a third color and knit for 10 rows.
- Suggested Color: Green (or your third color).
- Divider Stripe (White):
- Add a white (or another neutral) stripe for 15 rows.
- Fourth Color Stripe (Color 4):
- Knit for 10 rows. Suggested Color: Peach (or your fourth color).
- Repeat the Sequence:
- Repeat the color cycle from Color 1 (purple) to Color 3 (green) until the panel is complete. The pattern is as follows:
- Purple → Yellow → Green → White → Peach (Fourth Color)
- Back to Purple → Yellow
- Continue until the panel reaches 120 rows total.
- Repeat the color cycle from Color 1 (purple) to Color 3 (green) until the panel is complete. The pattern is as follows:
- Close the Panel with Waste Yarn:
- End with another row of waste yarn (7–8 rows) and remove the panel from the machine.
- Create 5 Panels following the same color sequence.

Panel Assembly
Now that all 5 panels are complete, it’s time to assemble!
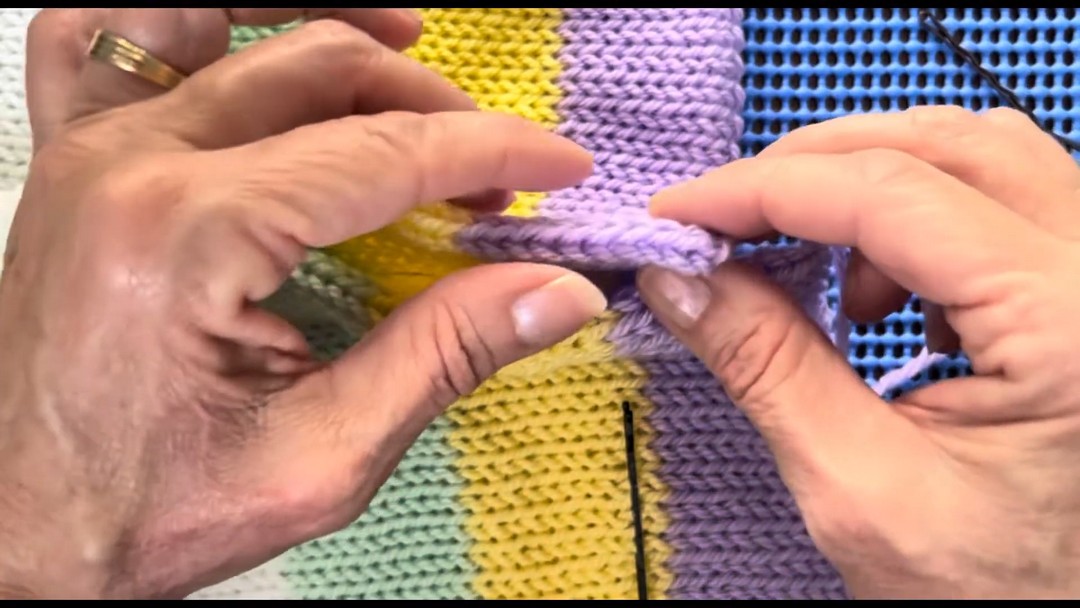
- Flatten Each Panel: Gently stretch the panels lengthwise and widthwise to even out tension. Lay them flat with the right side facing up.
- Match Colors and Edges:
- Lay two panels next to each other, ensuring the stripes line up.
- Join the Panels with Single Crochet:
- Use a 4 mm crochet hook. Insert the hook into the first stitch of each panel, pull through the loop, and make a single crochet stitch.
- Continue stitching down the entire length of the panels to join them.
- Repeat with the remaining panels.
- Check Alignment:
- Double-check that the stripes are evenly aligned across all panels as you proceed.
Adding the Border
With the assembly complete, finish the blanket with a simple border:
- Round 1: Single Crochet Base
- Using White yarn (or another color), create a row of single crochet around the entire edge of the blanket.
- Add 1 single crochet, 1 chain, 1 single crochet at each corner to keep it square.
- Round 2: Decorative Loops
- Slip stitch into the next stitch, then chain 3. Skip the next stitch and make another slip stitch into the following stitch.
- Continue this loop pattern around the border.
- In the corners, slip stitch directly into the corner chain spaces without skipping stitches.
- Fasten Off and Weave in Ends

Final Product
Your Sensational Stripes Baby Blanket is complete! Measuring 21.5″ x 27.5″, it’s perfect for the little ones in your life. Pair it with a solid-color version to create a charming set that’s both practical and beautiful.
Pattern Question
Q: Can I adjust the size of the blanket for a larger baby or a toddler?
A: Yes, you can! Simply add more rows to each color stripe and extend the white divider sections to achieve your desired size.